girl. Inspired.

travel, food, design

  • TRAVEL
  • FOOD
    • Breakfast
    • Breads
    • Main Course
    • Desserts
    • Drinks
    • Soups|Salads|Side Dishes
    • Sauces|Dips|Salad Dressings
    • Cake Decorating
      • Inspiration and Ideas
      • Tips and Tutorials
  • Design
    • Craft/DIY
    • Sewing
      • Patterns and Tutorials
      • Pattern and Product Reviews
      • Sewing Ideas and Inspiration
    • Parties
  • Shop
  • Blog
  • About
    • Privacy Policy
  • Subscribe

Homemade Oreo Ice Cream Cake!

June 15, 2020 by girlinspired 38 Comments

Have you ever wanted to make an ice cream cake? Everyone loves ice cream cake, but making your own means it’s possible to choose your favorite cake and ice cream flavors and decorate it however you please. This Oreo ice cream cake is a favorite combo of ours! Once you have the basic technique down, customize the cake to your liking!

oreo ice cream cake with slice removed on white plate

The first time I made an ice cream cake, I was scooping 31 flavors at my first job at Baskin’ Robbins. We don’t have alllll the same tools to make a Baskin’ Robbins ice cream cake, but we can get pretty darn close with this easy ice cream cake recipe.

overhead photo of oreos and chocolate sprinkles on ice cream cake on white plate with aqua linen

To make a homemade ice cream cake, we need just three basic components – a layer of cake, a layer of ice cream, and frosting. Basically, you’ll need to bake a thick, single layer of cake, top it with a formed layer of ice cream, then frost it with a nice freezer-friendly icing. Although “naked” cakes are all the rage and you could even skip the frosting all together and go with a naked ice cream cake! I am going to tell you the best way to frost your cake though.

Oreos on top of ice cream cake and half oreos around bottom border with white frosting and chocolate sprinkles on white plate with aqua linen

What do I use to frost the ice cream cake?

You will find two different cakes in these photos. Notice that one of the cakes has piped borders around the top and bottom and pretty swirls on the top. The other cake uses halved Oreo cookies as a bottom border and a swirl of cookies on the top.

The cake with the pretty piping has been frosted using a non-dairy frosting called Pastry Pride, which you buy as a frozen quart, defrost, and whip up to stable, pipe-able, freezable perfection.

The cake with the Oreo border was frosted with Cool Whip. Cool Whip is a really easy option and readily available. It is not my first choice for ice cream cakes though. For one, it will not hold its shape for a piped border or fluffy swirls. For another, it becomes too soft and can even begin sliding down the sides of the cake if it is out of the freezer for too long. For simply and quickly coating the cake, Cool Whip can work if Pastry Pride is not available.

You could also use a buttercream. Buttercream will pipe well and freeze well. It does take some extra work to prepare homemade buttercream, which is why I love using Pastry Pride. Find more about my favorite frosting recipes, including some various types of buttercream, here.

What is Pastry Pride

Pastry Pride is a non-dairy dessert topping that you can buy from cake supply stores.  Smart ‘n’ Final – a discount grocery store on the West Coast – also carries pastry Pride in the freezer section. It comes in quart-size cartons. I keep a supply in my freezer. When I need a quick batch of frosting, I thaw a carton out, whip up the amount I need, and I’m ready to go!  It’s great for spreading out smoothly and also for piping swirls, borders, and dots; it isn’t the best frosting for a lot of detail.  Frosted cakes and treats need to stay refrigerated.  The texture and flavor is similar to whipped cream, not too sweet, and really light and yummy.

oreo ice cream cake with slice removed on white plate

Ice Cream Cake Ingredients

  • prepared batter for one cake (1 box cake mix + eggs/oil/water/etc.)
  • 2 containers of ice cream (3 Quarts)
  • 1 Quart of Pastry Pride (or 12 oz. tub of Cool Whip)
  • one sleeve of Oreo cookies, chocolate candy melts, chocolate sprinkles, heart mold (optional)

Supplies

  • 9 inch baking pan
  • plastic wrap
  • spatula
  • icing spatula (optional)
  • piping bag, coupler, and decorating tip #1M (optional)
oreo ice cream cake with slice removed on white plate

How to Make the Oreo Ice Cream Cake

Prepare the cake batter according to the instructions on the box.  Fill your cake pan 2/3 of the way full.  Please note that you can use any size or shape cake pan you’d like – just as long as you have enough batter for your cake layer and enough ice cream to fill the same size pan for your ice cream layer. You may not use all of the batter. Use the leftover batter to whip up a few cupcakes.

Bake the cake layer until a toothpick inserted in the center comes out clean. Once the cake is cooled, remove it from the pan, cool it completely, then wrap in plastic wrap and freeze for at least 3 hours. 

While the cake is freezing, prepare the ice cream layer.  Set out 2 tubs of ice cream (1.5 Qts each) to soften a bit.  Once the cake is in the freezer, wash and dry the pan thoroughly.  Line the cake pan with plastic wrap.  Mound the softened ice cream into the plastic-lined cake pan.

mounded cookies n cream ice cream in plastic lined silver cake pan and spread evenly in cake pan

Smash it down and spread it out, making a smooth and level top.  Be sure the ice cream is pressed all the way down into the pan and that you fill the pan to the top (or as thick as you’d like the ice cream layer – I wanted the cake and ice cream layers the same thickness).  For this size cake, I used about 2.5 Quarts of ice cream.  Place the cake pan in the freezer for 2-3 hours.

Assembling the Cake

Alright, be sure you are working with a well frozen cake layer and ice cream layer. Remove both from the freezer. Let’s begin by leveling off the top of the cake layer. Remove the plastic wrap and use a bread knife to slice the domed top off of the cake layer, leaving a flat even layer.

side by side overhead photos of chocolate cake layer with the top dome sliced off, knife, white plate, ice cream layer

Now, lift the ice cream layer from the pan by lifting the pastic wrap. If it won’t come out, you can dip the bottom of the pan in some warm water to soften it enough to remove it. Tip the ice cream layer upside down on top of the cake layer.

Use a large icing spatula to smooth the softened outer layer of ice cream to form a nice flat top on the cake. Smooth the ice cream down over the sides to the separation where it meets the cake.  You want a nice smooth, sealed edge.  Smooth out any lines from the plastic wrap, but maintain the structured shape of the cake.  Place the cake back into the freezer for 30 minutes-1 hour until the ice cream has hardened again.

step by step photo collage of removing ice cream layer from pan and stacking it on top of cake and smoothing it down and around sides

Prepare your icing. If you are using Pastry Pride, whip it up until it holds its shape. Cool Whip should be set out to soften until it is spreadable. Remove the frozen cake from the freezer. Mound a large pile of icing on the top of the cake. Spread it down and around the sides, maintaining at least 1/2″ thickness of frosting all the way around the cake.

photo collage showing overhead step by step mounding frosting on ice cream cake and spreading it across top and around the sides

When the icing is smooth, get that cake back into the freezer as soon as possible. If you have used Pastry Pride, you can finish decorating before you put it back in the freezer. It will hold up just fine. Cool Whip will start sliding off the cake if it is out of the freezer for too long.

I melted some chocolate candy melts and drizzled them around the top edge (be sure to freeze up the frosted cake very well first if you’re going to add a warm chocolate drizzle!!)

Then use tip #1M to pipe a border around the top and bottom.  Pipe a few swirls in a circle around the top, pop on some little molded hearts (read more about molding candy melts here), and toss on some chocolate sprinkles.

side by side collage of frosted cake with chocolate drizzle dripping down rim, piped frosting in swirls around the bottom and top

If you use Cool Whip, you can do quick and simple decorations by cutting Oreos in half and lining them around the bottom of the cake like a border. Place Oreos in a spoke pattern standing on their ends on top of the cake. Then tip them almost like you’re tipping dominoes to nestle them in a spiral on top of the cake.

side by side overhead photos of frosted cake on white platter with chocolate sprinkles showing circle of oreos standing in a spoke shape and then collapsed overlapping flat

Freeze the cake really well until it’s time for serving. The cake will need to sit out for just a little bit before cutting if your freezer is super cold. In general, if you are lighting candles and singing the birthday song, that is enough time for the cake to soften just a tad. A sharp knife will cut the cake just fine.

Not only does this baby look impressive, but it tastes amazing!  Totally doable, right?   Now go pick out your favorite flavors and make someone an ice cream cake!!

More Desserts to Try

The Very Best Double Chocolate Cake

Lemon Rolls with Citrus Cream Cheese Icing

overhead photo of oreos and chocolate sprinkles on ice cream cake on white plate with aqua linen

Oreo Ice Cream Cake

Everything you need to know to make your own Oreo ice cream cake (or any kind of ice cream cake!!)
Print Pin Rate
Prep Time: 45 minutes
Cook Time: 40 minutes
Time in Freezer: 5 hours
Servings: 10
Calories: 658kcal

Ingredients

  • 1 prepared batter from boxed chocolate cake mix
  • 2 1.5 quart tubs cookies and cream ice cream
  • 1 quart Pastry Pride non-dairy frosting or 16 oz. tub of Cool Whip
  • 14 Oreo cookies
  • chocolate sprinkles

Instructions

  • Prepare cake according to the instructions on the box. Fill 9" round cake pan 2/3 of the way full. Bake until toothpick inserted in center of cake comes out clean.
  • Remove cake from pan. Cool completely. Wrap in plastic wrap and freeze for several hours.
  • Set out cartons of ice cream to soften.
  • Wash and dry pan that cake was baked in. Line with plastic wrap.
  • Mound ice cream into lined cake pan and spread until the pan is full, forming a layer of ice cream about the same thickness as the cake.
  • Place pan of ice cream into the freezer for several hours.
  • Prepare Pastry Pride (defrost in advance) by whipping until it holds its shape – it will be the consistency of whipped cream.
  • Remove cake and pan of ice cream from freezer. Cut the domed top off of the cake layer so that it is flat.
  • Place ice cream layer over the top of the cake layer. Use an icing spatula to smooth the ice cream down and over the sides of the cake layer, sealing up the crack between the layers.
  • Return cake to freezer for at least one hour.
  • Frost with whipped Pastry Pride. Use tip #1M to pipe a top and bottom border around cake. Make swirls on the top of the cake and place an oreo in the center of each swirl.
  • Alternately, spread Cool Whip over the frozen cake to frost. Work quickly and return to freezer to keep Cool Whip stable. Decorate with Oreo cookies and chocolate sprinkles.
Tried this recipe?Follow me on Pinterest @girlinspired!

Nutrition

Calories: 658kcal | Carbohydrates: 88g | Protein: 10g | Fat: 31g | Saturated Fat: 15g | Cholesterol: 84mg | Sodium: 586mg | Potassium: 555mg | Fiber: 3g | Sugar: 64g | Vitamin A: 797IU | Vitamin C: 1mg | Calcium: 312mg | Iron: 4mg

Filed Under: Cake Decorating, Desserts, Food and Recipes, Holiday Inspiration, Tips and Tutorials, Valentine's Day Tagged With: cake, ice cream

The Very Best Double Chocolate Cake

May 5, 2020 by girlinspired Leave a Comment

The ultimate in moisture and flavor, this double chocolate cake uses a box of cake mix, sour cream, and dark chocolate chips for an easy to make and delicious chocolate bundt cake. Simply stir the 6 ingredients, dump into a pan, bake and you’re done! You can add a quick chocolate glaze over the cooled cake for another layer of shine and richness. It is one of the best chocolate cake recipes I’ve ever tried!

chocolate cake with glaze on white cake platter with text overlay

Double Chocolate Cake Ingredients

For the Cake:

  • 1 box Devil’s Food Chocolate cake mix
  • 2 eggs
  • 1/2 cup rich coffee, espresso preferred
  • 1/4 cup vegetable oil
  • 16 oz. tub of sour cream
  • 12 oz. package of semi-sweet chocolate chips
  • cocoa powder for dusting the pan
  • powdered sugar for dusting the cake if the glaze is not used
  • Bundt Cake pan (you can find the one I used here through this referral link)

For the Chocolate Glaze:

  • 3/4 cup chocolate chips
  • 1 Tbs. corn syrup
  • 1/2 teaspoon vanilla extract
  • 4 Tbs. butter
chocolate bundt cake on white cake platter with white and red linen

How to Make A Double Chocolate Cake

MIX THE MAIN INGREDIENTS

In a large mixing bowl, or the bowl of a standing mixer, combine cake mix, eggs, espresso, vegetable oil, and sour cream. Beat until fluffy and well combined.

photo collage of cake ingredients in glass bowls - eggs, cake mix, sour cream, and chocolate chips

ADD CHOCOLATE CHIPS

Gently fold in dark or semi-chocolate chips until thoroughly combined into batter.

cake batter with chocolate chips on top

PREPARE THE PAN SO CAKE DOES’T STICK

Prepare the bundt pan. Bundt pans can be tricky when it comes time to remove the baked cake because there are many nooks and crannies where the cake may stick. Grease the pan or spray with a non-stick cooking spray. Be sure to get the grease into all of the curves of the pan.

empty bundt pan and linen

Sprinkle a good amount of cocoa powder into the pan and tap the sides and base of the pan, tilting it in every direction until the cocoa powder has completely coated the inside of the pan.

empty bundt pan with cocoa powder coating the inside

POUR BATTER INTO PREPARED PAN

Pour the chocolate cake batter carefully into the bundt pan. Gently drag a spatula across the top of the batter to ensure that it is evenly distributed within the pan and smooth across the top.

bundt pan filled with chocolate cake batter and red and white linen

BAKING THE CAKE

Bake in a 350 degree Fahrenheit oven for 40-45 minutes or until the cake springs back when touched and a toothpick inserted in the center of the cake comes out clean.

cooked chocolate cake in bundt pan

REMOVING THE CAKE FROM THE PAN

It is very important to allow the cake to cook substantially before removing it from the pan. The pan should be cool enough to handle it with your bare hands. The cake will retract slightly from the pan as it cools, which will also aid in the removal process. Heavier bundt pans will take longer to cool that lightweight bundt pans.

Allow the cake to cool for 15-45 minutes. Use a spatula to lightly loosen the side of the cake from the pan, as much as possible. Place a cooling rack over the opening of the bundt pan. While holding the cooling rack and bundt pan in place, tip the cake over and place the cooling rack onto the counter. You should hear the light thud of the cake falling loosely and perfectly from the pan. If some of your cake has stuck in the pan, gently loose it from the pan and place it into its spot on the cake. Most of the time a light powdered sugar dusting or a bit of frosting will disguise any pieces that didn’t make it perfectly out of the pan.

chocolate cake on cooling rack and baking sheet

MAKING THE CHOCOLATE GLAZE

Go ahead and leave your cake on the cooling rack to cool the rest of the way. You can simply dust the cake with powdered sugar immediately before serving or add another level of chocolate amazing by drizzling a chocolate glaze over the top. The chocolate glaze is SUPER simple and quick to make.

In a double boiler (or in a glass/ceramic bowl placed over a pan of simmering water), heat together chocolate chips, corn syrup, and butter until melted. Remove from heat and add in vanilla extract. Bam! Ready to drizzle. Place your cake laden cooling rack over a cookie sheet to catch the drips and then pour the chocolate glaze over the cake, letting the glaze run down the crevices of the cake.

chocolate cake on cooling rack and baking sheet with white pot of melted chocolate glaze and whisk
chocolate bundt cake on metal cooling rack with glaze drizzled over and white and red linen

Cake is done and ready to serve! Yum! The rich, moist double chocolate cake is going to be a new favorite in your recipe box! I know I love a great chocolate cake mix recipe!

forkful of chocolate cake from cake slice on white plate
slice of chocolate cake on white plate with cake on pedestal in the background

More Cake Recipes

Chocolate Kahlua Cake Recipe

Glazed Pecan Rum Cake

DOUBLE CHOCOLATE CAKE RECIPE

chocolate bundt cake on white cake platter with white and red linen

Double Chocolate Cake

The ultimate in moisture and flavor, this double chocolate cake uses a box of cake mix, sour cream, and dark chocolate chips for an easy to make and delicious chocolate bundt cake.
Print Pin Rate
Prep Time: 15 minutes
Cook Time: 45 minutes
Servings: 16
Calories: 410kcal

Equipment

  • bundt pan

Ingredients

  • 1 box Devil's Food cake mix
  • 2 eggs
  • 1/2 cup espresso
  • 1/4 cup vegetable oil
  • 16 oz. sour cream
  • 12 oz. semi-sweet chocolate chips
  • cocoa powder for dusting pan

Chocolate Glaze

  • 3/4 cup semi-sweet chocolate chips
  • 1 tbsp corn syrup
  • 4 tbsp butter
  • 1/2 tsp vanilla extract

Instructions

Making the Cake

  • Combine cake mix, vegetable oil, sour cream, espresso, and eggs and beat well.
  • Gently fold in chocolate chips and stir until combined.
  • Prepare bundt pan by spraying with non-stick spray and sprinkle with cocoa powder to coat well.
  • Pour batter into prepared bundt pan and spread evenly.
  • Bake in a 350 degree Farenheit oven for 40-45 minutes or until toothpick inserted in center comes out clean.
  • Allow cake to cool until you can handle the pan with bare hands. Turn cake over onto cooling rack and allow to cool the rest of the way.

Making the Chocolate Glaze

  • Heat chocolate chips, corn syrup, and butter in a double boiler until melted and combined.
  • Remove from heat; stir in vanilla extract.
  • Drizzle glaze over cooled chocolate cake and serve!
Tried this recipe?Follow me on Pinterest @girlinspired!

Video

Nutrition

Calories: 410kcal | Carbohydrates: 37g | Protein: 5g | Fat: 28g | Saturated Fat: 15g | Cholesterol: 45mg | Sodium: 283mg | Potassium: 314mg | Fiber: 3g | Sugar: 23g | Vitamin A: 310IU | Vitamin C: 1mg | Calcium: 94mg | Iron: 3mg

Filed Under: Desserts, Food and Recipes Tagged With: bundt cake, cake, cake mix, chocolate, chocolate chips

Peanut Butter Chocolate Layer Cake

February 18, 2015 by girlinspired 3 Comments

Peanut Butter Chocolate Layer Cake - a peanut butter lover's dream cake! Layers of fluffy chocolate cake, creamy peanut butter buttercream, and rich chocolate ganache!

So last week I told you how amazing swiss meringue buttercream tastes when you turn it into Peanut Butter Buttercream.  Today, I promised I would give you the recipe for the best way I’ve found to demolish that frosting – in this ridiculously delicious sugar loaded layer cake!

Peanut Butter Chocolate Layer Cake - a peanut butter lover's dream cake! Layers of fluffy chocolate cake, creamy peanut butter buttercream, and rich chocolate ganache!

Peanut Butter Chocolate Layer Cake - a peanut butter lover's dream cake! Layers of fluffy chocolate cake, creamy peanut butter buttercream, and rich chocolate ganache!I’m going to be straight up and just tell you that I really like using box cake mixes.  They make it easy – some of my favorite desserts have a box cake mix foundation, but I do like to experiment with the cake mixes.  I made some changes to the regular preparation for this one and it turned out SO good.  Moist, but very light and fluffy – the perfect compliment to the creamy peanut butter and rich chocolate ganache.

Peanut Butter Chocolate Layer Cake - a peanut butter lover's dream cake! Layers of fluffy chocolate cake, creamy peanut butter buttercream, and rich chocolate ganache!

An easy way to make perfect layers is by using one of these nifty sets of single layer cake pans.  They come in a set of five so you can divide your one batch of cake mix evenly between the pans and bake them up all at the same time.  I found mine at Target, but you can also find them online here – Easy Layers! 5-Piece Cake Pan Set (aff link).  Okay!  So, you divide your mix evenly between the pans and bake them up – about 15-18 minutes.  Once the cakes are cooled down. use a large bread knife to slice the tops off straight across – this will give you nice flat layers to work with and ensure that they’re all sliced off evenly.  As you stack the layers, use a consistent measuring cup to add the frosting between the layers – I used 1/2 c. between each layer and smoothed it to the edges before pressing the next cake layer on.  Do not add frosting to the very top layer (unless you want to fully frost the whole cake, of course).

Peanut Butter Chocolate Layer Cake - a peanut butter lover's dream cake! Layers of fluffy chocolate cake, creamy peanut butter buttercream, and rich chocolate ganache!

We’re going for the “messy” look on this cake by leaving it unfrosted and drizzling chocolate ganache over the top.  Once you have all of your layers stacked and pressed gently together, use a large icing spatula to smooth around the outside of the cake.  Then, it’s time to make the ganache:  heat 2/3 C. heavy whipping cream and 1 Tablespoon of corn syrup in a saucepan over medium heat until it simmers.  Pour warm cream mixture over 3/4 C. semi-sweet chocolate chips.  Allow chips to melt a little and then whisk the mixture until smooth and pourable.  Pour the ganache over the center of the top of the cake until it runs down the sides – however much you like.

Peanut Butter Chocolate Layer Cake - a peanut butter lover's dream cake! Layers of fluffy chocolate cake, creamy peanut butter buttercream, and rich chocolate ganache!

Now you can leave your cake with just the ganache poured over the top or you can add some decorations.  I used Tip #1M to add a border of peanut butter frosting peaks around the top of the cake.  Then, I dumped on some peanut butter chips, semi-sweet chocolate chips, and chopped Reese’s peanut butter cups.  I would use mini chocolate chips in the future, but didn’t have any on hand.  Now, go slice that cake and indulge!

Peanut Butter Chocolate Layer Cake - a peanut butter lover's dream cake! Layers of fluffy chocolate cake, creamy peanut butter buttercream, and rich chocolate ganache!

Peanut Butter Chocolate Layer Cake - a peanut butter lover's dream cake! Layers of fluffy chocolate cake, creamy peanut butter buttercream, and rich chocolate ganache!

Peanut Butter Chocolate Layer Cake - a peanut butter lover's dream cake! Layers of fluffy chocolate cake, creamy peanut butter buttercream, and rich chocolate ganache!


Peanut Butter Chocolate Layer Cake - a peanut butter lovers' dream cake! Layers of fluffy chocolate cake, creamy peanut butter buttercream, and rich chocolate ganache!

Peanut Butter Chocolate Layer Cake

Layers of moist, fluffy chocolate cake with creamy, light peanut butter buttercream, and rich chocolate ganache. A peanut butter lover's dream cake!
Print Pin Rate
Course: Dessert
Prep Time: 10 minutes
Cook Time: 20 minutes
Total Time: 30 minutes
Servings: 12
Calories: 269kcal

Ingredients

  • 1 box of Betty Crocker triple chocolate fudge cake mix or similar
  • 1 C. water
  • 1/2 C. vegetable oil
  • 2 eggs
  • 1/2 C. sour cream
  • 1 recipe of Peanut Butter Buttercream

Instructions

  • Grease five, 6-inch cake pans.
  • Beat all ingredients in an electric mixer.
  • Divide mixture between cake pans, approximately 3/4 C. per pan.
  • Bake at 350 degrees for 15-18 minutes or until cake is set and a toothpick poked in the center comes out clean.
  • Layer cake with Peanut Butter Buttercream and top with ganache (recipe links included in blog post).
Tried this recipe?Follow me on Pinterest @girlinspired!

Nutrition

Calories: 269kcal | Carbohydrates: 27g | Protein: 3g | Fat: 18g | Saturated Fat: 11g | Cholesterol: 32mg | Sodium: 316mg | Potassium: 143mg | Fiber: 1g | Sugar: 14g | Vitamin A: 101IU | Vitamin C: 1mg | Calcium: 69mg | Iron: 2mg

Peanut Butter Chocolate Layer Cake - a peanut butter lover's dream cake! Layers of fluffy chocolate cake, creamy peanut butter buttercream, and rich chocolate ganache!


Filed Under: Desserts, Food and Recipes Tagged With: buttercream, cake, chocolate, peanut butter

Berry Topped Cake – Easy Cake Decorating!

April 23, 2014 by girlinspired 3 Comments

Berry Topped Cake - so easy to decorate with stunning results.I recently shared the Bunny Breakfast I put together for the girls and several of you commented about the berry topped cake on display.  While that particular cake was purchased, I wanted to show you just how easy it would be to make your own!  This is a simple cake to decorate with stunning results.  It’s really all about the berries – they’re gorgeous by themselves, so when you arrange them on top of a simple cake and give them a quick glaze, you really can’t go wrong!

Berry Topped Cake - so easy to decorate with stunning results.

For this Berry Topped Cake, you will need:

1 – 3-inch thick, 8-inch round cake layer
1 batch of buttercream or other frosting suitable for piping (please, please don’t use canned frosting)
Piping bag and Wilton Tip No. 32 (open star)
assorted berries
jelly (you can really use any berry flavor; I even used some strawberry rhubarb jam because that’s what I had on hand)
Berry Topped Cake - so easy to decorate with stunning results.

Begin by leveling the top of the cake layer and coating it with a thin layer of frosting to seal in the crumbs and provide a base of frosting behind where you will pipe the decorations.  Chill the cake in the freezer for several minutes.

Berry Topped Cake - so easy to decorate with stunning results.

Fit your piping bag with Tip. No. 32 and fill 1/2 full with frosting.

Berry Topped Cake - so easy to decorate with stunning results.Pipe parallel lines of frosting from the base of the cake, straight up and just over the edge of the top.

Berry Topped Cake - so easy to decorate with stunning results.Continue all the way around the cake.

Berry Topped Cake - so easy to decorate with stunning results.Rinse and dry berries.

Berry Topped Cake - so easy to decorate with stunning results.Mound on the top center of the cake.

Berry Topped Cake - so easy to decorate with stunning results.Heat about 1/3 C. of jelly in a small saucepan over medium heat until smooth and liquid.  Use a pastry brush to carefully coat the exposed berries with a thin layer of jelly.

Berry Topped Cake - so easy to decorate with stunning results.

Done!

Berry Topped Cake - so easy to decorate with stunning results.

Was that about the easiest cake you’ve ever made?  I used this marshmallow frosting recipe (the vanilla version) and a boxed cake mix (lemon, yum!).  Once the cake was baked and frosting made, the total decorating time was less than 15 minutes – gotta love that!

Filed Under: Cake Decorating, Food and Recipes, Tips and Tutorials Tagged With: berries, blackberry, buttercream, cake

Chocolate Kisses Cake

February 12, 2013 by girlinspired 14 Comments


If you love chocolate, I’ve got a cake for you!!  And just in time for Valentine’s Day, it’s one covered in dark chocolate piped “kisses.”  As far as I’m concerned, the best fix for a chocolate craving is this Dark Chocolate Frosting slathered on a pile of cake.  Chocolate frosting doesn’t get better – this one’s rich, it’s thick, it’s shiny and gorgeous.  You can spread it out smooth or pipe it into swirls or kisses!

To make a chocolate kisses cake, you will need your cake layers, one recipe of dark chocolate frosting (double the recipe if you’re using the frosting to fill your layers, too),  a piping bag fitted with a coupler and #12 piping tip.
The directions couldn’t be easier.  Stack and fill your cake (click here for more detailed instructions on stacking and filling).  Then, fill your bag with frosting and start piping – you can start anywhere on the cake, you might want to start on a side (or even practice off the cake) to get the feel of it.  Holding your tip just off the cake layer, begin squeezing until the frosting has formed a small mound, then release pressure on the bag while swiftly lifting straight out from the cake.  You can make your “kisses” any size you like, but you should try to make them a consistent size.  Cover the whole cake, fitting each “kiss” up against those around it.  They won’t all be perfect and that is just fine – once the cake is done, any imperfections will blend seamlessly together.  If you really flop on one of the kisses, just scrape that part away with a knife and continue!  So easy and such pretty results!
As far as the inside of the cake, I used a cool checkerboard pan set from Wilton and the results were easy and fun!
My inspiration for this kisses cake came my friend and baker extraordinaire, Emily.  That girl is seriously AMAZING!!  She makes the most delicious sweets and has true creative genius.  

Filed Under: Desserts, Food and Recipes, Holiday Inspiration, Parties, Valentine's Day Tagged With: cake, chocolate

Ocean Waves Ombre Cake – Tutorial

July 23, 2012 by girlinspired 20 Comments

Well, hello!!  I’ve missed you!  It seems I took a bit of an unplanned break – my husband took 10 glorious days off from work and we just played!  He and I even got to sneak away for a couple nights to the coast to celebrate his 40th birthday!  It was bliss, I tell you.  But, we’re back, I’m back, and I have a few fun things planned to share this week!!
 
First off, I want to get the mermaid party tutorials wrapped up.  I think I’ve covered most everything except for the sweets.  I think the Ocean Waves Ombre Cake made a big impact on the dessert table and it really was pretty simple to frost.  I didn’t take pictures along the way, but I’ll give you the deets and I did a mini-demonstration on a mason jar, so we’ll see how that suffices.

 Supplies:

  • cake, filling, and dowels to support upper tier
  • 2 recipes Swiss Meringue Buttercream (link will take you to my favorite recipe)
  • food coloring (I used AmeriColor in Turquoise and Electric Blue)
  • 16-inch pastry bag, large coupler set
  • Tip #124
  • Turntable for cake decorating

 Specifics:

  • 2 tier cake – 9-inch layers on the bottom and 7-inch layers on the top
  • Rasberry filling (purchased from a cake supply store)
  • One batch of buttercream frosting for crumb coating + base coat

( I tinted the base coat of frosting a light blue, but in retrospect, the base coat did show between some of the ruffles and I wish that I would have tinted the base coat of frosting darker for the bottom tier.)

 
  • Second batch of buttercream frosting for the “waves” to cover the whole cake
  • To Frost:  Large piping bag, 16 inch, large coupler set, piping tip #124
  • Ombre effect:  After mixing up the buttercream, I added a few drops of color to get a light aqua tint, then scooped one large spatula full into my piping bag.  Then, I mixed in a few more drops of color, another large spatula scoop into the bag, and so on, adding the same approximate number of color drops for each scoop.  If you could see into the piping bag when I started frosting the cake, you would see an ombre color effect with the lightest frosting at the tip and the most saturated color at the top of the bag – make sense? 
  • Now, to pipe:  Hold the bag perpendicular to the side of the cake with the narrow end of tip #124 pointed down and resting on the top edge of the cake.  Steadily squeeze the frosting through the tip while turning your cake (a turntable is pretty much a must for this one!!).  Turn and squeeze until you reach the bottom of the cake and that is it!! 
  •  Oh, yes, and then you can sprinkle the top with some raw sugar “sand” and molded candy seashells.

 Other Tidbits:

  • I typically see this type of ruffle cake done with fondant.  I was too scared to try fondant, plus I wanted the cake to taste good.  The buttercream ruffles are definitely not as “perfect” as I envisioned, but I think the cake as a whole turned out fun and cool!
  • It was warm when I frosted the cake – maybe 80+ degrees in the house – not ideal, so if you can work in cooler temps it will be easier.  However, if it’s warm, don’t hesitate to stop for a bit here and there to pop your piping bag into the fridge and firm up your frosting a little.
  • This buttercream recipe really holds up well in warm weather.  It was around 90 degrees during the outdoor party and the cake held up fine until slicing time.  I refrigerated the cake overnight and up until the party.  (The candy seashells, on the other hand, will definitely melt in the heat/sun.
  • Follow the recipe directions to beat out the air bubbles before piping – you’ll be glad.
  • Anything else?  Questions?  Okay!  Have fun!
 

Filed Under: Cake Decorating, Food and Recipes, Popular Posts, Tips and Tutorials Tagged With: buttercream, cake, mermaid party, ombre, ruffles, seashells, sweet treats

  • 1
  • 2
  • 3
  • Next Page »
About Stef
  • Email
  • Facebook
  • Instagram
  • Pinterest
  • RSS
  • Twitter

Search Older Posts

Sharing Policy

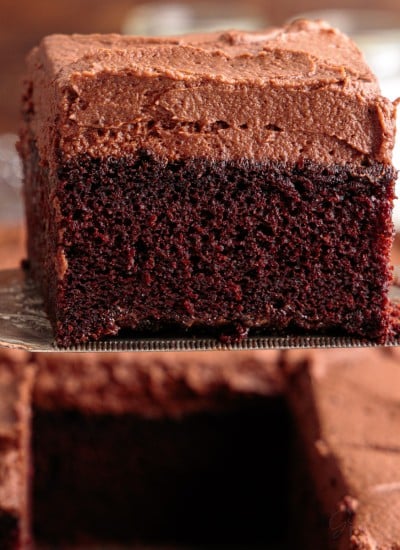
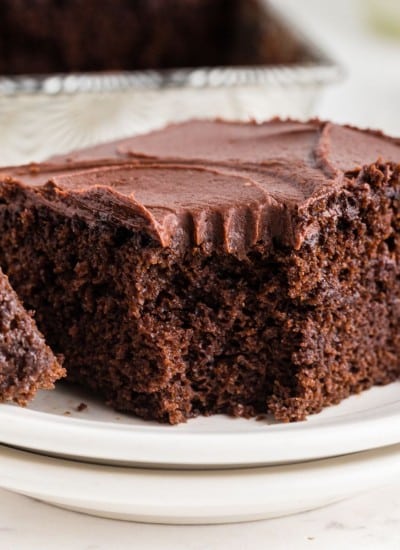
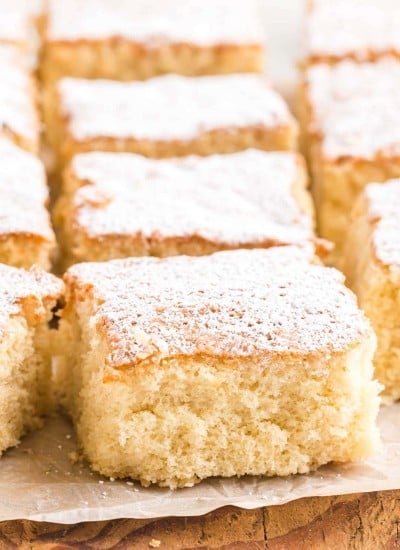
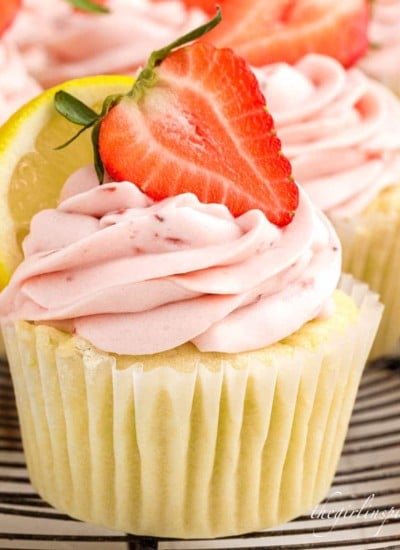
It is my hope that you will find inspiration on the Girl. Inspired. blog. All photos are copyright protected by Girl. Inspired. If you wish to share something that you have seen here, I am absolutely thrilled! Please use only one picture with a direct link back to the project you are referencing. Thank you so much for your understanding!

Privacy Policy

What are You Looking For?

Search by Category

Copyright © 2021 · Foodie Child Theme by Shay Bocks · Built on the Genesis Framework · Powered by WordPress

This site uses cookies: Find out more.