

Have you ever wanted to make an ice cream cake? Everyone loves ice cream cake, but making your own means it’s possible to choose your favorite cake and ice cream flavor and decorate it however you please. This Oreo ice cream cake recipe combines simple ingredients to make an amazing ice cream dessert! Once you have the basic technique down, customize the cake to your liking!
The first time I made an ice cream cake, I was scooping 31 flavors at my first job at Baskin’ Robbins. We don’t have alllll the same tools to make a Baskin’ Robbins ice cream cake, but we can get pretty darn close with this easy ice cream cake recipe and knowing the basics of the original recipe.
To make a homemade ice cream cake, we need just three basic components – a layer of cake, a layer of ice cream, and frosting. Basically, you’ll need to bake a thick, single layer of cake, top it with a formed layer of ice cream, then frost it with a nice freezer-friendly icing. I am going to tell you the best way to frost your cake though.
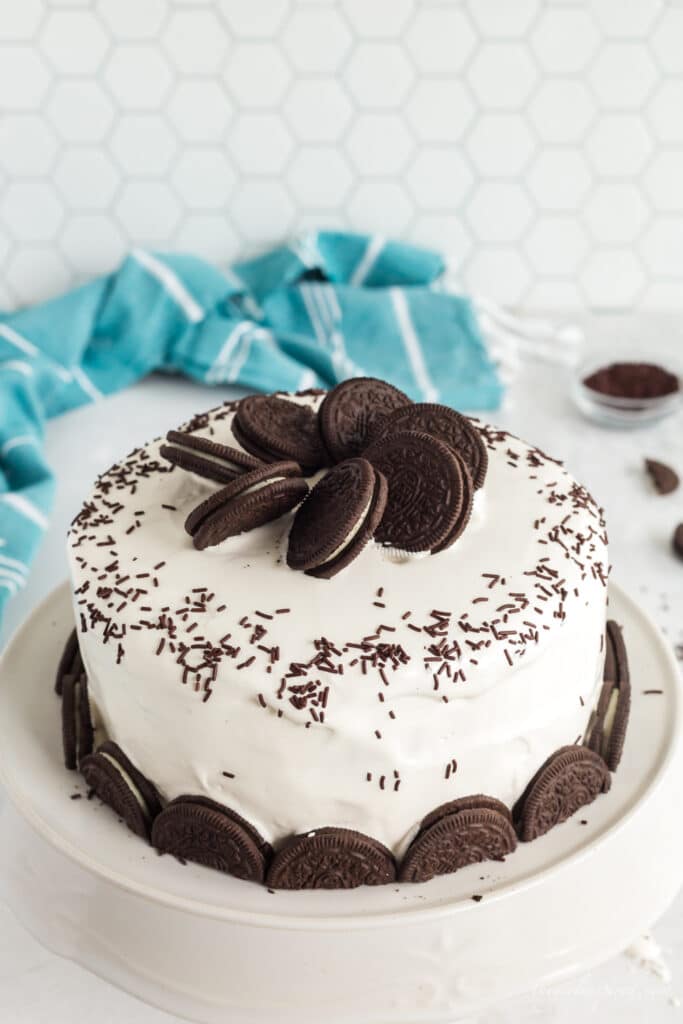
Table of contents
- What do I use to frost the ice cream cake?
- What is Pastry Pride?
- Ice Cream Cake Ingredients
- Supplies
- How to Make the Oreo Ice Cream Cake
- Assembling the Cake
- Decorating an ice cream cake:
- When should I Serve a Homemade Oreo ice cream cake?
- What are some other great flavor combinations for an ice cream cake?
- What if I want a no bake dessert?
What do I use to frost the ice cream cake?
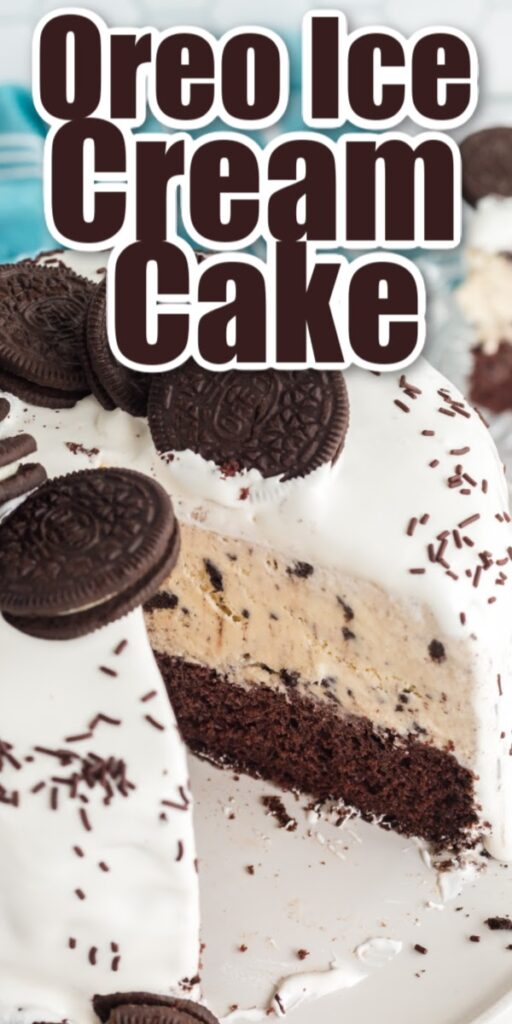
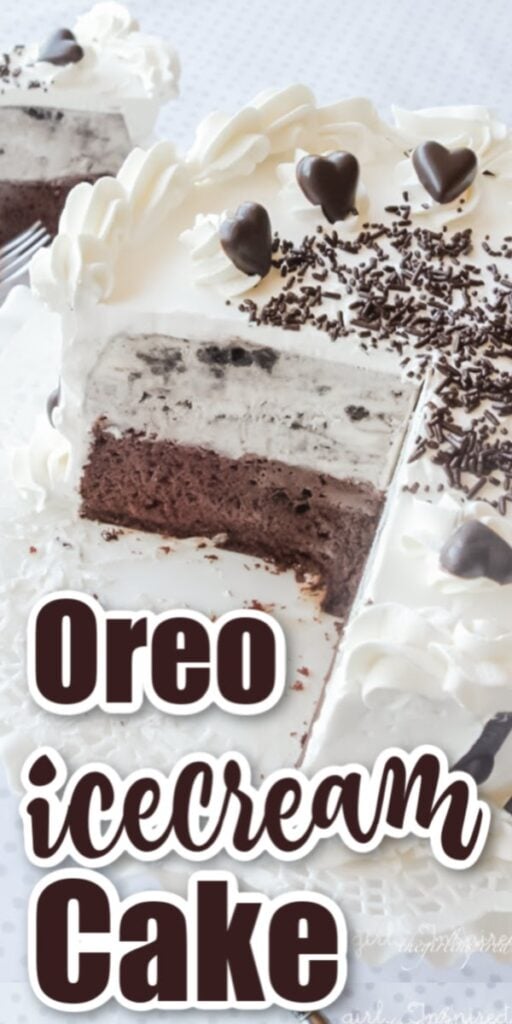
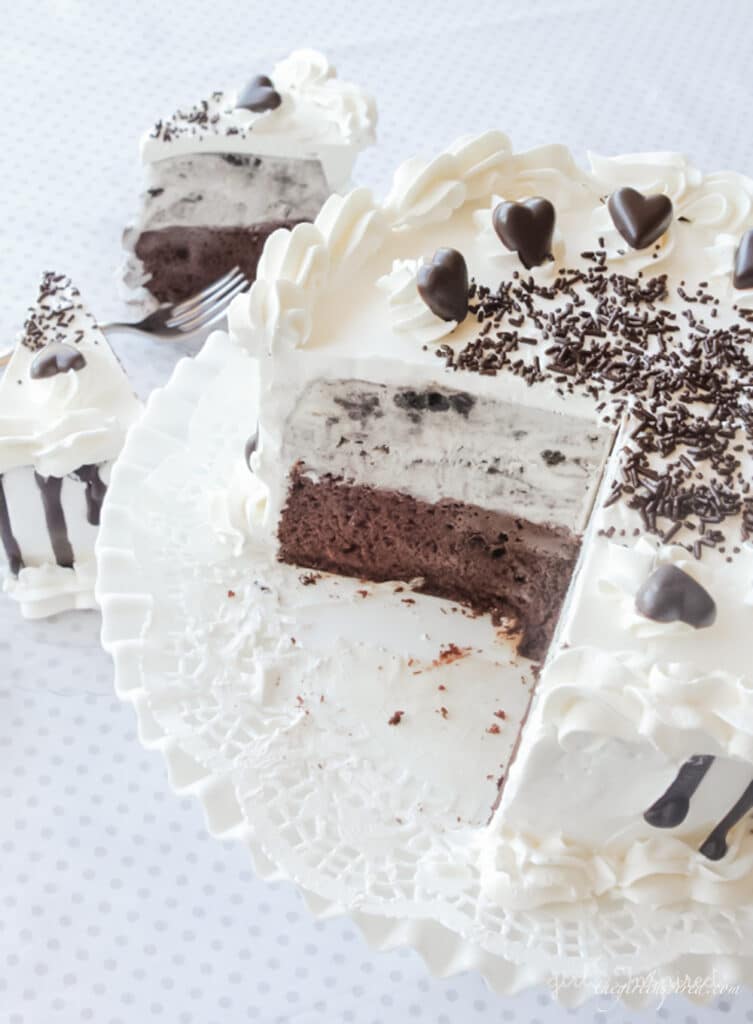
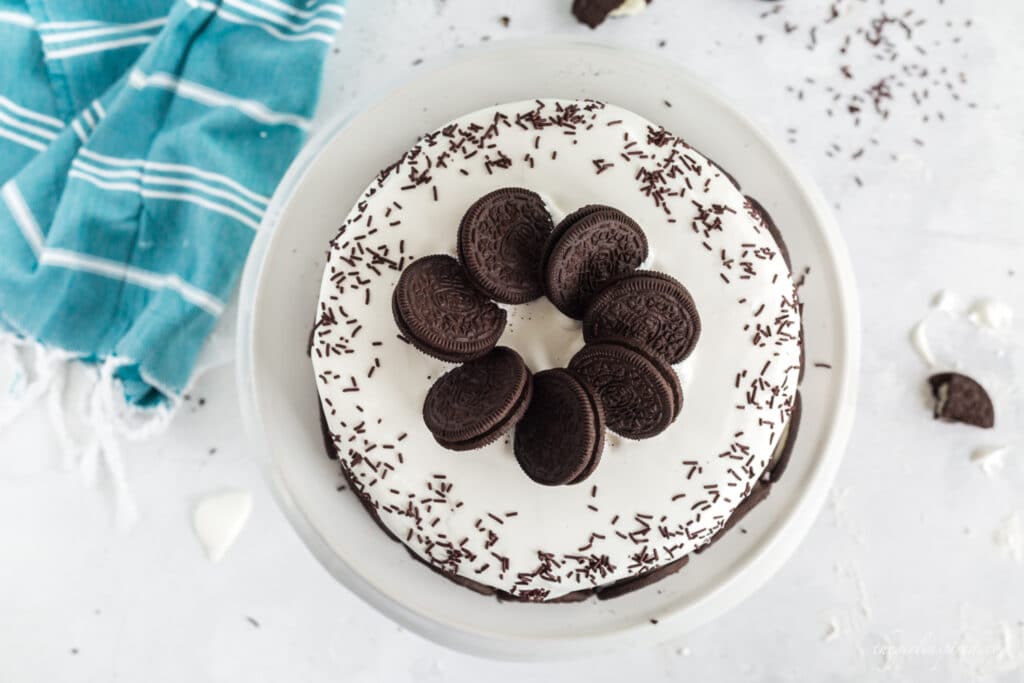
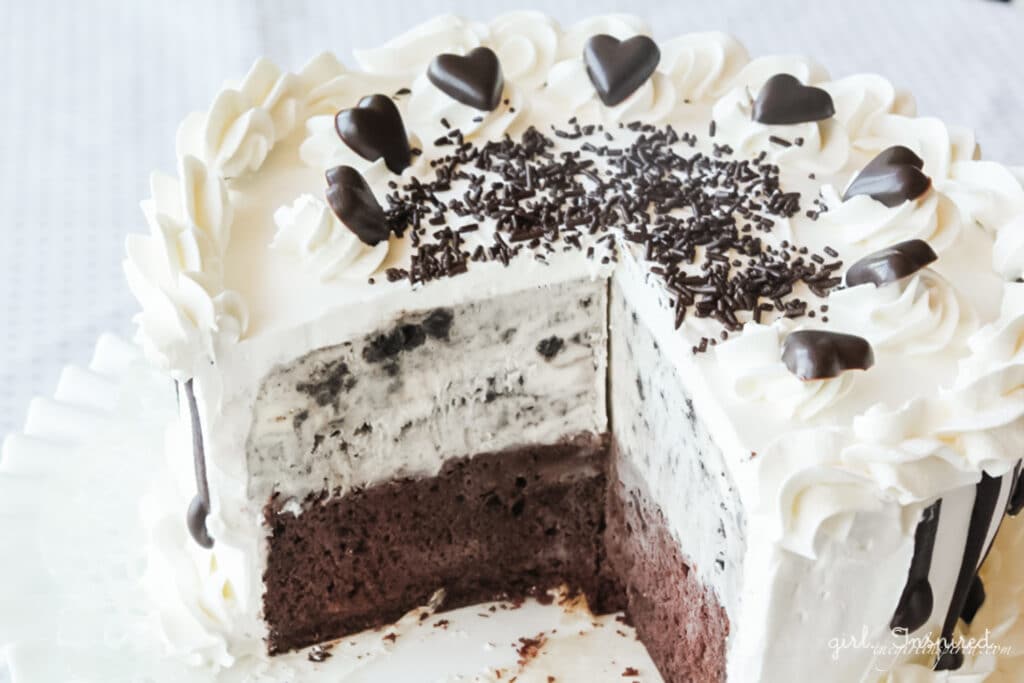
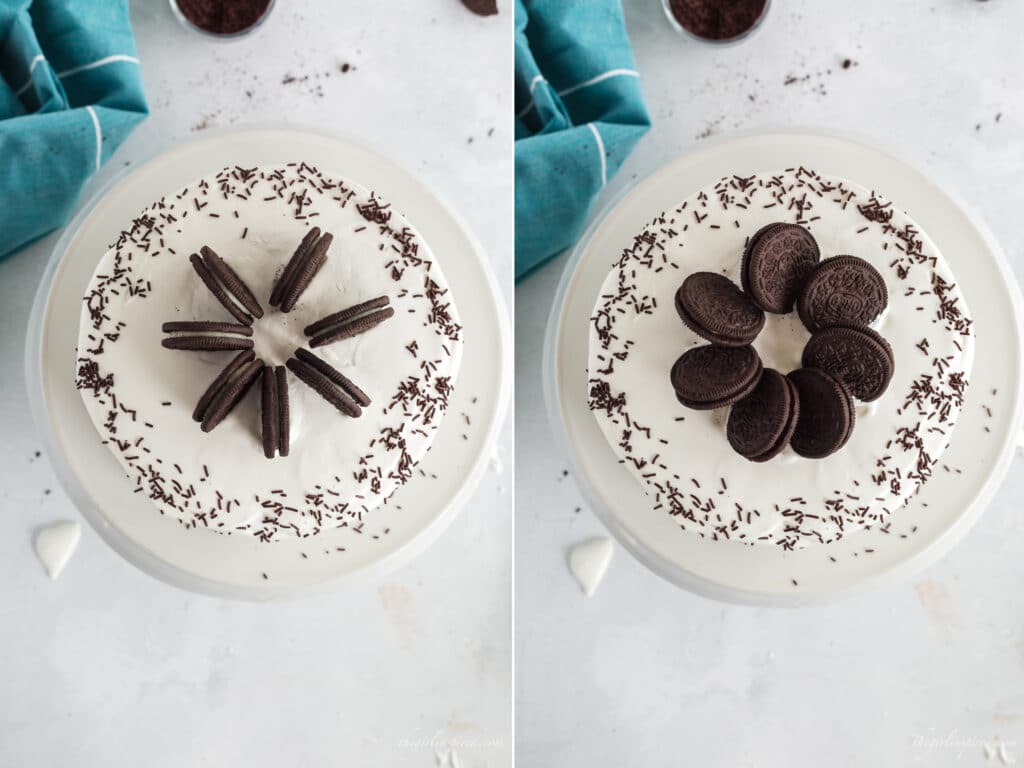
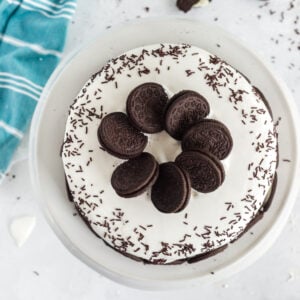
You will find two different cakes in these photos. Notice that one of the cakes has piped borders around the top and bottom and pretty swirls on the top. The other cake uses halved Oreo cookies as a bottom border and a swirl of cookies on the top.
The cake with the pretty piping has been frosted using a non-dairy frosting called Pastry Pride, which you buy as a frozen quart, defrost, and whip up to stable, pipe-able, freezable perfection.
The cake with the Oreo border was frosted with Cool Whip. Cool Whip is a really easy option and readily available. It is not my first choice for ice cream cakes though. For one, it will not hold its shape for a piped border or fluffy swirls. For another, it becomes too soft and can even begin sliding down the sides of the cake if it is out of the freezer for too long. For simply and quickly coating the cake, Cool Whip can work if Pastry Pride is not available.
You could also use a buttercream. Buttercream will pipe well and freeze well. It does take some extra work to prepare homemade buttercream, which is why I love using Pastry Pride. Find more about my best frosting recipes, including a variety of buttercreams.
What is Pastry Pride?
Pastry Pride is a non-dairy dessert topping that you can buy from cake supply stores. Smart ‘n’ Final – a discount grocery store on the West Coast – also carries pastry Pride in the freezer section. It comes in quart-size cartons. I keep a supply in my freezer. When I need a quick batch of whipped topping, I thaw a carton out, whip up the amount I need, and I’m ready to go! It’s great for spreading out smoothly and also for piping swirls, borders, and dots; it isn’t the best frosting for a lot of detail. Frosted cakes and treats need to stay refrigerated, but pastry pride holds up to freezer burn better than heavy cream. The texture and flavor is similar to whipped cream, not too sweet, and really light and yummy.
Ice Cream Cake Ingredients
- prepared batter for one cake (1 box cake mix + eggs/oil/water/etc.)
- 2 containers of ice cream (3 Quarts)
- 1 Quart of Pastry Pride (or 12 oz. tub of Cool Whip)
- one sleeve of Oreo cookies, chocolate candy melts, chocolate sprinkles, heart mold (optional)
Supplies
- 9 inch baking pan
- plastic wrap
- spatula
- icing spatula (optional)
- piping bag, coupler, and decorating tip #1M (optional)
How to Make the Oreo Ice Cream Cake
Prepare the cake batter according to the instructions on the box. Fill your cake pan ⅔ of the way full. Please note that you can use any size or shape cake pan you’d like – just as long as you have enough batter for your cake layer and enough ice cream to fill the same size pan for your ice cream layer. You may not use all of the batter. Use the leftover batter to whip up a few cupcakes.
Bake the cake layer until a toothpick inserted in the center comes out clean. Once the cake is cooled, remove it from the pan, cool it completely, then wrap in plastic wrap and freeze for at least 3 hours.
While the cake is freezing, prepare the ice cream layer. Set out 2 tubs of ice cream (1.5 Qts each) to soften a bit. Once the cake is in the freezer, wash and dry the pan thoroughly. Line the cake pan with plastic wrap. Mound the softened ice cream into the plastic-lined cake pan.
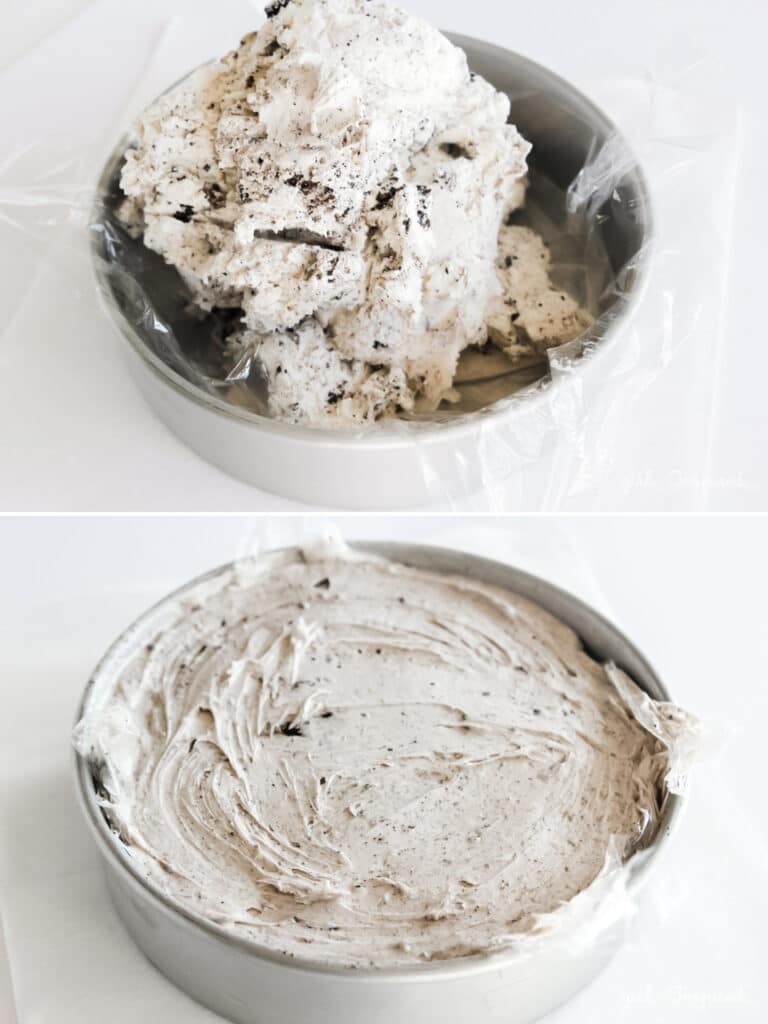
Smash it down and spread it out, making a smooth and level top. Be sure the ice cream is pressed all the way down into the pan and that you fill the pan to the top (or as thick as you’d like the ice cream layer – I wanted the cake and ice cream layers the same thickness). For this size cake, I used about 2.5 Quarts of ice cream. Place the packed cake pan in the freezer for 2-3 hours.
Assembling the Cake
Alright, be sure you are working with a well frozen cake layer and ice cream layer. Remove both from the freezer. Let’s begin by leveling off the top of the cake layer. Remove the plastic wrap and use a bread knife to slice the domed top off of the cake layer, leaving a flat even surface.
Alright, be sure you are working with a well frozen cake layer and ice cream layer. Remove both from the freezer. Let’s begin by leveling off the top of the cake layer. Remove the plastic wrap and use a bread knife to slice the domed top off of the cake layer, leaving a flat even layer.
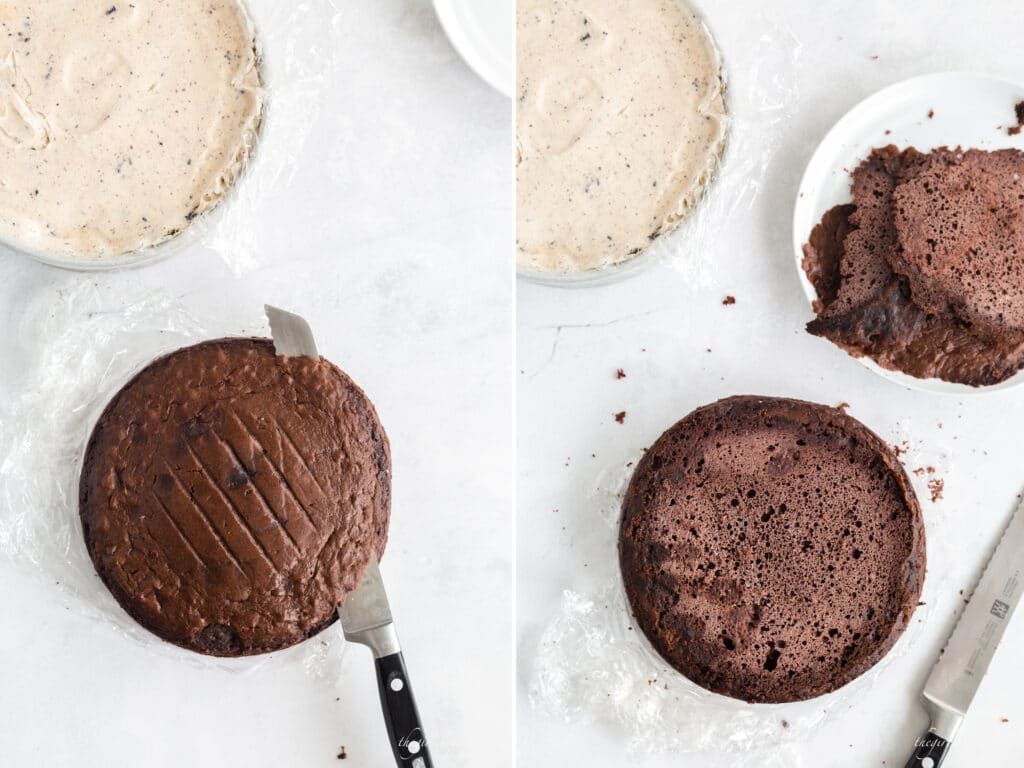
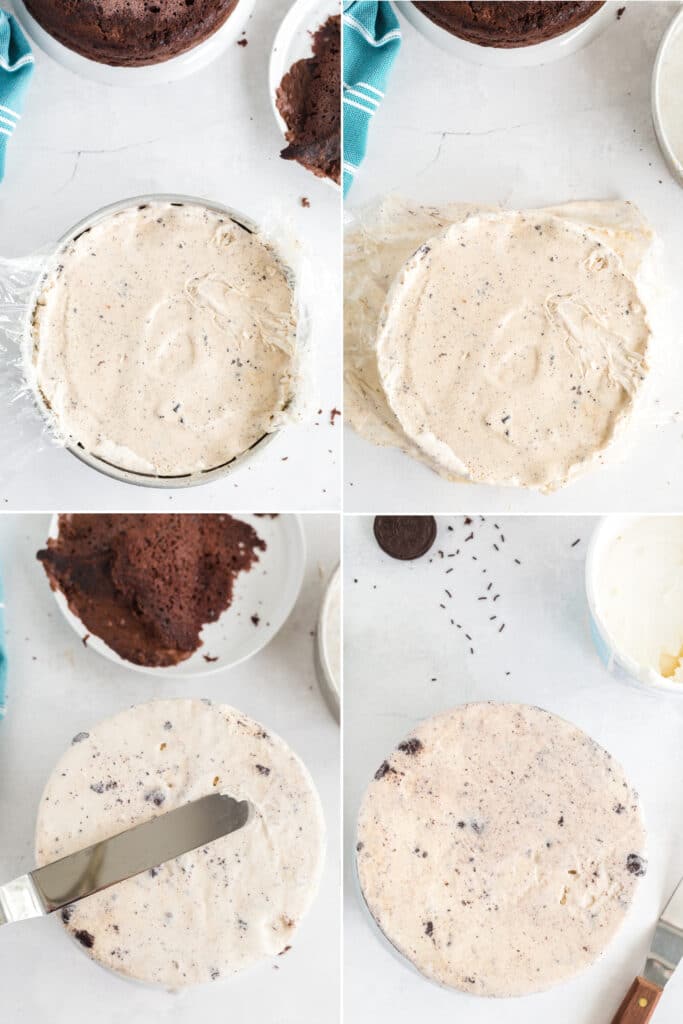
Now, lift the ice cream layer from the pan by lifting the pastic wrap. If it won’t come out, you can dip the bottom of the pan in some warm water to soften it enough to remove it. Tip the ice cream layer upside down on top of the cake layer.
Use a large icing spatula to smooth the softened outer layer of ice cream to form a nice flat top on the cake. Smooth the ice cream down over the sides to the separation where it meets the cake. You want a nice smooth, sealed edge. Smooth out any lines from the plastic wrap, but maintain the structured shape of the cake. Place the cake back into the freezer for 30 minutes-1 hour until the ice cream has hardened again.
Decorating an ice cream cake:
Prepare your icing. If you are using Pastry Pride, whip it up until it holds its shape. Cool Whip should be set out to soften until it is spreadable. Remove the frozen cake from the freezer. Mound a large pile of icing on the top of the cake. Spread it down and around the sides, maintaining at least ½″ thickness of frosting all the way around the cake.
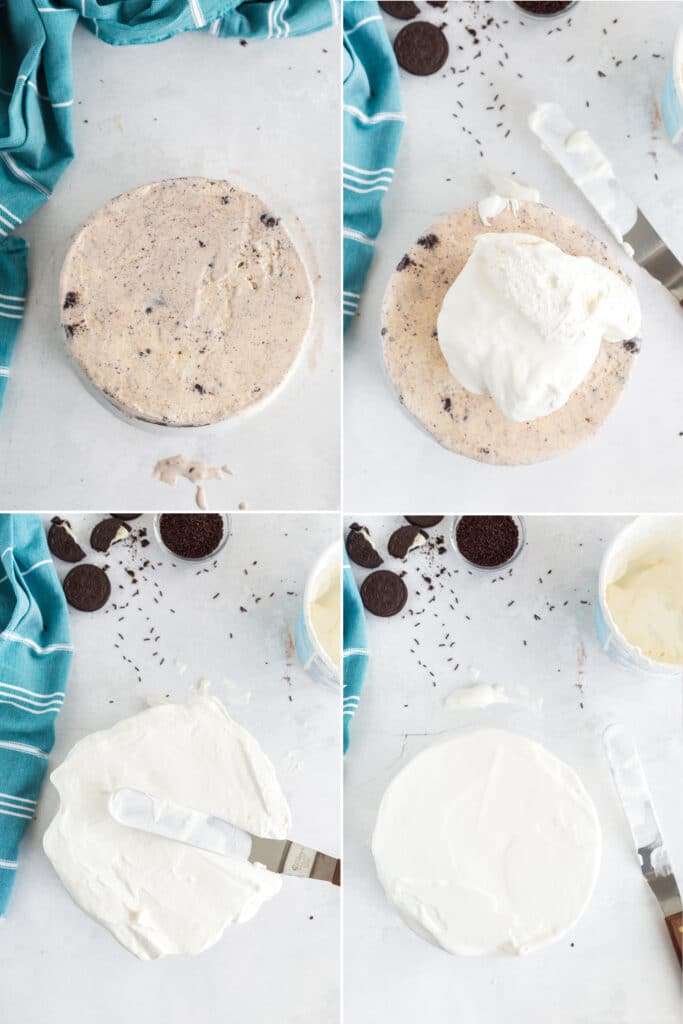
When the icing is smooth, get that cake back into the freezer as soon as possible. If you have used Pastry Pride, you can finish decorating before you put it back in the freezer. It will hold up just fine. Cool Whip will start sliding off the cake if it is out of the freezer for too long.
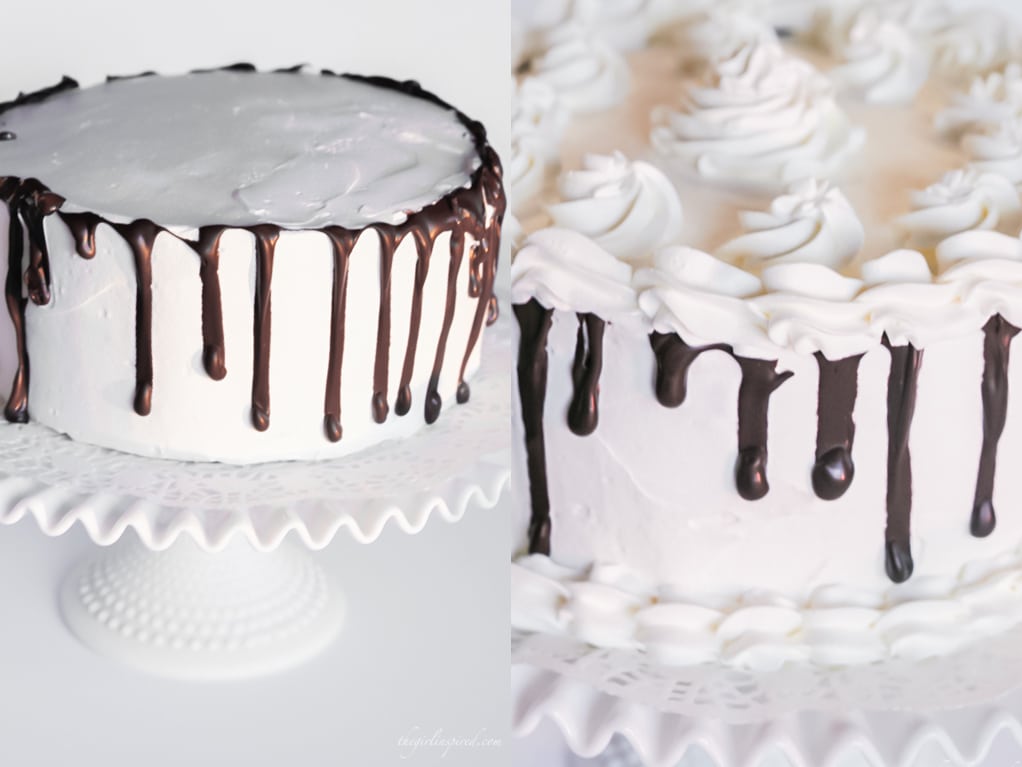
I melted some chocolate candy melts and drizzled them around the top edge (be sure to freeze up the frosted cake very well first if you’re going to add a warm chocolate drizzle!!)
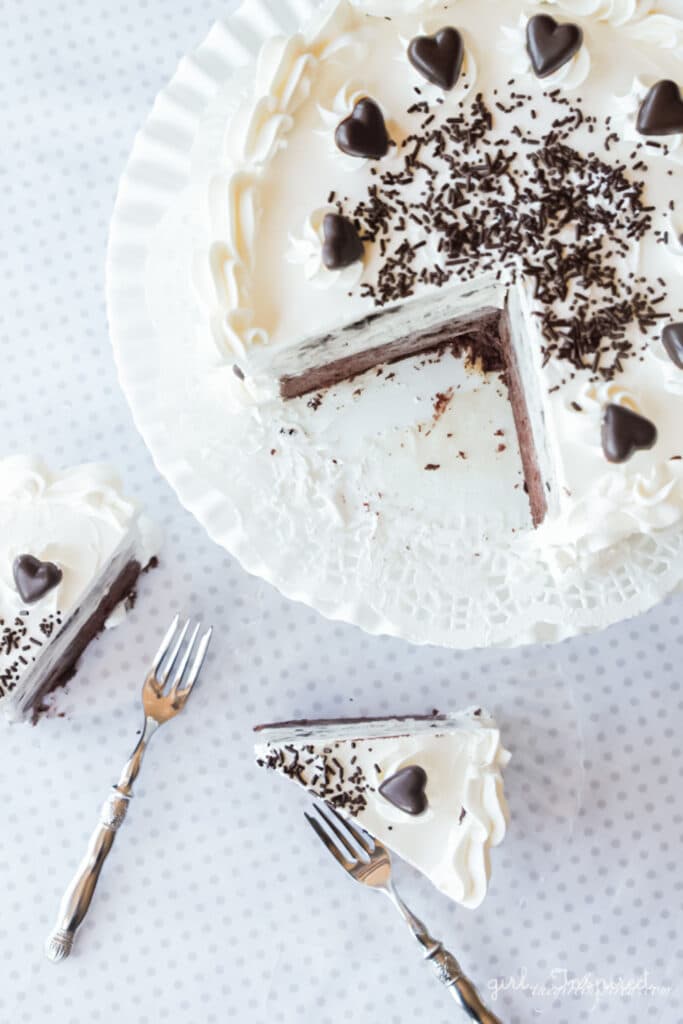
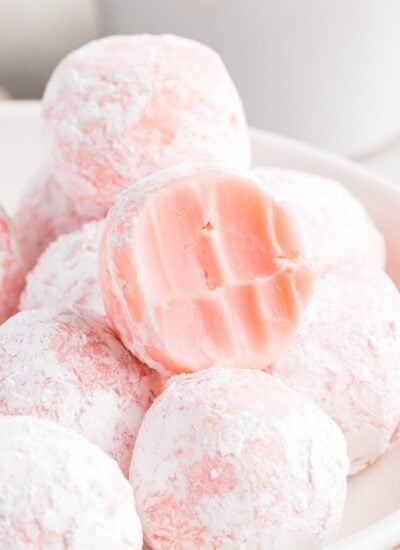
Then use tip #1M to pipe a border around the top and bottom. Pipe a few swirls in a circle around the top, pop on some little molded hearts (read more about molding candy melts in this molded chocolate bunnies recipe), and toss on some chocolate sprinkles.
If you use Cool Whip, you can do quick and simple decorations by cutting Oreos in half and lining them around the bottom of the cake like a border. Place Oreos in a spoke pattern standing on their ends on top of the cake. Then tip them almost like you’re tipping dominoes to nestle them in a spiral on top of the cake. You can add sprinkles or even crushed Oreos to the top.
Freeze the cake really well until it’s time for serving. The cake will need to sit out for just a little bit before cutting if your freezer is super cold. In general, if you are lighting candles and singing the birthday song, that is enough time for the cake to soften just a tad in the time it sits at room temperature. A sharp knife will cut the cake just fine; a hot knife can also be used if needed.
When should I Serve a Homemade Oreo ice cream cake?
This is the perfect sweet treat for summer time, but it doesn’t require a hot summer day or a summer birthday celebration to find a reason to make this yummy recipe.
- birthday cake any time of the year
- family gatherings (but only if you’re traveling short distances with the cake!)
- surprise treat any day for Oreo lovers
What are some other great flavor combinations for an ice cream cake?
- Mint chocolate chip ice cream and chocolate cake
- Chocolate ice cream with vanilla or yellow cake
- Turtle – pralines and cream ice cream with yellow cake, caramel sauce, and hot fudge sauce, too!
- Neopolitan – a strawberry and a vanilla ice cream layer with chocolate cake
- Black Forest – cherry ice cream, chocolate cake topped with chocolate sauce and maraschino cherries
What if I want a no bake dessert?
No bake desserts are really convenient on hot summer days. If you don’t want to heat up the oven to cook a layer cake, you can make a simple Oreo crust by combining Oreo crumbs and melted butter. Crush the cookies in a food processor or roll over them with a rolling pin to make fine crumbs. Press the cookie crumbs mixture into a pie plate and then top with your favorite ice cream. Read more about making this type of frozen dessert in this Peanut Butter Chocolate Ice Cream Pie recipe!
Now that you’re armed with all of the information, making this cool dessert at home seems totally doable, right? Now go pick out your favorite flavor of ice cream and make someone an easy homemade ice cream cake!!
Even More No Bake Desserts
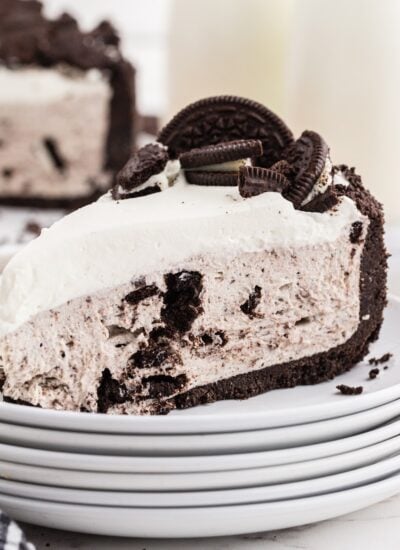
Oreo Ice Cream Cake
Ingredients
- 1 prepared batter from boxed chocolate cake mix
- 2 1.5 quart tubs cookies and cream ice cream
- 1 quart Pastry Pride non-dairy frosting or 16 oz. tub of Cool Whip
- 14 Oreo cookies
- chocolate sprinkles
Instructions
- Prepare cake according to the instructions on the box. Fill 9" round cake pan ⅔ of the way full. Bake until toothpick inserted in center of cake comes out clean.
- Remove cake from pan. Cool completely. Wrap in plastic wrap and freeze for several hours.
- Set out cartons of ice cream to soften.
- Wash and dry pan that cake was baked in. Line with plastic wrap.
- Mound ice cream into lined cake pan and spread until the pan is full, forming a layer of ice cream about the same thickness as the cake.
- Place pan of ice cream into the freezer for several hours.
- Prepare Pastry Pride (defrost in advance) by whipping until it holds its shape – it will be the consistency of whipped cream.
- Remove cake and pan of ice cream from freezer. Cut the domed top off of the cake layer so that it is flat.
- Place ice cream layer over the top of the cake layer. Use an icing spatula to smooth the ice cream down and over the sides of the cake layer, sealing up the crack between the layers.
- Return cake to freezer for at least one hour.
- Frost with whipped Pastry Pride. Use tip #1M to pipe a top and bottom border around cake. Make swirls on the top of the cake and place an oreo in the center of each swirl.
- Alternately, spread Cool Whip over the frozen cake to frost. Work quickly and return to freezer to keep Cool Whip stable. Decorate with Oreo cookies and chocolate sprinkles.
Would you like to save this?
Nutrition
Make this recipe?
Share it with me on Instagram @girlinspired1 and follow on Pinterest for more!


Comments & Reviews
Debbie says
This looks incredible. I can’t wait to try it. I see that you had wax paper or something under the cake while decorating and then transferred it to a doily. It looks so nice and clean. How did you manage that. There must be a trick. My husband loves ice cream cakes. Beautiful.
girlinspired says
Yes, I like to put three strips of wax paper wedged under the cake so that it catches any spills or smears. Then just gently pull it out when you’re done. I usually pipe the bottom border of the cake last so that I can pull out the wax paper beforehand. If you pipe the bottom border with the wax paper there, it can pull away with the wax paper.
Eva Popovich says
The hardest part of ice cream cakes is how long it needs to set out before you can cut it. How long for this cake?
girlinspired says
I’d say 30 minutes.
Karley Blakemore says
Do you know of anything that could substitute for the pastry pride? I was thinking of just using whipped cream.
girlinspired says
You can use whipped cream if you are going to serve it right away and eat it right away. However, real whipped cream won’t hold its structure in the freezer. You could use Cool Whip if you need a substitute that will hold up in the freezer!
Kate says
Does freezer the cake stop it from going sogging? Could you use any type of cake, like would betty crockers strawberry cake be ok or is a mud cake better? TIA. My daughter has set a crazy challenge doe her birthday
girlinspired says
Yes, any kind of cake mix! It won’t get soggy if you keep everything frozen until just before serving.
Eileen says
Made this today! It was fantastic! I used whipped cream for the icing and added a layer of crunchies between the cake and ice—cream! Delicious!
C says
I tried the recipe for my daughters bday. No need to hunt for pastry pride – cool whip works just fine! Just needs some time in the freezer to set it after you frost the cake. Go through the effort to make a homemade cake – Hershey Cocoa has a simple and very good recipe on the back of the box that is delicious!
Brittany Rice says
where can i find the pastry pride? ive looked it up and cant find it.
girlinspired says
Smart and Final in CA carries it. You can also purchase it from most cake supply stores. They might have a different brand, but if you ask for Pastry Pride, they’ll know what you’re talking about.
Gabby says
I’m going to attempt to make this for my boyfriends birthday this Monday, but I’m also taking him out of town hiking for most of the day. If I make this in the morning would I be able to decorate it and store it in the freezer until we come home and have dinner with the family?
girlinspired says
Of course!