girl. Inspired.

travel, food, design

  • TRAVEL
  • FOOD
    • Breakfast
    • Breads
    • Main Course
    • Desserts
    • Drinks
    • Soups|Salads|Side Dishes
    • Sauces|Dips|Salad Dressings
    • Cake Decorating
      • Inspiration and Ideas
      • Tips and Tutorials
  • Design
    • Craft/DIY
    • Sewing
      • Patterns and Tutorials
      • Pattern and Product Reviews
      • Sewing Ideas and Inspiration
    • Parties
  • Blog
  • About
    • Privacy Policy
  • Subscribe

Ready to Bustle?

February 28, 2012 by girlinspired 33 Comments

Tutorial for the skirt of this Gorgeous Princess Gown!
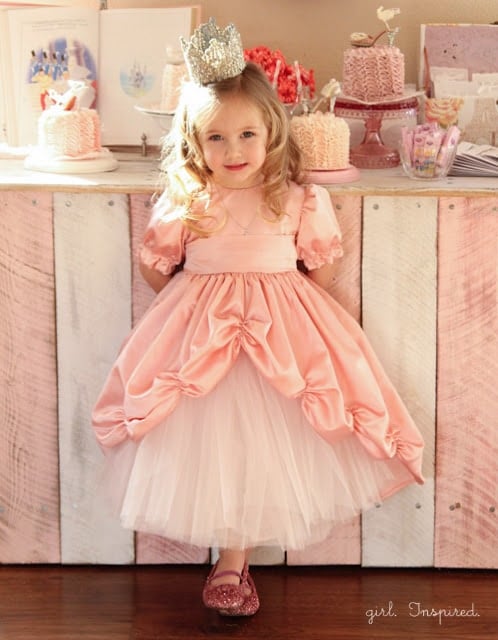
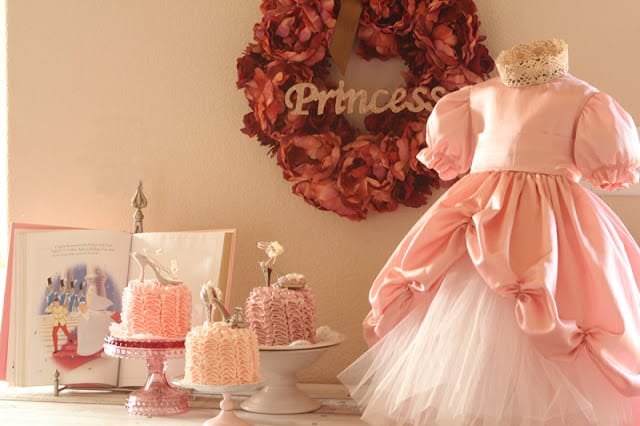
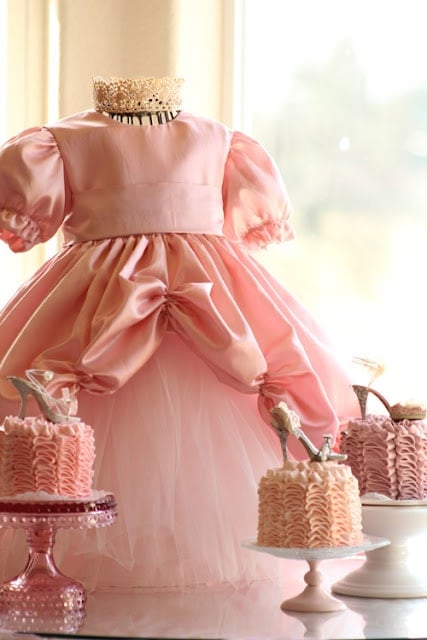
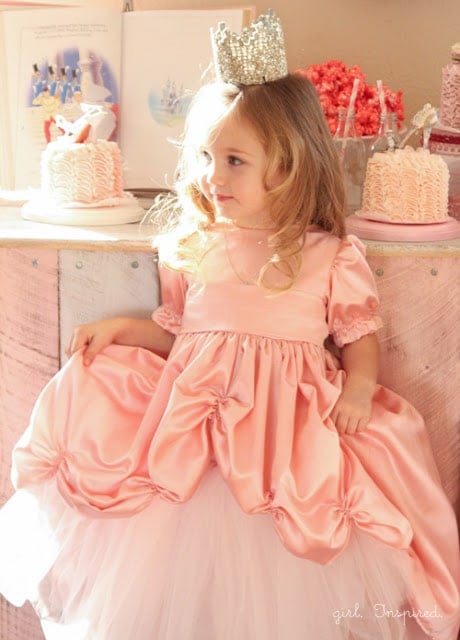
I promised I’d tell you how to make the skirt of the princess gown, so here goes.  You can use your favorite dress pattern for the bodice and sleeves, this tutorial will cover how to create the skirt portion of the dress.  The dress should be worn over a very full pettiskirt/tutu to really get the lifted effect.  I assembled the whole dress and did the bustling last.
Princess Gown Tutorial - learn how to sew the skirt for a gorgeous princess gown!
  • Assemble dress, making sure that you have a very full skirt.  I used a full width of the fabric for both the front and the back of the dress skirt – I didn’t measure the fabric, but it was probably 45″-50″ wide or so.  So, the full circumfrence of the skirt would be around 90″ – a very full skirt!!  Gather the skirt and attach it to the bodice – here’s a more detailed tutorial on gathering – How  To Gather Fabric

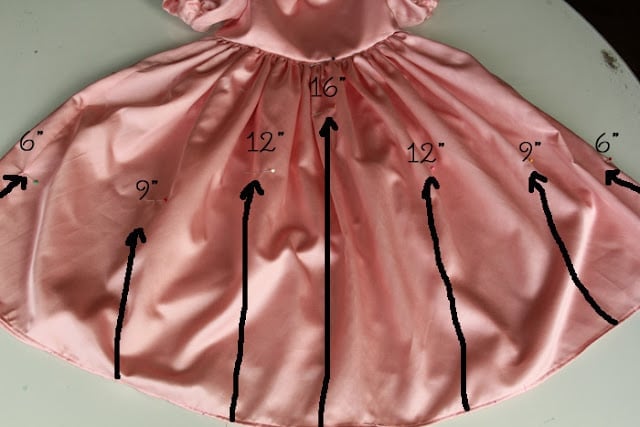
  • Find and mark the top and bottom center of the front of the skirt.
  • Measure the distance from the center to the side.  Divide by 3 and mark along the bottom of the skirt.  So, let’s say that the distance from the center to the side is 24″.  You’re going to mark every 8″ – the center, at 8″ over from the center, at 16″ over from the center, and at the side seam (24″).  Repeat for the other front half.
  • Mark 6″ up from the bottom at each side seam.  Then, 9″.  Then 12″.  Then 16″ at the center.  These increments may vary depending on the length of the dress you’re making.  I made about a 2T/3T.  The top of my center point (16″ from the bottom) was about 3 1/4″ down from the top of the skirt.
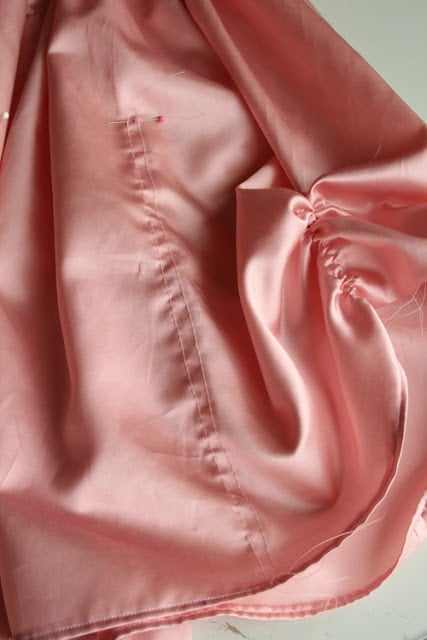
  • Sew two parallel lines (using a gathering, or a loose, stitch) straight down from the top mark to the bottom.  Secure your thread at the top so that you can scrunch it up without the bobbin threads pulling loose.
  • Now scrunch…cinch…whatever you wanna call it!  Be sure you scrunch all of your bustles an even amount.  The finished length of my scrunched portions were about 2 1/2″.
  • Secure the threads.  I tried to just tie triple knots in the thread, but this won’t hold. Stitch using a regular stitch right down the center of the gathered portions; be sure to backstitch at the beginning and end of the section.
  • Fluff and wear!!
Tutorial for the skirt of this Gorgeous Princess Gown!
You might also like:
Make princess crowns from Lace!!
Lace Crowns DIY (the original)  and new Tips for Perfect Lace Crowns
Make this BEAUTIFUL tutu tablecloth!
Princess Birthday Party Inspiration and Tutu Tablecloth Tutorial

Filed Under: Patterns and Tutorials, Sewing Tagged With: fabric, princess, skirts, special occasion clothing, tutorials

« the "brief appearance" dress
Inspiration Board – DIY »

Comments

  1. Sharon says

    February 28, 2012 at 10:21 pm

    very beautiful!! Lovely party as well!

    Reply
  2. Kristie-Creating Chaos says

    February 29, 2012 at 5:46 am

    I love it! I can’t wait to make my own. Mina will love it.

    Reply
  3. Jessica at Me Sew Crazy says

    February 29, 2012 at 1:21 pm

    this knocked me out – could she look anymore like a real princess? incredible!!!

    Reply
  4. Chris says

    March 1, 2012 at 3:25 am

    Hi Stef, this is adorable. I’m just stopping by to say how delightful your blog is. Thanks so much for sharing. I have recently found your blog and am now following you, and will visit often. Please stop by my blog and perhaps you would like to follow me also. Have a wonderful day. Hugs, Chris
    http://chelencarter-retiredandlovingit.blogspot.com/

    Reply
  5. Simple Simon & Co says

    March 1, 2012 at 3:49 am

    I really think this is one of my favorite dresses and photo shoots ever. It’s just so cute.

    When I saw your post yesterday I had to call Elizabeth and tell her that you had actually made 3 dresses for the party not just the 2 we had seen previously. Honestly I don’t know how you did it all. You are amazing.
    liZ

    Reply
  6. Simple Simon & Co says

    March 1, 2012 at 3:49 am

    I really think this is one of my favorite dresses and photo shoots ever. It’s just so cute.

    When I saw your post yesterday I had to call Elizabeth and tell her that you had actually made 3 dresses for the party not just the 2 we had seen previously. Honestly I don’t know how you did it all. You are amazing.
    liZ

    Reply
  7. Cassandra says

    March 3, 2012 at 11:32 am

    Oh… this just gushes with gorgeousness!!! I love it!

    Reply
  8. Anonymous says

    March 4, 2012 at 6:58 am

    You are simply amazing… I would love to have an inch of your talent – thank you for sharing

    Reply
  9. zanonymarts says

    March 7, 2012 at 7:51 pm

    Just wahou !!!!

    Reply
  10. Kate says

    March 8, 2012 at 2:19 am

    May I ask what pattern you used for the princess dress? I really like it, especially the tulle underneath. I have just found your blog and am a new sewer, so I am really enjoying your tutorials. I’m going to try the men’s shirt dress tomorrow (just have to figure out shirring). I have been looking at princess dresses for my daughter’s birthday and it’s really hard to judge by looking at patterns at the store. I’d like to make one that someone recommends 🙂 Thanks for a great blog! Definitely adding it to my favorites 🙂

    Reply
  11. Kate says

    March 13, 2012 at 3:13 am

    Oh, I forgot to give you my email. katedruchniak@gmail.com (if you could share where the pattern for the princess dress is from?) Also, I’ve finished a men’s shirty dress and it was SOOO much fun and is deliciously adorable! I added puffy sleeves and a bit of eyelet lace around the neck. Ahhhh….in love with sewing 🙂

    Reply
  12. Leslie :) says

    May 17, 2012 at 2:50 am

    So cute! I need those cake stands! Where did you find them??

    Reply
  13. Mammy Made says

    June 5, 2012 at 5:56 pm

    Hiya babe. Just wanted to let you know that I featured this on my blog yesterday. Too cute!! I would love it if you could check it out and grab my button 🙂

    http://mammymade.blogspot.co.uk/2012/06/mint-stuff-ive-seen-16.html

    – Adele @ Mammy Made

    Reply
  14. Sew Set says

    July 23, 2012 at 11:22 am

    this is absolutely the sweetest thing Stef! I am so thankful you shared it with SewSet. I featured it as one of today’s top patterns. L-o-v-e.

    Thank you again!
    – Jess, SewSet.com

    Reply
  15. Jackie says

    July 25, 2012 at 2:28 am

    This dress is so precious! I would love to make one for my daughter, but I am new to sewing. Would you be able to give me an idea of how you made the entire dress? Were you working off of a pattern?

    Reply
  16. Jane J. says

    November 24, 2012 at 11:42 pm

    Just discovered your Website through Pinterest. And I LOVE it! If it’s pink with ruffles, lace and goo-gaws, I love it! I’ve even posted the URL to my Facebook home page for those like me.

    Reply
  17. Paige says

    December 31, 2012 at 4:25 am

    Love this!! Question on the tulle underlayer, did you just make a skirt sort of similar to the ruffled pettiskirt? Except not ruffled? Does that make sense? LOVE your blog…so so cute! Thanks for all the wonderful inspiration.

    Reply
    • Stef says

      December 31, 2012 at 4:34 am

      Hi Paige,

      Yes, very similar to the pettiskirt tutorial, except all of the layers were one length. You will need an underskirt layer (soft against the skin), two layers of a stiff tulle, and 2-3 layers of the fluffier, lightweight tulle. Stack them all, gather them all, sew them onto a waistband! If your underskirt isn’t fluffy enough or stiff enough to hold out the skirt of the gown, you’re not going to get the same effect! It kind of needs to be a heavy duty underskirt! Have fun!

      Reply
      • pam says

        July 26, 2013 at 8:06 am

        Is there a pattern for the underskirt. I’m not understanding how it is made. tutorial?

        Reply
        • girlinspired says

          July 28, 2013 at 10:16 pm

          Hi Pam, the underskirt is basically like a big, puffy tutu. Lots and lots of layers of tulle! The princess dress pattern that is for sale as part of the Five and Ten Designs Volume One eBook shows how to build the underskirt directly into the dress – you can find the eBook at fiveandtendesigns.com and read more about the dress here: https://thegirlinspired.com/2013/07/princess-dress-sewing-pattern/

          Reply
  18. Liz says

    January 30, 2013 at 10:49 pm

    I absolutely love this dress and am hoping to make a version of this for my daughter’s 3rd birthday. What pattern did you use for the actual dress part? Thank you!

    Reply
    • Dodie Winebrenner says

      July 2, 2013 at 11:28 pm

      I love this dress. I have three granddaughters I am sure would love it as well. I am wondering if a hoop sewn in the underskirt layer would help the tulle fluff more and be able to hold the satan weight of the skirt better so it would stand out, thus you would not have to have so much tulle scrunched up around the waist?

      Reply
  19. Kristin Kirch says

    February 15, 2013 at 3:25 pm

    Gorgeous!!!!!!!! I love this dress. I am going to plan a whole party around it. 🙂 THank you so much for your tutorial!!

    Reply
  20. Mandy Saunders says

    March 8, 2013 at 8:47 pm

    Wow. Just wow. That dress looks straight from Disney, but classier. Until now I didn’t realize that was possible. So awesome.

    Reply
  21. Mandy Saunders says

    March 8, 2013 at 8:47 pm

    Wow. Just wow. That dress looks straight from Disney, but classier. Until now I didn’t realize that was possible. So awesome.

    Reply
  22. Mama Pixie says

    March 26, 2013 at 3:49 pm

    Are you aware that there is a page on Facebook using your photograph of your daughter as their profile picture, claiming they can order this dress for customers?

    http://www.facebook.com/pages/Princess-Jessica-Clothing/319133001490872

    Reply
  23. Annie says

    May 29, 2013 at 8:01 pm

    Thank you for this tutorial! You helped me make the first princess dress for my daughter!

    Reply
  24. Rosnéia Toneti Barboza says

    November 7, 2013 at 4:46 am

    Muito lindo….um sonho….

    Reply
  25. Gina says

    January 26, 2014 at 1:30 pm

    Do u think u can make one for my little girl? Her birthday is in march I would so pay for if u make it!!!! Can u email me ……bgina83@aol.com

    Reply
    • girlinspired says

      February 17, 2014 at 11:17 pm

      Hi Gina,

      Unfortunatley, I’m no longer taking custom clothing orders. I hope you find the perfect outfit for your little girls birthday! xo, Stef

      Reply

Trackbacks

  1. Princess Dress Sewing Pattern for Girls - girl. Inspired. says:
    July 25, 2013 at 5:00 am

    […] among the little girls in my life and I receive frequent emails asking for a pattern for the other princess dress I designed more than a year ago.  So, I’m happy to give you all the tools you’ll need […]

    Reply
  2. we’re {wild} about home made princess dresses | Wild Wandering says:
    August 7, 2013 at 5:44 am

    […] If your cutie wants to be her OWN princess you could use Girl Inspired tutorial to make her a princess dress in her favorite colors. Tutorial HERE […]

    Reply
  3. Lace Princess Crowns - DIY - girl. Inspired. says:
    August 19, 2013 at 9:01 pm

    […] If you sew, I have a tutorial for the skirt portion of the dress, which is can be found here: https://thegirlinspired.com/2012/02/ready-to-bustle/ I hope your Royal Birthday Princess Party is a […]

    Reply

Leave a Reply Cancel reply

Your email address will not be published. Required fields are marked *

Recipe Rating


About Stef
  • Email
  • Facebook
  • Instagram
  • Pinterest
  • RSS
  • Twitter

Sharing Policy

It is my hope that you will find inspiration on the Girl. Inspired. blog. All photos are copyright protected by Girl. Inspired. If you wish to share something that you have seen here, I am absolutely thrilled! Please use only one picture with a direct link back to the project you are referencing. Thank you so much for your understanding!

Privacy Policy

What are You Looking For?

Copyright © 2022 · Foodie Child Theme by Shay Bocks · Built on the Genesis Framework · Powered by WordPress

288 shares