


This easy Oreo Cookie Balls Recipe makes bite size sweet treats that will satisfy those sweet tooth cravings without the need of making an entire dessert. These dessert balls are a simple mixture of crushed Oreo cookies and cream cheese. Roll into balls, dip to coat with chocolate, and you’re done! A very quick and easy dessert with simple ingredients. An Oreo no bake dessert ball is ALWAYS a good idea.
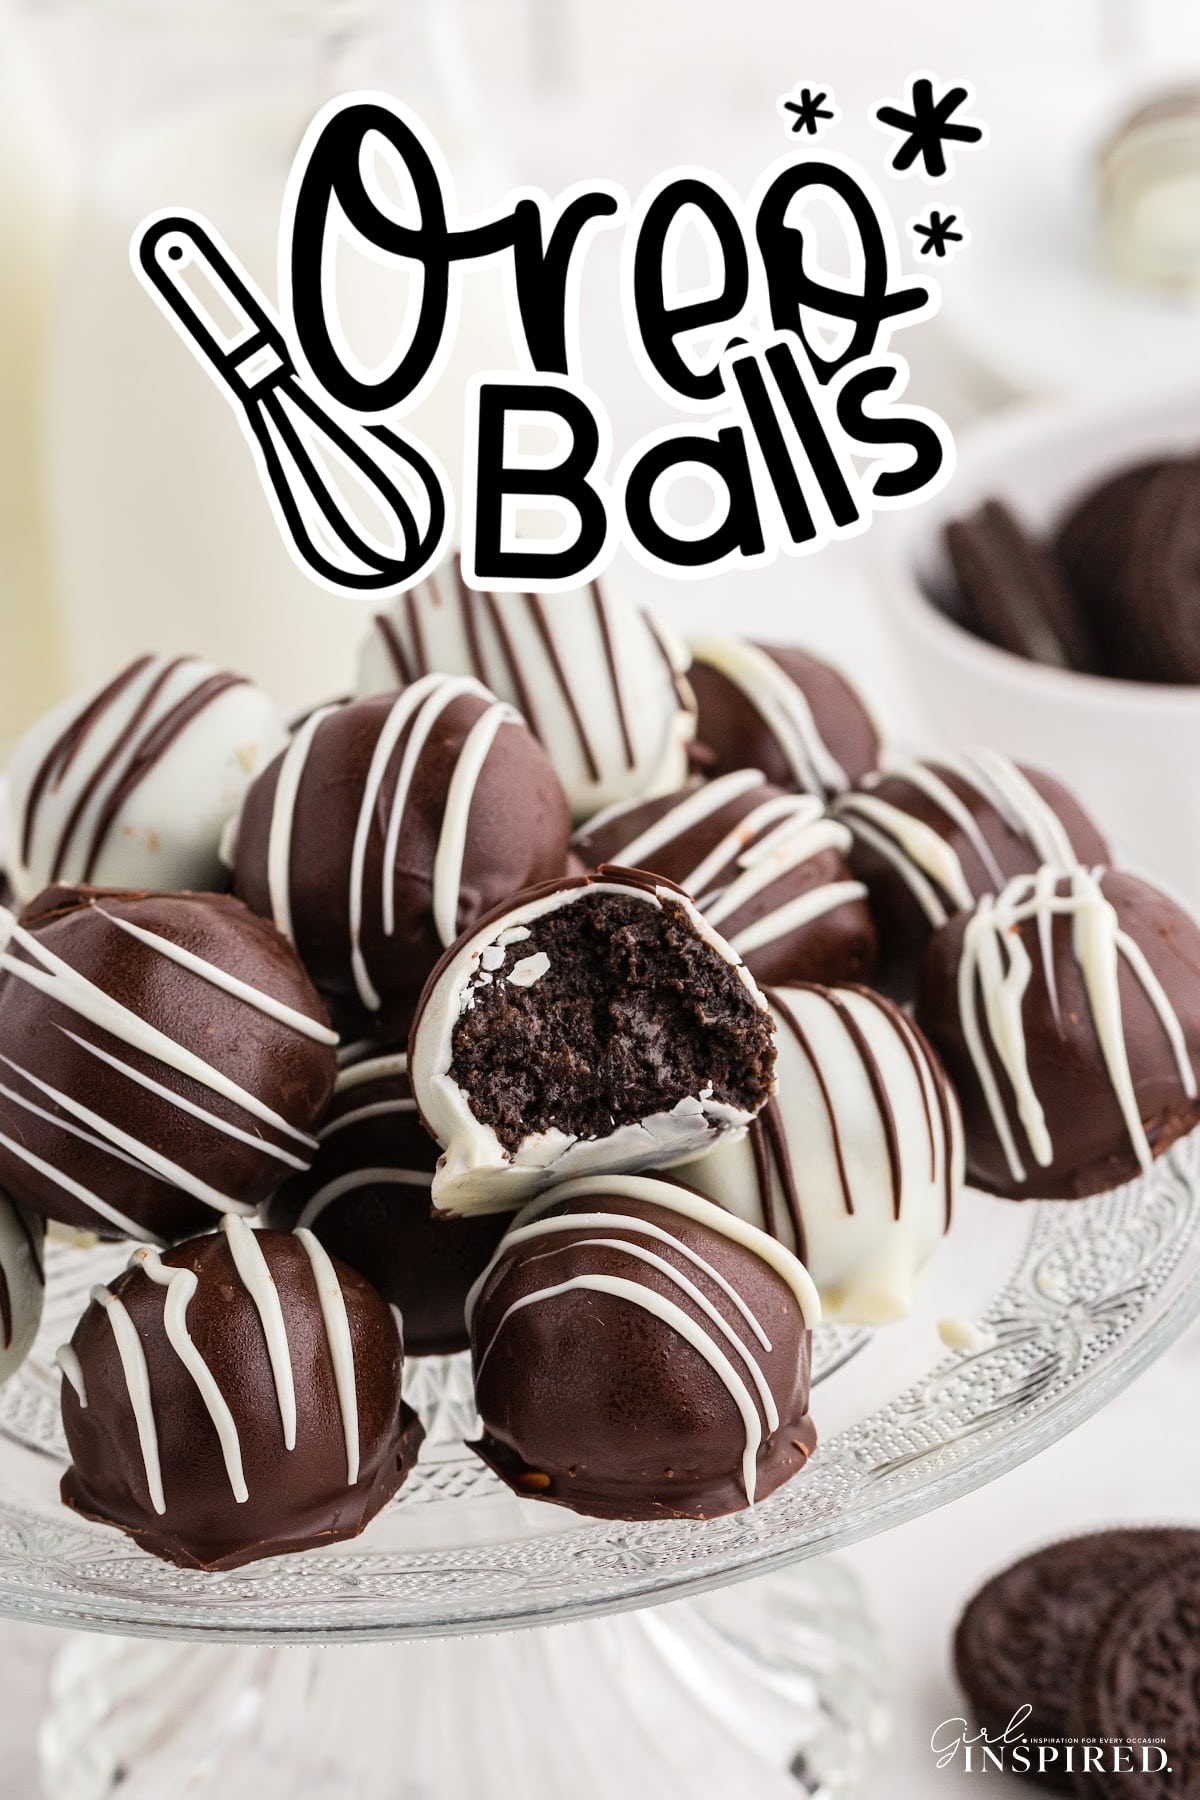
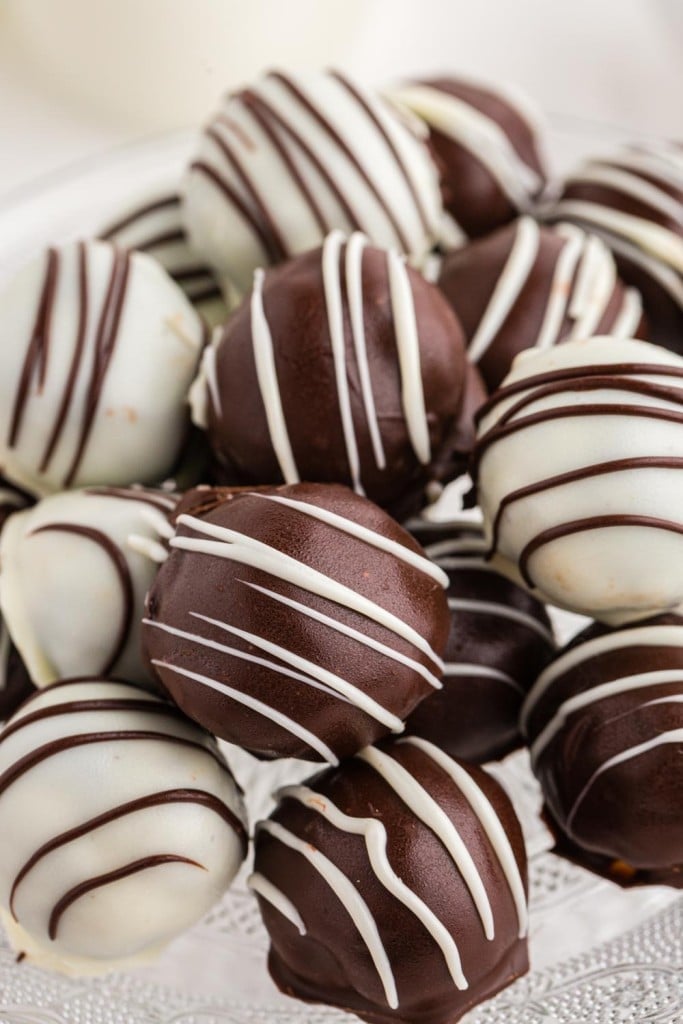
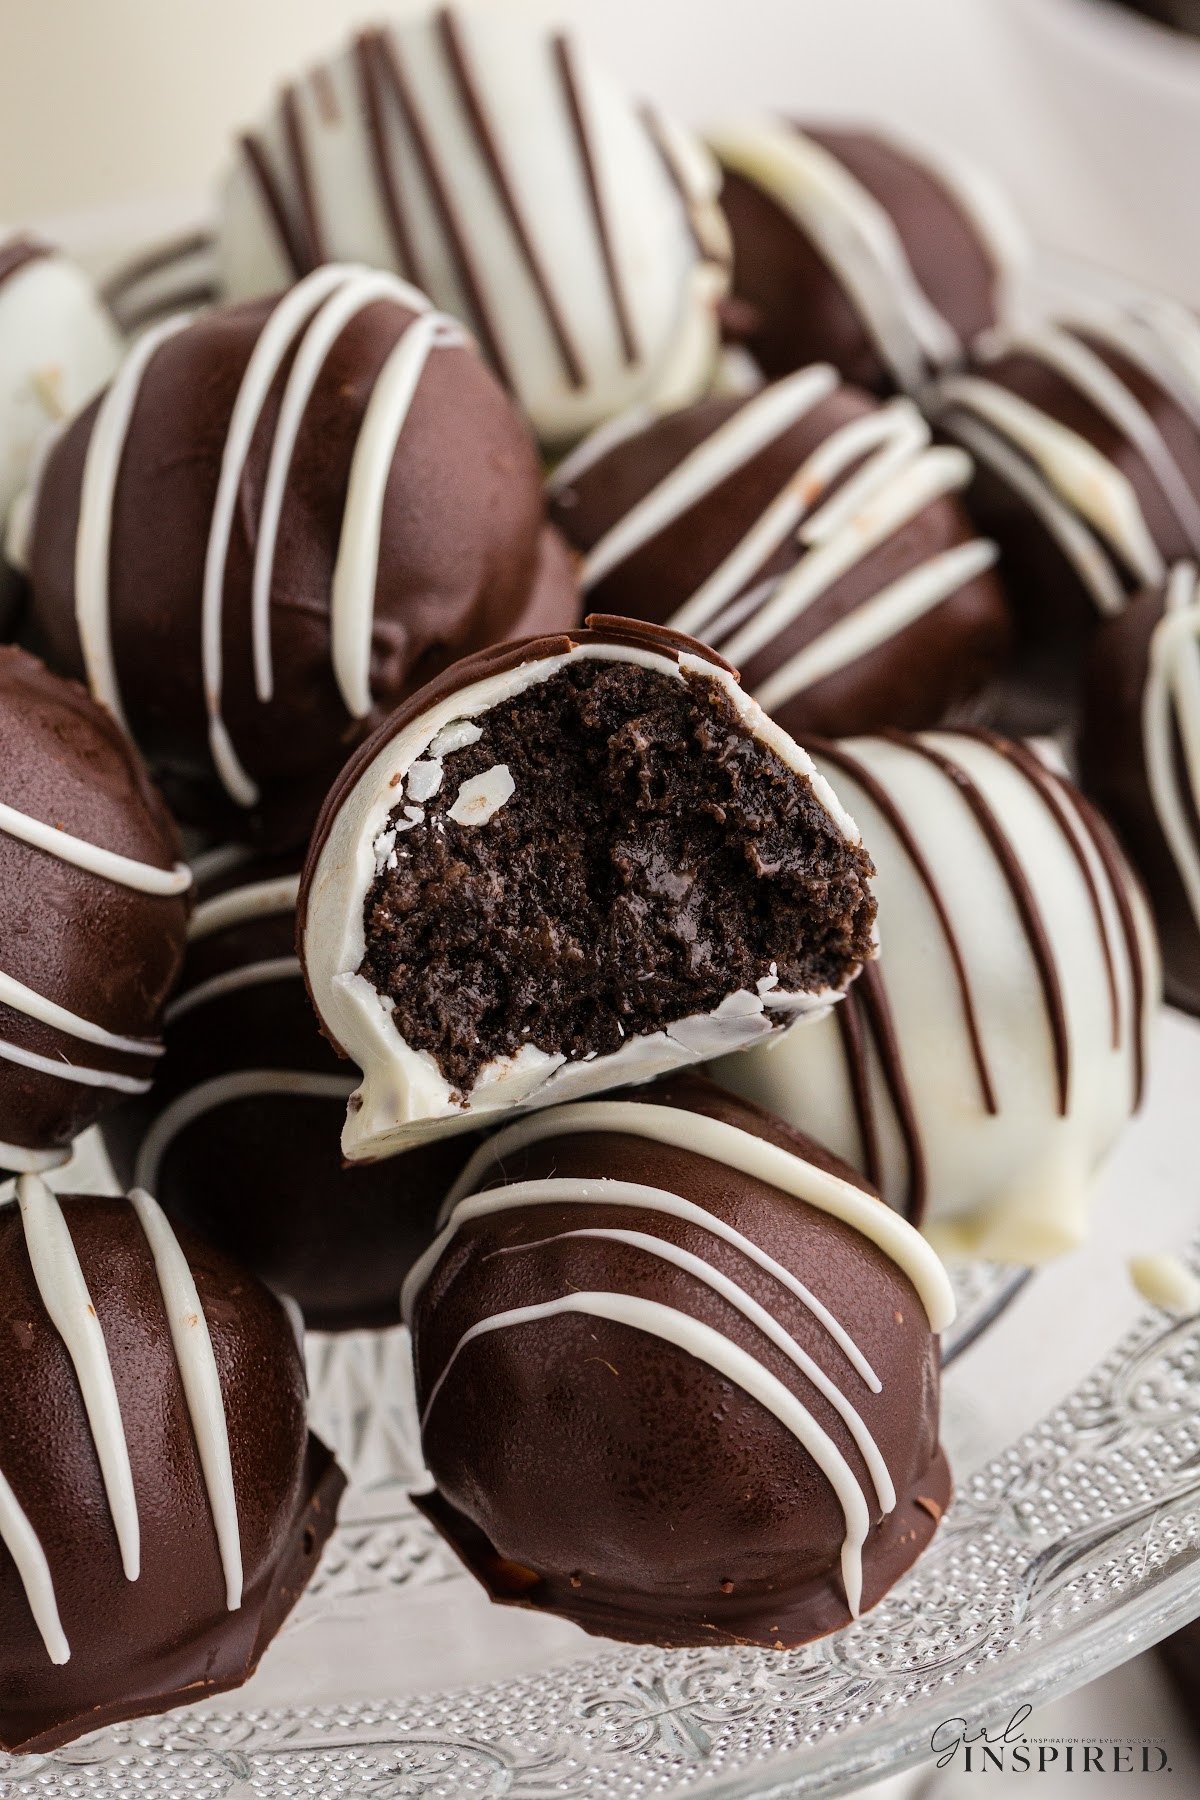
Delicious Oreo truffles are so addictive. They have a doughy, creamy chocolate cookie center and thin melted chocolate shell that instantly cracks upon first bite. The ingredient list is so short and I always love a no-bake treat!
Oreo cookie fans should also try our recipes for Chocolate Lasagna, Chocolate Cheesecake Trifle, and chocolate cream pie!
Jump to:
🍫 Ingredients:
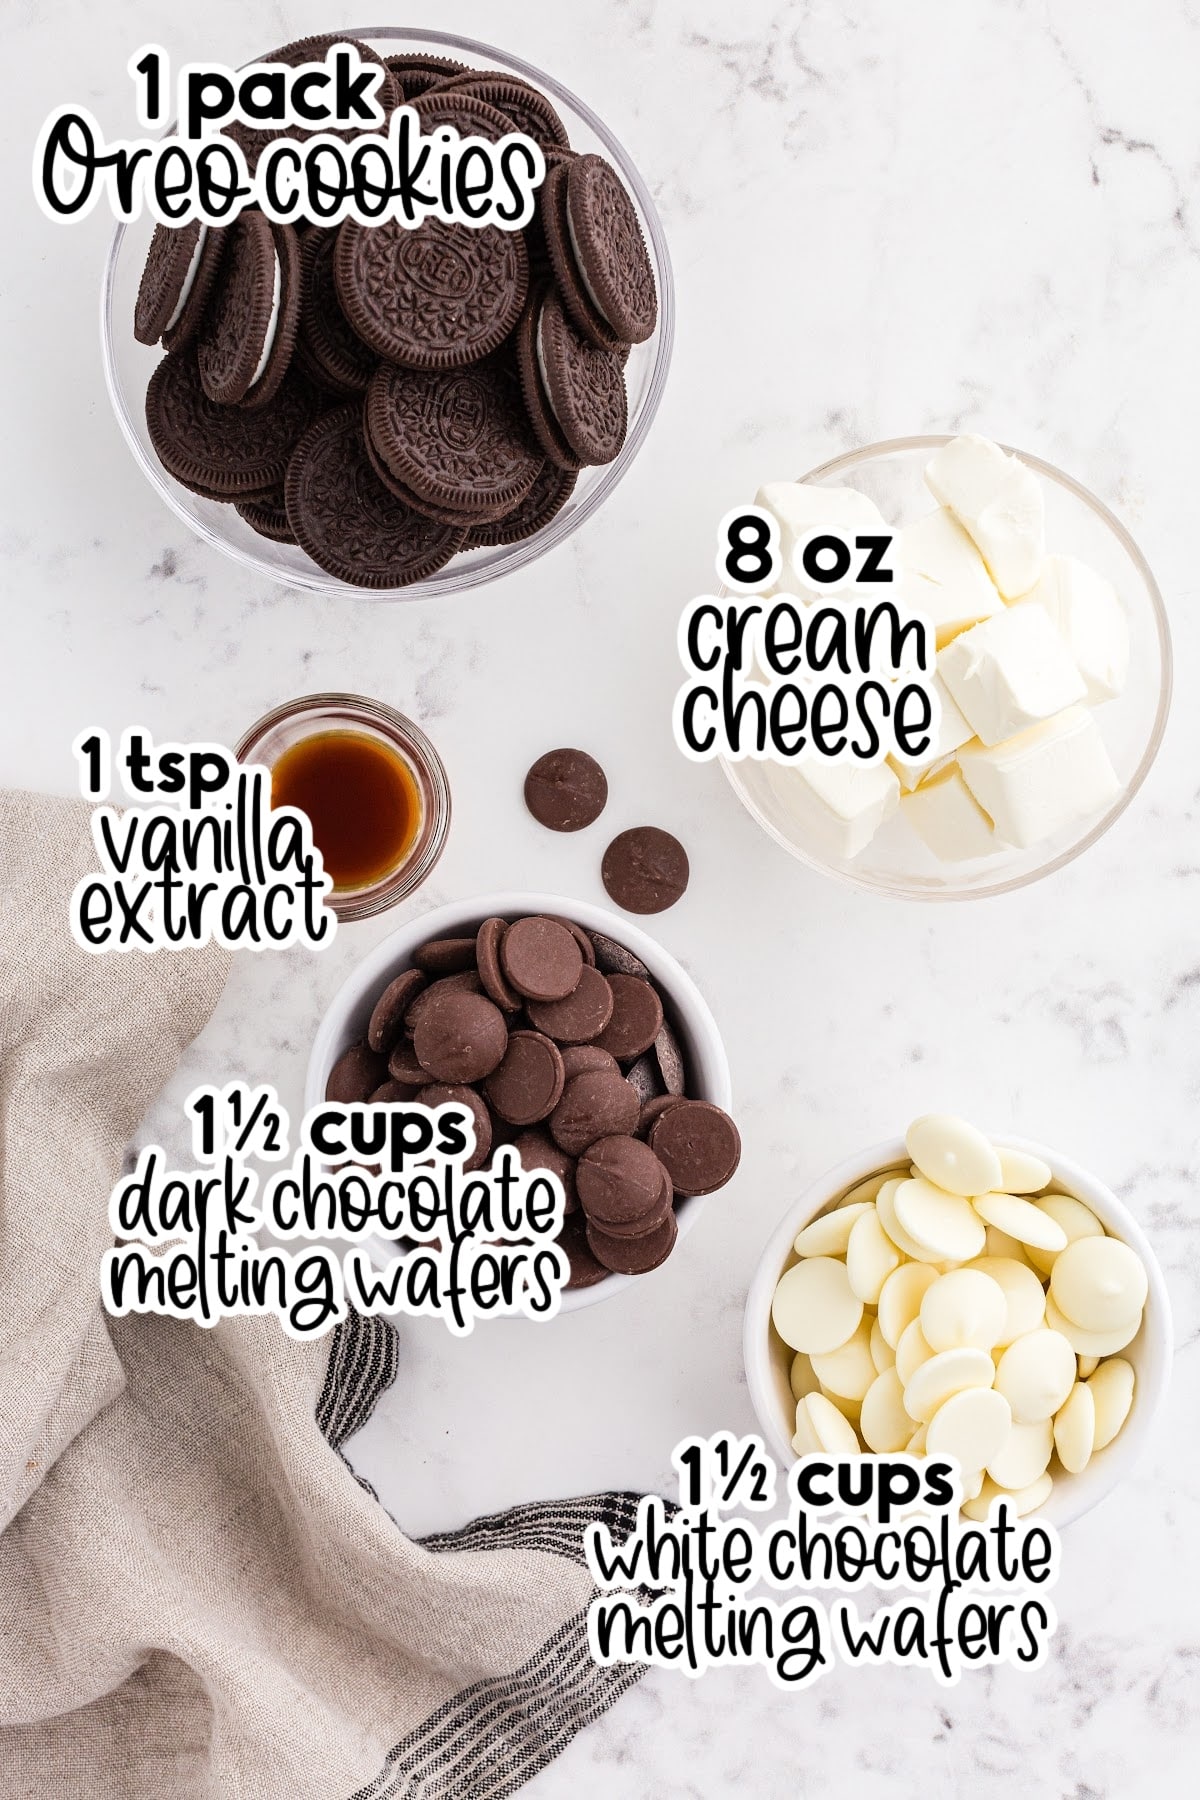
- 1 package Oreo cookies (about 36 cookies) – we use regular oreos instead of double stuffed or the other flavors that are available
- 8 oz. cream cheese, cut into pieces and softened – room temperature cream cheese helps it combine better in the food processor
- 1 teaspoon vanilla extract – this can be omitted
- 1 ½ cups dark or milk chocolate melting wafers (we love the Ghirardelli brand)
- 1 ½ cups white chocolate melting wafers
For a full list of ingredients and their measurements, 📋 please view my printable recipe card at the bottom of the post.
Optional Garnish:
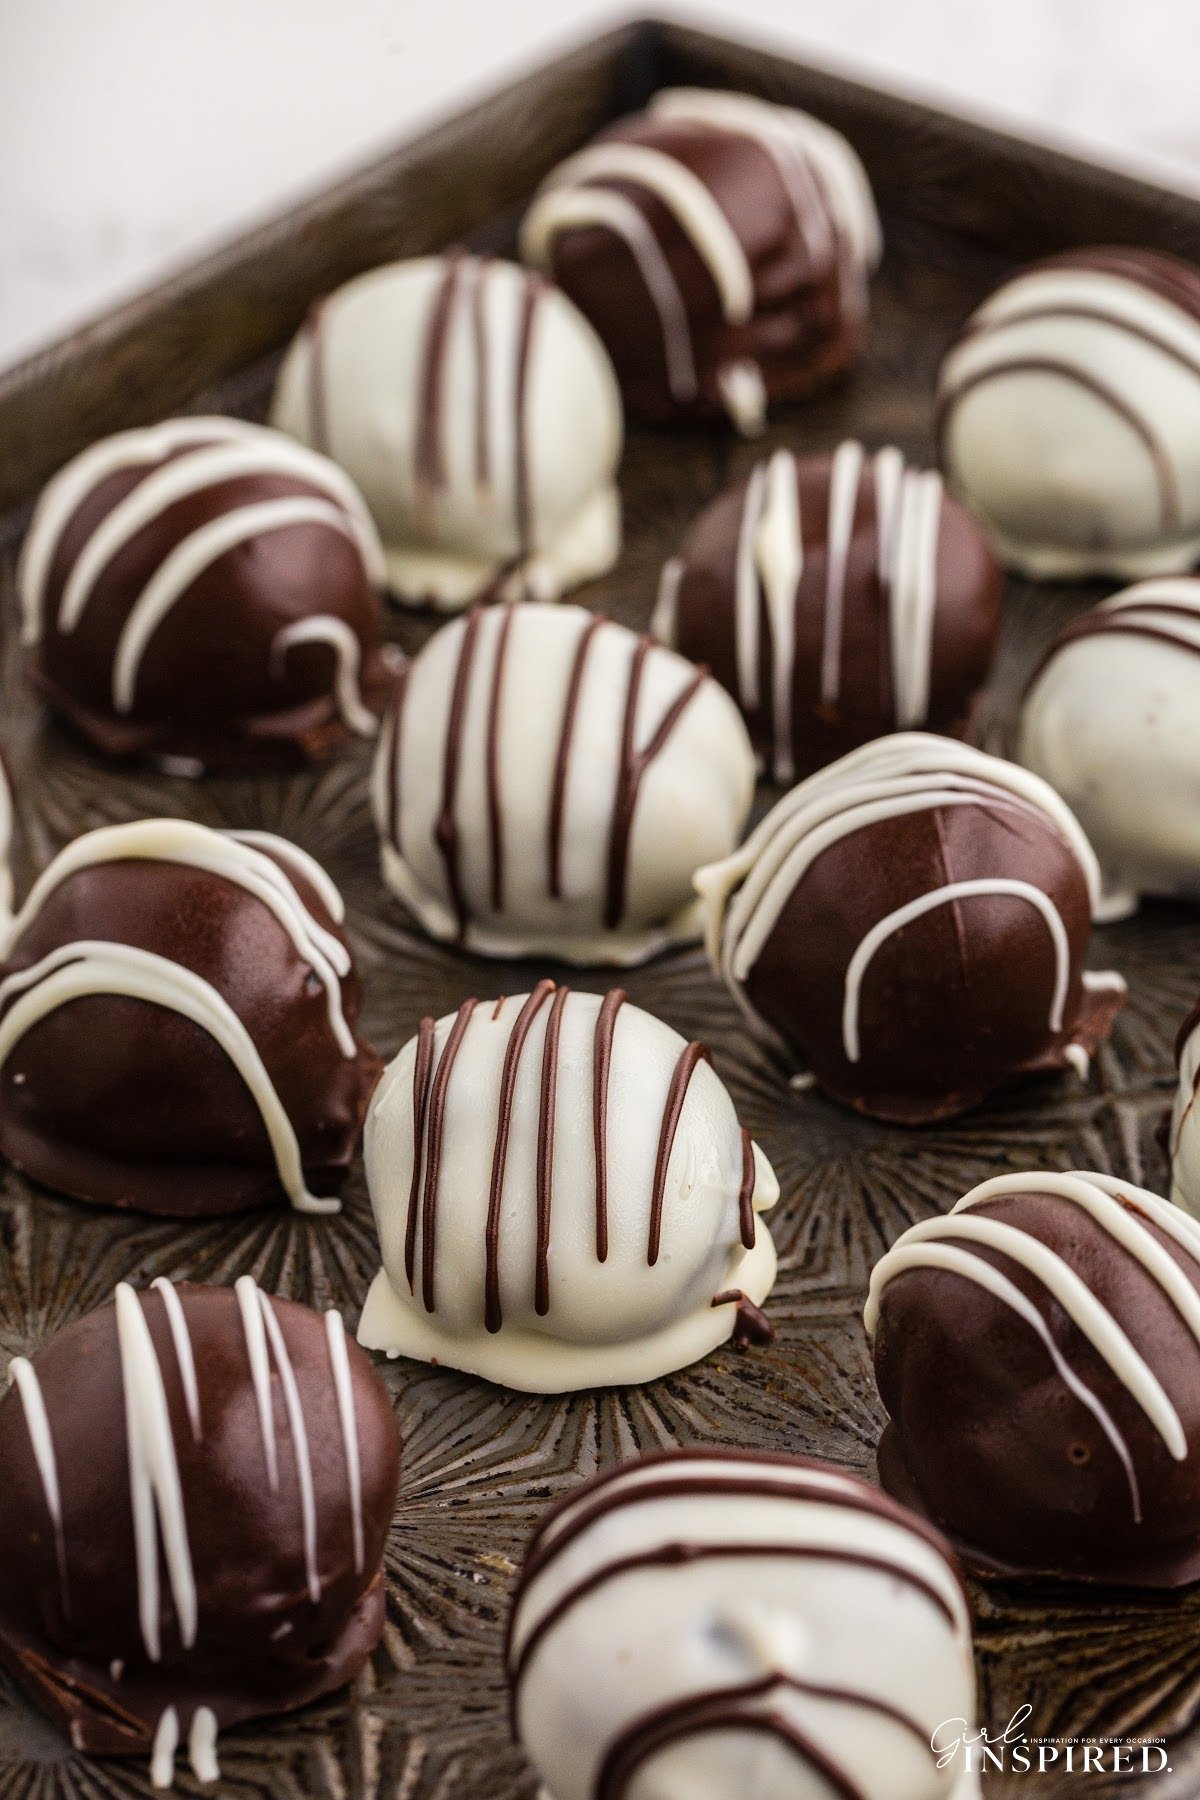
We’ve used a contrasting color chocolate drizzle to decorate this Oreo cookie balls recipe, but you can also sprinkle the tops with some crushed Oreo cookies or use colorful nonpareils or sprinkles to make your treats coordinate with a holiday or special occasion.
Substitutions and Variations
- Add some chopped roasted nuts (such as walnuts, macadamia or peanuts) into the cream cheese Oreo mixture for a nutty crunch. You could also add a whole roasted nut like a hazelnut to the center of each ball.
- Instead of using a mixture of dark chocolate and white chocolate melting wafers, try only white chocolate wafers for the chocolate coating. Or, only make dark chocolate coatings for your Oreo balls. You can easily color white chocolate with food gel for those special occasions such as a holiday theme, like Valentine’s day, St Patrick’s day or Halloween! Crushed candy cane pieces on top of your Oreo balls make a festive looking Christmas treat at holiday parties, too!
- Add some sprinkles while the chocolate coating is still wet or edible glitter.
- Add some chopped Maraschino cherries to your ball mixture. Cherries and chocolate are a delicious combo!
- Instead of vanilla extract, use peppermint extract, mint, or almond extract.
- Make Golden Oreo truffles instead – same steps, but vanilla flavored!
🔪 Instructions:
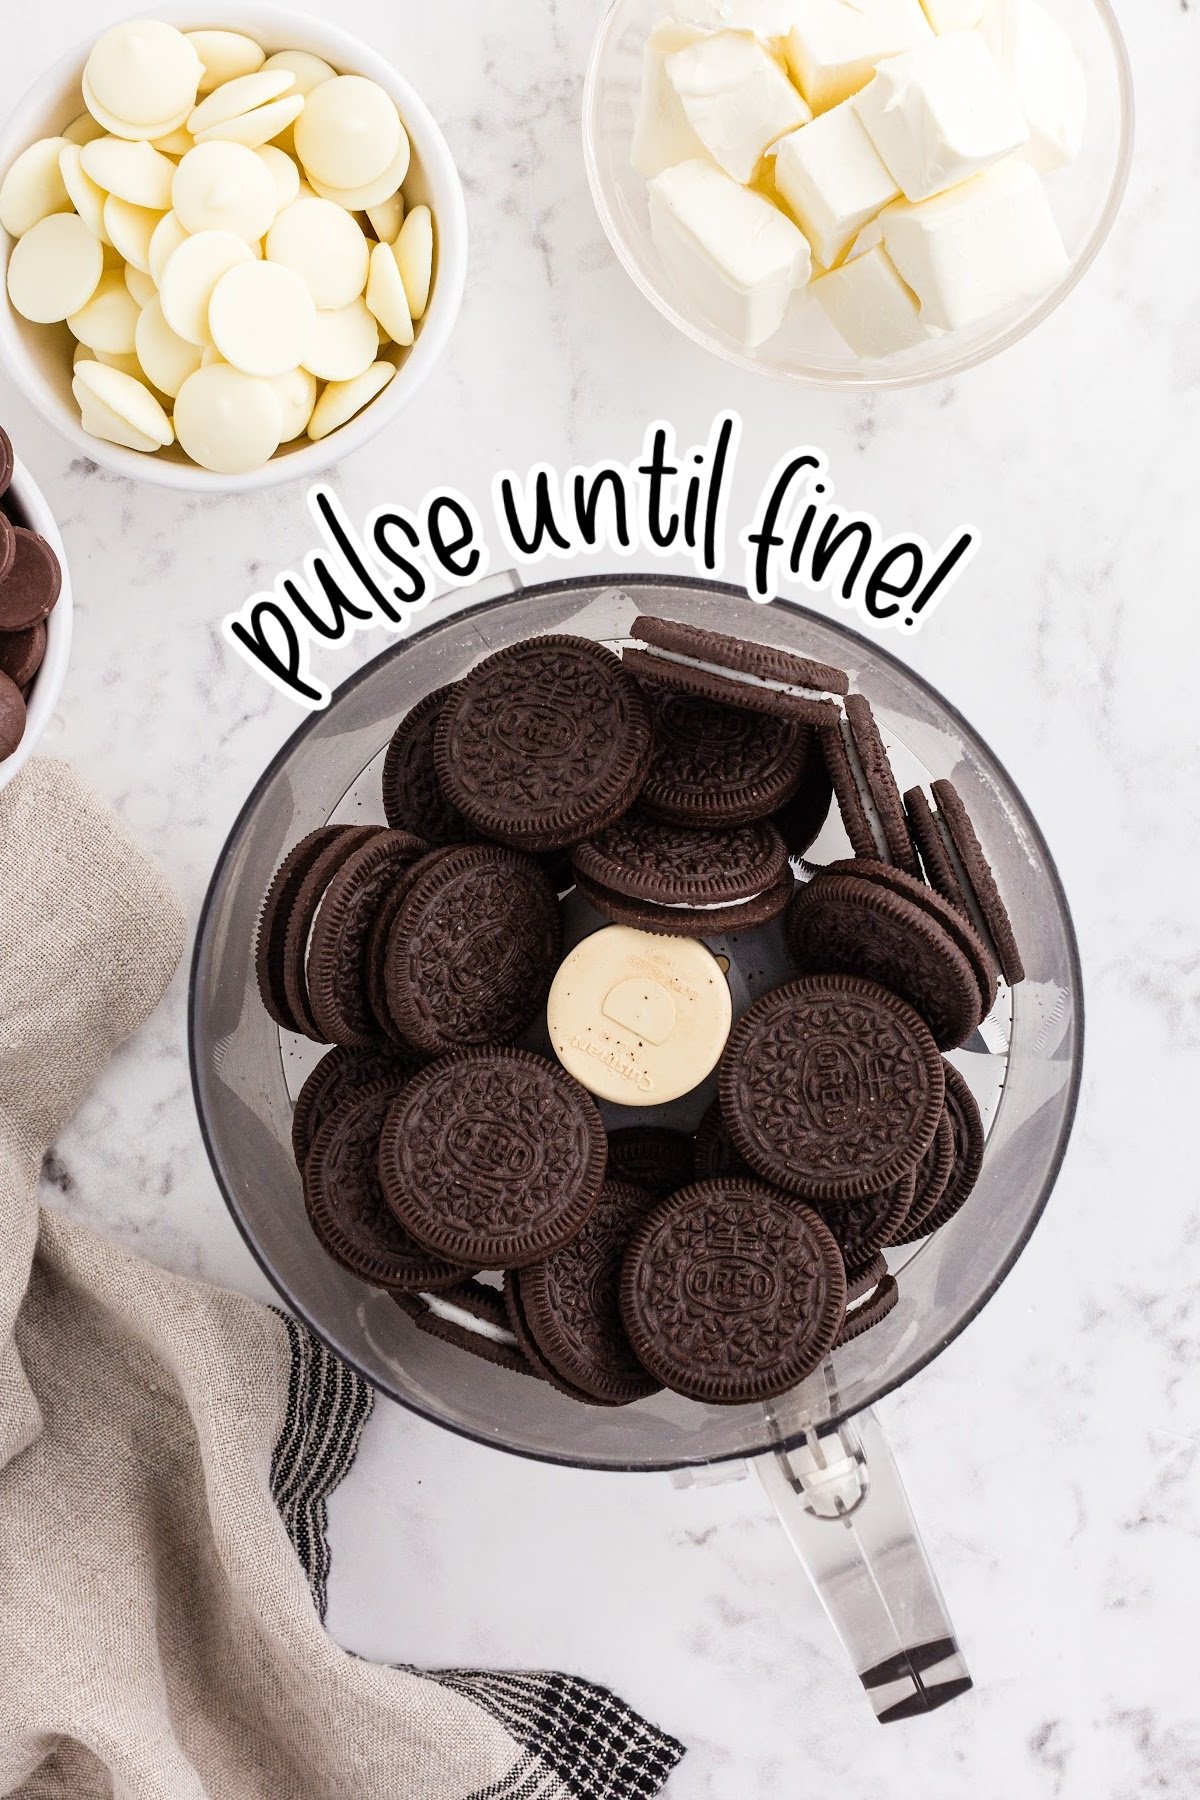
Step 1: Place Oreo cookies in the a food processor bowl and pulse until you’ve broken them down into even fine crumbs.
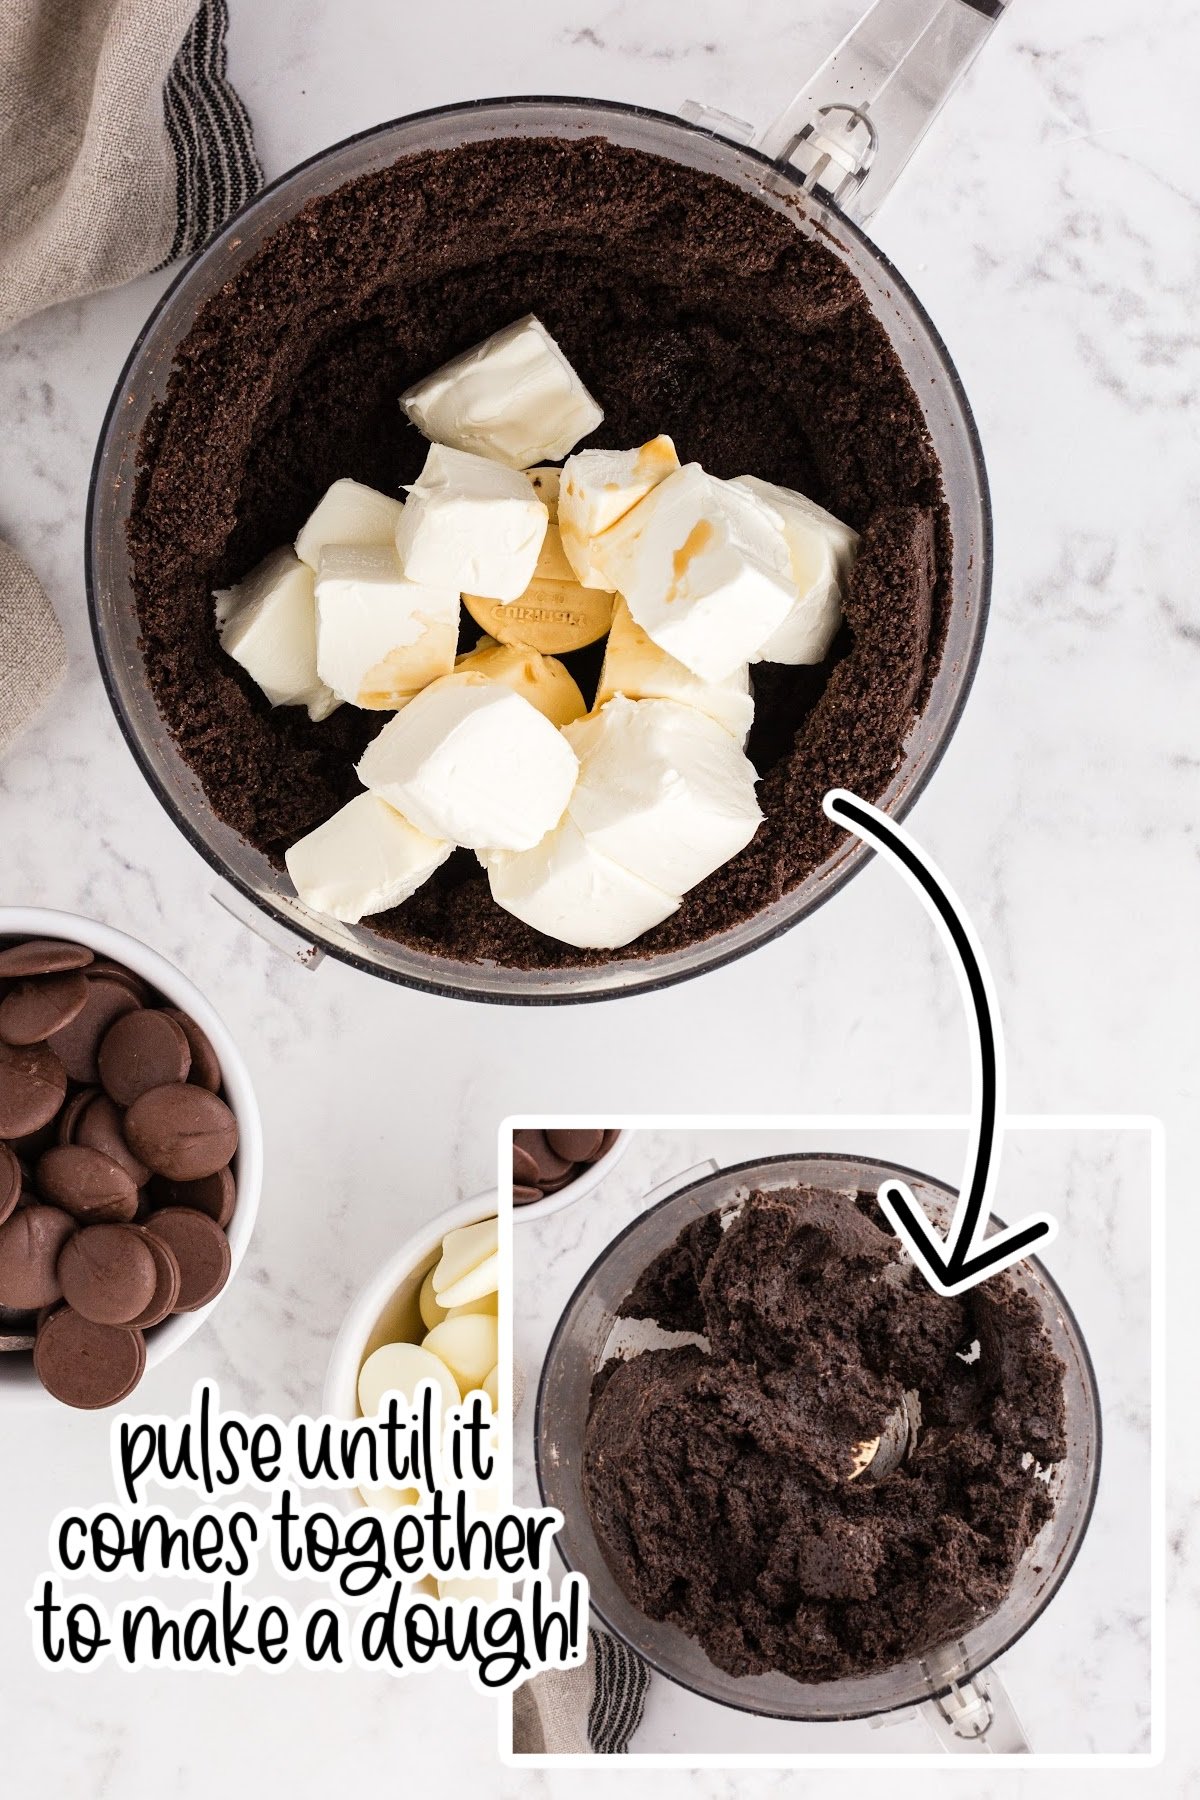
Step 2: Add the softened cream cheese and vanilla extract directly to the Oreo crumbs. Then, pulse until the mixture combines evenly and comes together making a “dough.”
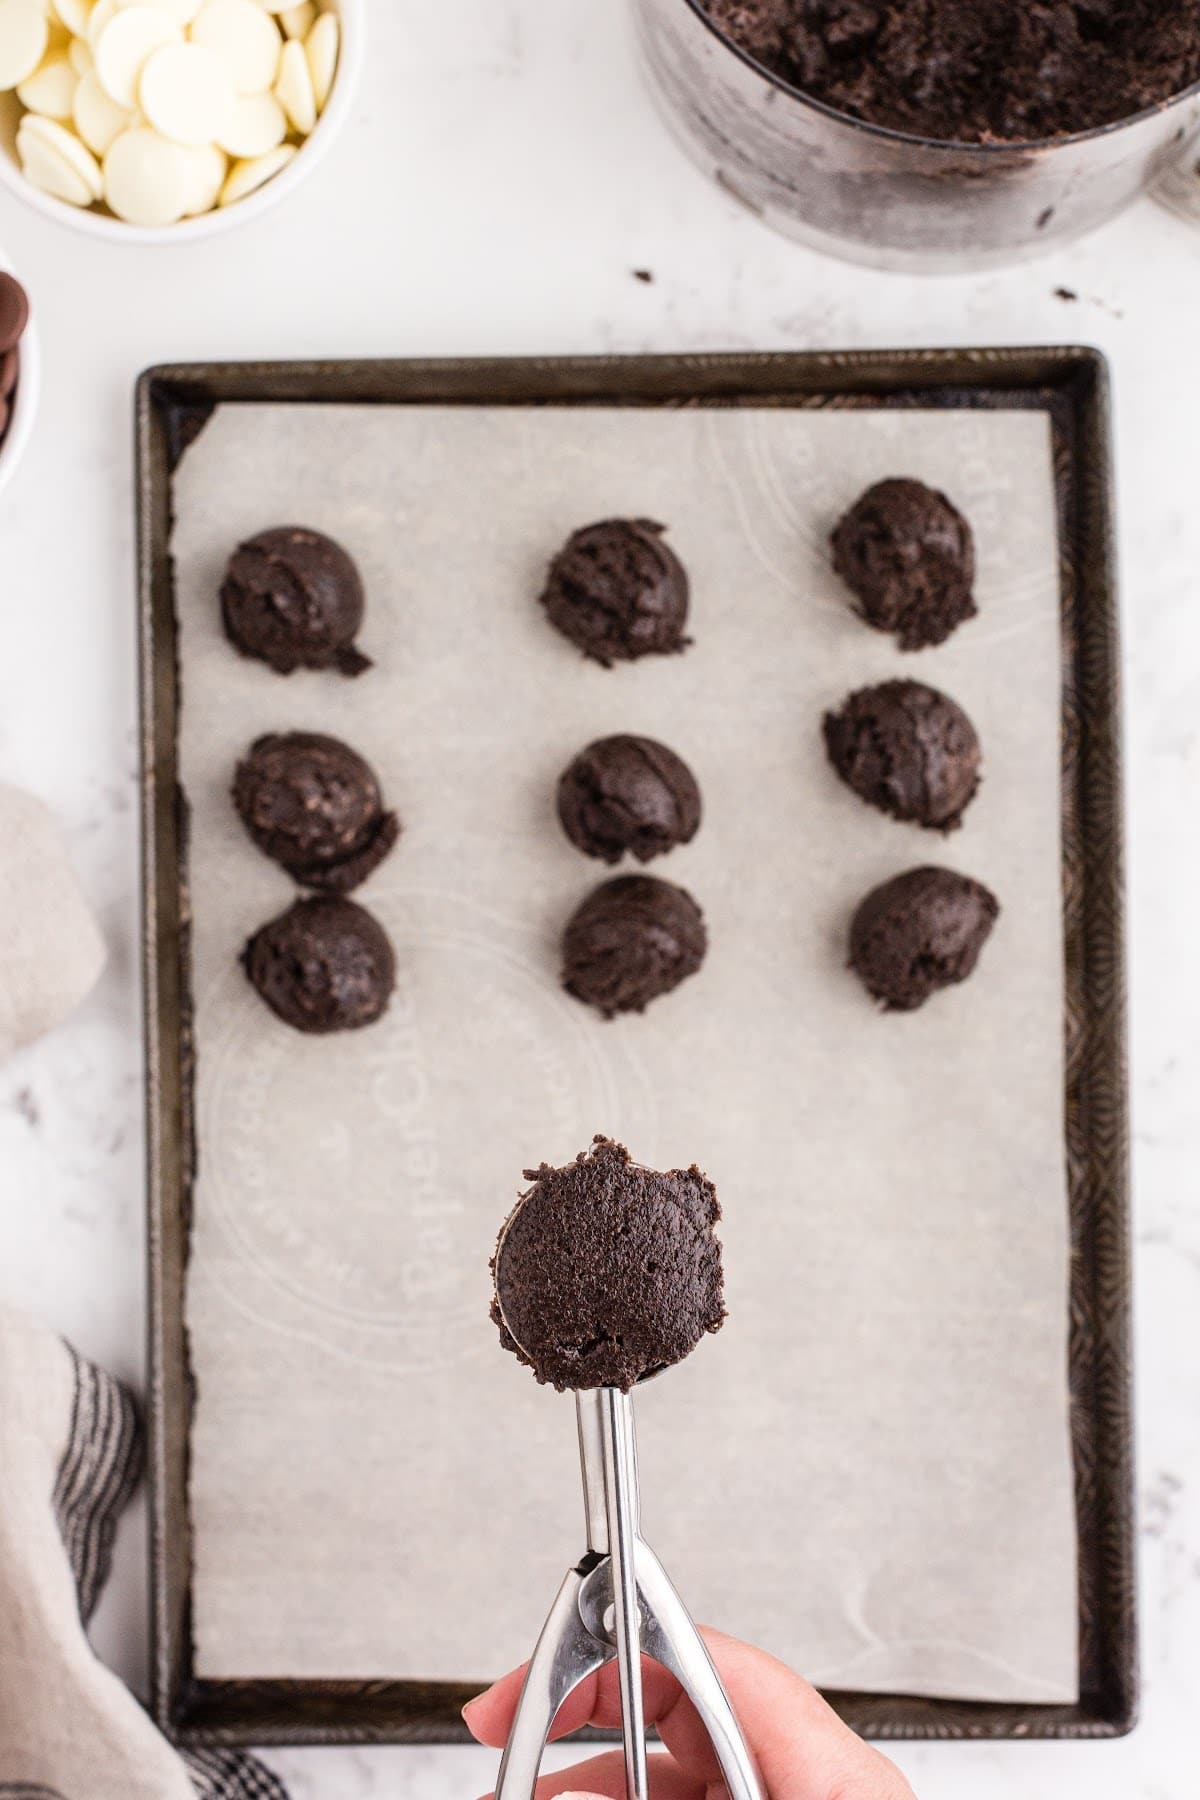
Step 3: Use a 1 ½ tablespoon cookie scoop to scoop balls of the Oreo mixture onto a prepared baking sheet lined with parchment paper or wax paper. Use your hands to roll them into smooth balls, if desired.

Step 4: Place the baking sheet with Oreo balls into the freezer to harden for about 20 minutes.
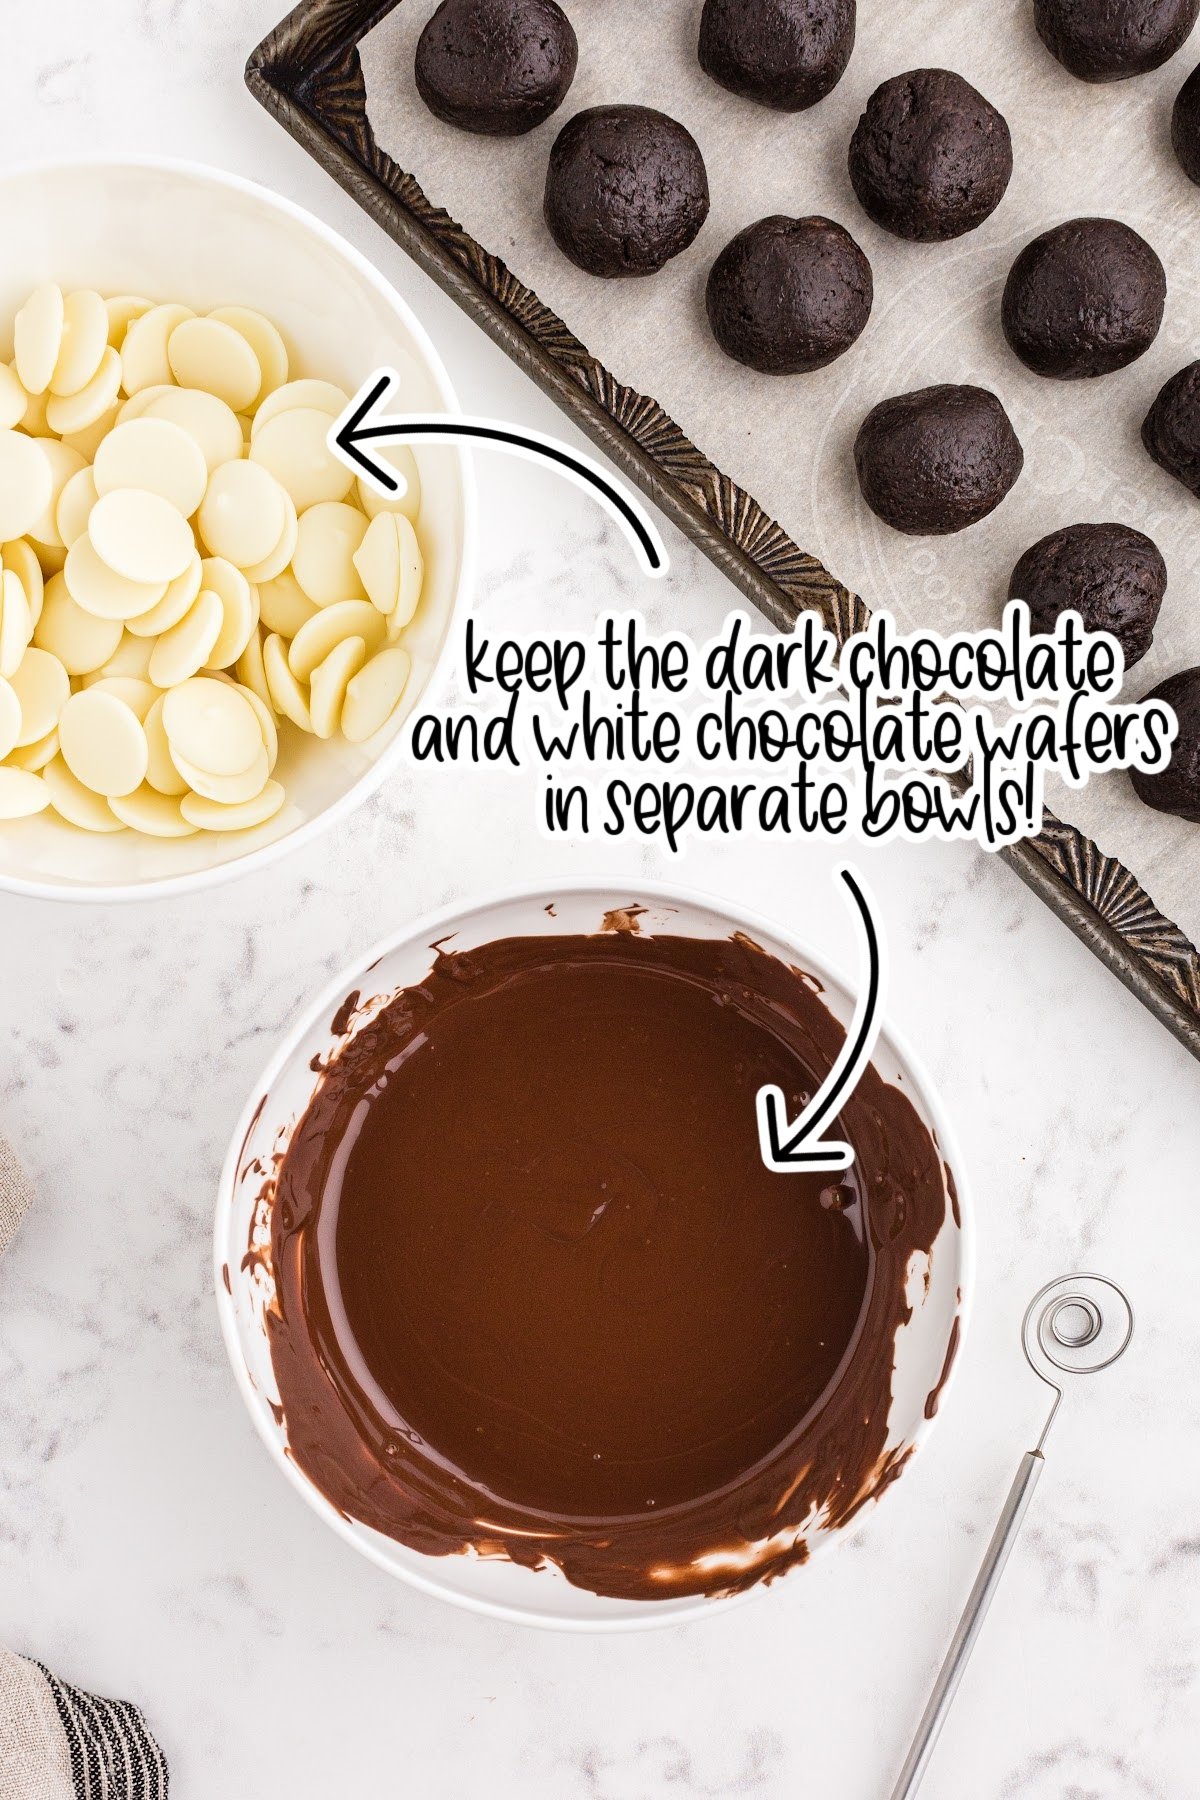
Step 5: Once the cookie balls are firm, place the melting wafers into a microwave-safe bowl. (Keep the milk chocolate and white chocolate wafers in separate bowls.)
Heat in 30-second increments, stirring between each, until you’ve mostly melted the chips. Stop heating and stir the mixture until it is fully melted and smooth.
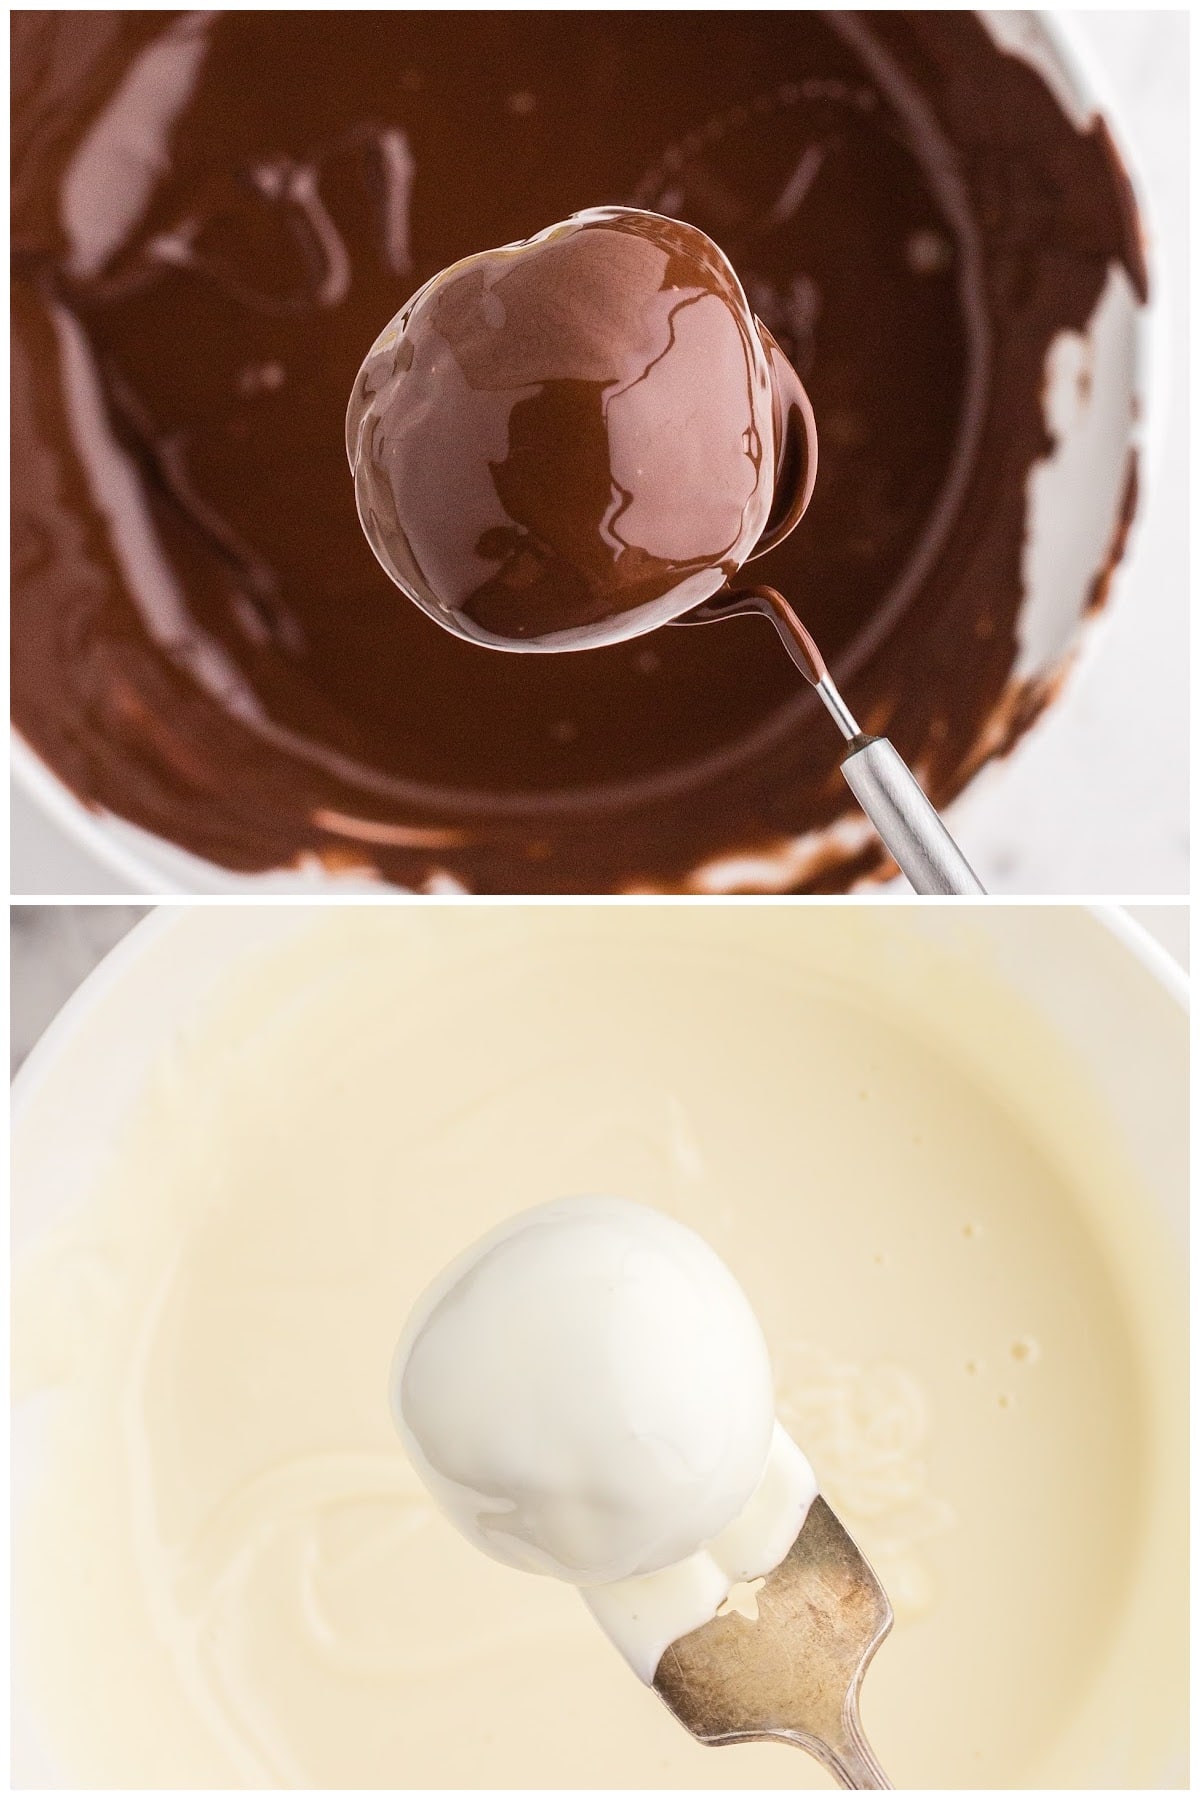
Step 6: Remove several Oreo balls from the freezer at a time. Use a fork to dip and roll each Oreo ball in the melted chocolate. Lift from the chocolate, tap to remove excess chocolate.
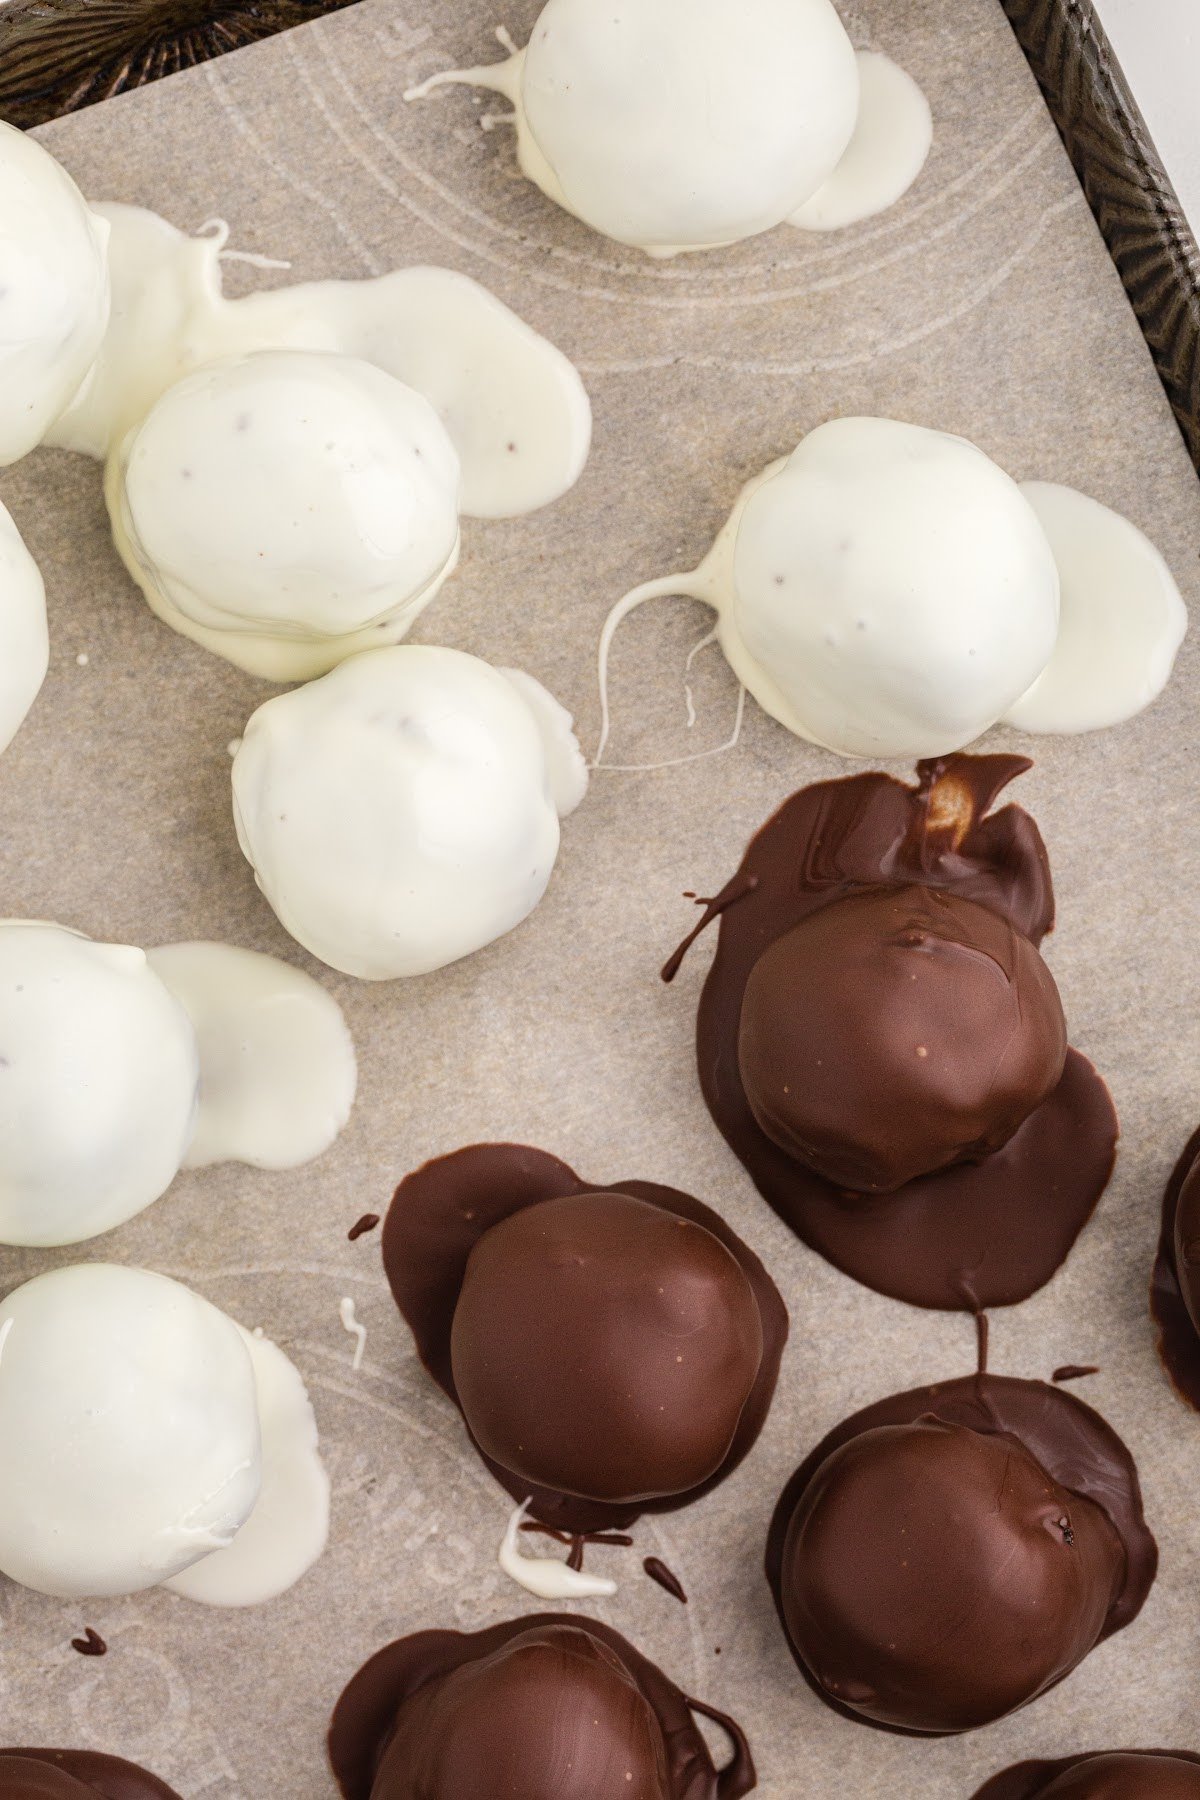
Step 7: Place on a sheet of waxed or parchment paper to set. Continue dipping and setting no bake Oreo balls. Coat half the balls in milk chocolate and half the balls in white chocolate.
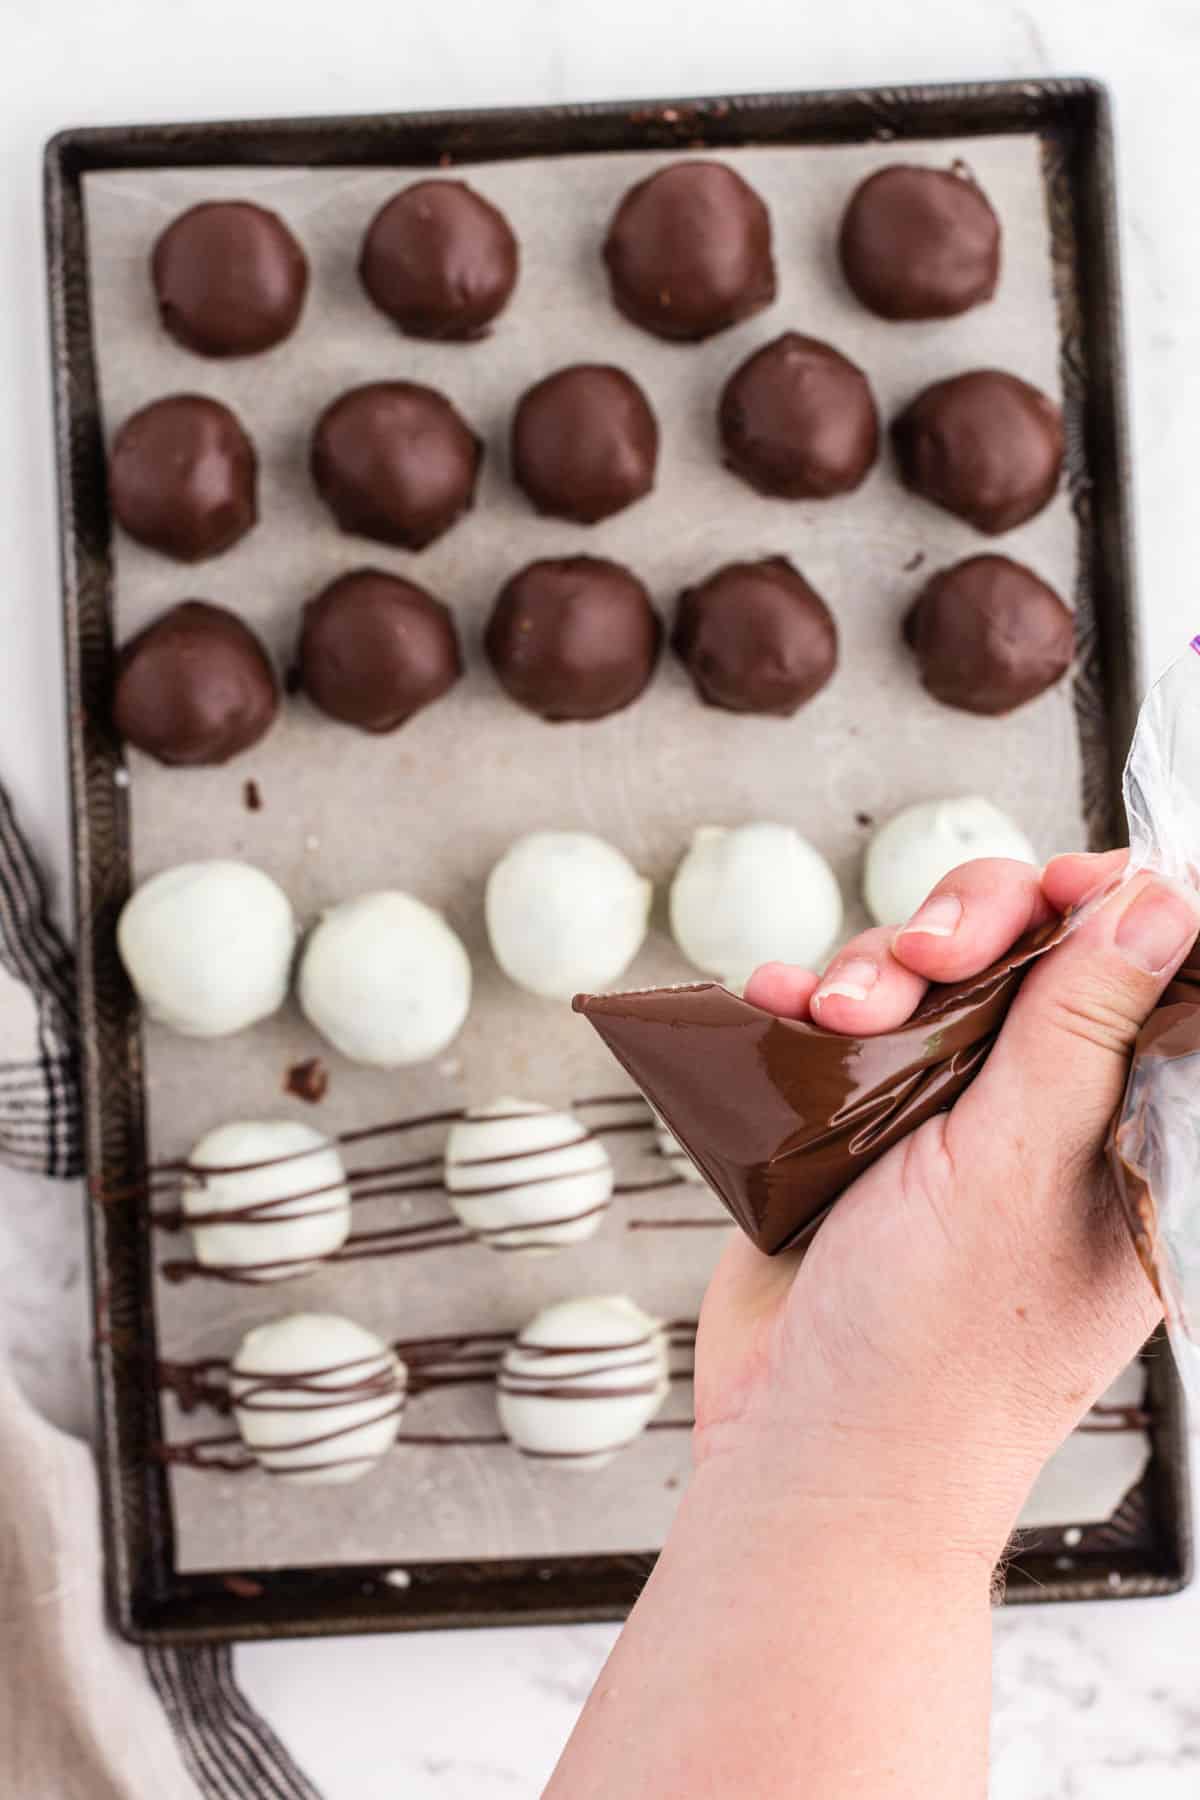
Step 8: When the balls are set (this only takes a few seconds), drizzle the top with the opposite type of chocolate for contrast. You could also top with crushed Oreo crumbs, sprinkles, chocolate curls, etc.
Pro Tip: If you have puddles around the bottom of your confections, run a toothpick around the base before the chocolate sets up. This is easier than breaking off the bases when you move them to a serving platter.
GARNISH/SLICE/SERVE: Serve immediately or store in a cool location until serving.
Recipe Tips for Oreo Cookie Balls
- Minimize the mess: Use parchment paper during the chocolate coating process. This will also prevent your balls from sticking to any surface while drying.
- Use a toothpick instead of a fork minimizes holes made in your Oreo balls while dipping them. However, I find it more difficult to keep the truffle stuck on the ball and prefer to simply hold the ball on top of a fork.
- Work quickly when dipping your Oreo balls. If the chocolate starts to harden while dipping the Oreo balls, reheat it for 15 second intervals, stirring in between, until it’s at the right consistency for dipping.
- You may want to limit yourself to working with 2 – 3 frozen Oreo balls at a time when dipping in chocolate. Leaving the others in the freezer until you’re ready to move on helps to keep the balls firm during the chocolate coating. You also won’t feel as pressurized during the process.
- The Ghirardelli brand of chocolate wafers in 10 oz. bag that I like to use measures out to 1 ½ cups.
- You can use chocolate chips (and/or white chocolate chips) instead of the melting wafers. Follow the same instructions for melting and dipping, but add 1 teaspoon of shortening per cup of chips when melting. The shortening helps create a smoother and more even consistency for coating your balls than using melted chocolate chips alone.
- If you’re making these Oreo balls on a hot day or during summer, place the dipped Oreo balls back into the freezer or refrigerator for a few minutes after dipping. This will help the chocolate set faster. Please note that condensation will form on the chocolate coating if you do place them in the fridge or freezer. This doesn’t effect the flavor!
Fun Fact
Since 1912, nearly half a trillion Oreo cookies have been sold around the world. In 2011 alone, more than 35 billion were sold, and more than 10 billion of those were sold in the United States.
Recipe FAQs
You can store your Oreo Balls in the refrigerator in an airtight container for up to 1 week, or in the freezer for up to 3 months. To save some space in your freezer, you can store your Oreo balls in a Ziplock bag or freezer bag once they are completely frozen. This ensures they won’t stick together. Since these Oreo balls contain cream cheese, I do not recommend storing them at room temperature for any extended amount of time
Yes, you can make these Oreo balls ahead of time. With that said, sometimes condensation forms on the chocolate ball coating when you store them in the freezer, or your chocolate coating can “bloom” which is a discoloration of the chocolate. It’s still edible, it just doesn’t look as pretty.
If you are going to serve these to guests or at a party, store your Oreo balls in the refrigerator. I usually make mine a couple hours prior to serving and keep them cool before enjoying them.
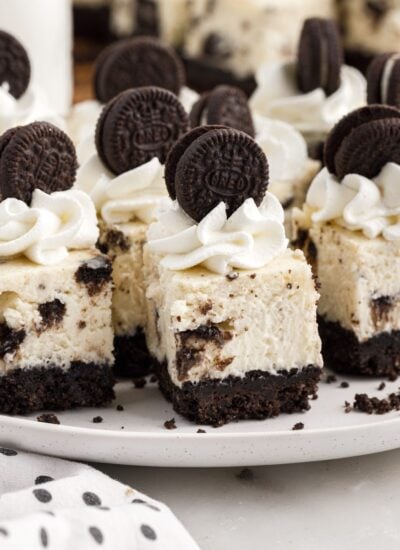
Oreo Balls are bite size sweet treats made with a mixture of Oreo cookie crumbs, cream cheese, vanilla extract, and white and dark candy melts. They’re incredibly quick and easy to make. These are perfect for high tea and hand-held desserts.
When you chill the soft Oreo filling, it contracts. When the filling is coated in chocolate, it can warm and expand, which sometimes causes the candy coating to crack. To minimize this, only chill the Oreo balls long enough for them to hold their shape while coating. If you freeze the balls for longer than a few minutes, let them warm up a bit before coating in the melted chocolate. Ultimately, you can redip any balls that crack for a uniform finish.
More Treats for OREO LOVERS

If you tried these Oreo Balls or other great recipes on my website, please please leave a 🌟 star rating and let me know how you liked it in the 📝 comments below.

Oreo Cookie Balls Recipe
Ingredients
- 1 package Oreo cookies about 36 cookies
- 8 oz. cream cheese cut into pieces and softened
- 1 teaspoon vanilla extract
- 1 ½ cups dark or milk chocolate melting wafers we love the Ghirardelli brand
- 1 ½ cups white chocolate melting wafers
Instructions
- Place Oreo cookies in the bowl of a food processor and pulse until they have been broken down into fine, even crumbs.
- Add the cream cheese and vanilla extract directly to the Oreo crumbs and pulse until the mixture combines evenly and comes together making a “dough.”
- Use a 1 ½ tablespoon cookie scoop to scoop balls of the Oreo mixture onto a baking sheet lined with parchment paper. Use your hands to roll them into smooth balls, if desired.
- Place the baking sheet with Oreo balls into the freezer to harden – 20 minutes.
- Once the balls are firmed up, place the melting wafers into a microwave-safe bowl. (Keep the milk chocolate and white chocolate wafers in separate bowls.)
- Heat in 30-second increments, stirring between each, until chips are mostly melted.
- Stop heating and continue stirring until the mixture is fully melted and smooth.
- Remove several Oreo balls from the freezer at a time. Use a fork to dip and roll each Oreo ball in the melted chocolate. Lift from the chocolate, tap to remove excess chocolate, and place on a sheet of waxed or parchment paper to set.
- Continue dipping and setting Oreo balls – coat half of the balls in milk chocolate and half of the balls in white chocolate.
- When the balls are set (this only takes a few seconds), drizzle the top with the opposite type of chocolate for contrast. You could also top with crushed Oreo crumbs, sprinkles, chocolate curls, etc.
- Serve immediately or store in a cool location until serving.
Would you like to save this?
Notes
- The Ghirardelli brand of chocolate wafers that come in a 10 oz. bag measure out to 1 ½ cups.
- Reheat the chocolate for 15 seconds at a time if it begins to thicken too much for dipping.
- If you would prefer to use chocolate chips (and/or white chocolate chips) instead of the melting wafers, follow the same instructions for melting and dipping, but add about 1 teaspoon of shortening per cup of chips when melting.
- Place the balls on parchment paper so that they do not stick to the baking sheet.
- If you are working during the warmer months, you can place the dipped Oreo balls back into the freezer or refrigerator for a few minutes after dipping to help the chocolate set more quickly.
- You can make these ahead of time, but sometimes the chocolate forms condensation on the outside of it after it has been placed in the freezer. For the best presentation, serve Oreo balls within a couple hours of making them and keep cool.
Nutrition
Make this recipe?
Share it with me on Instagram @girlinspired1 and follow on Pinterest for more!


Leave A Reply!