
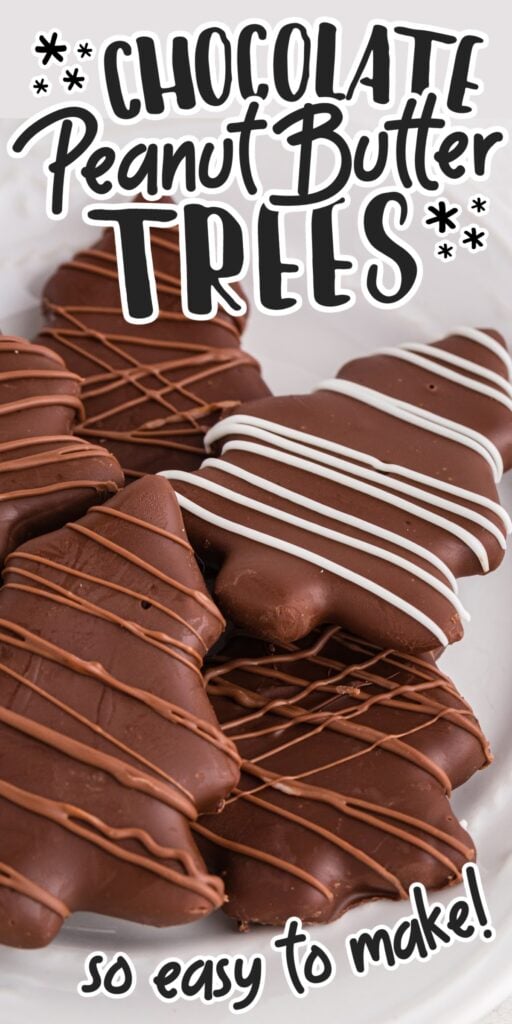

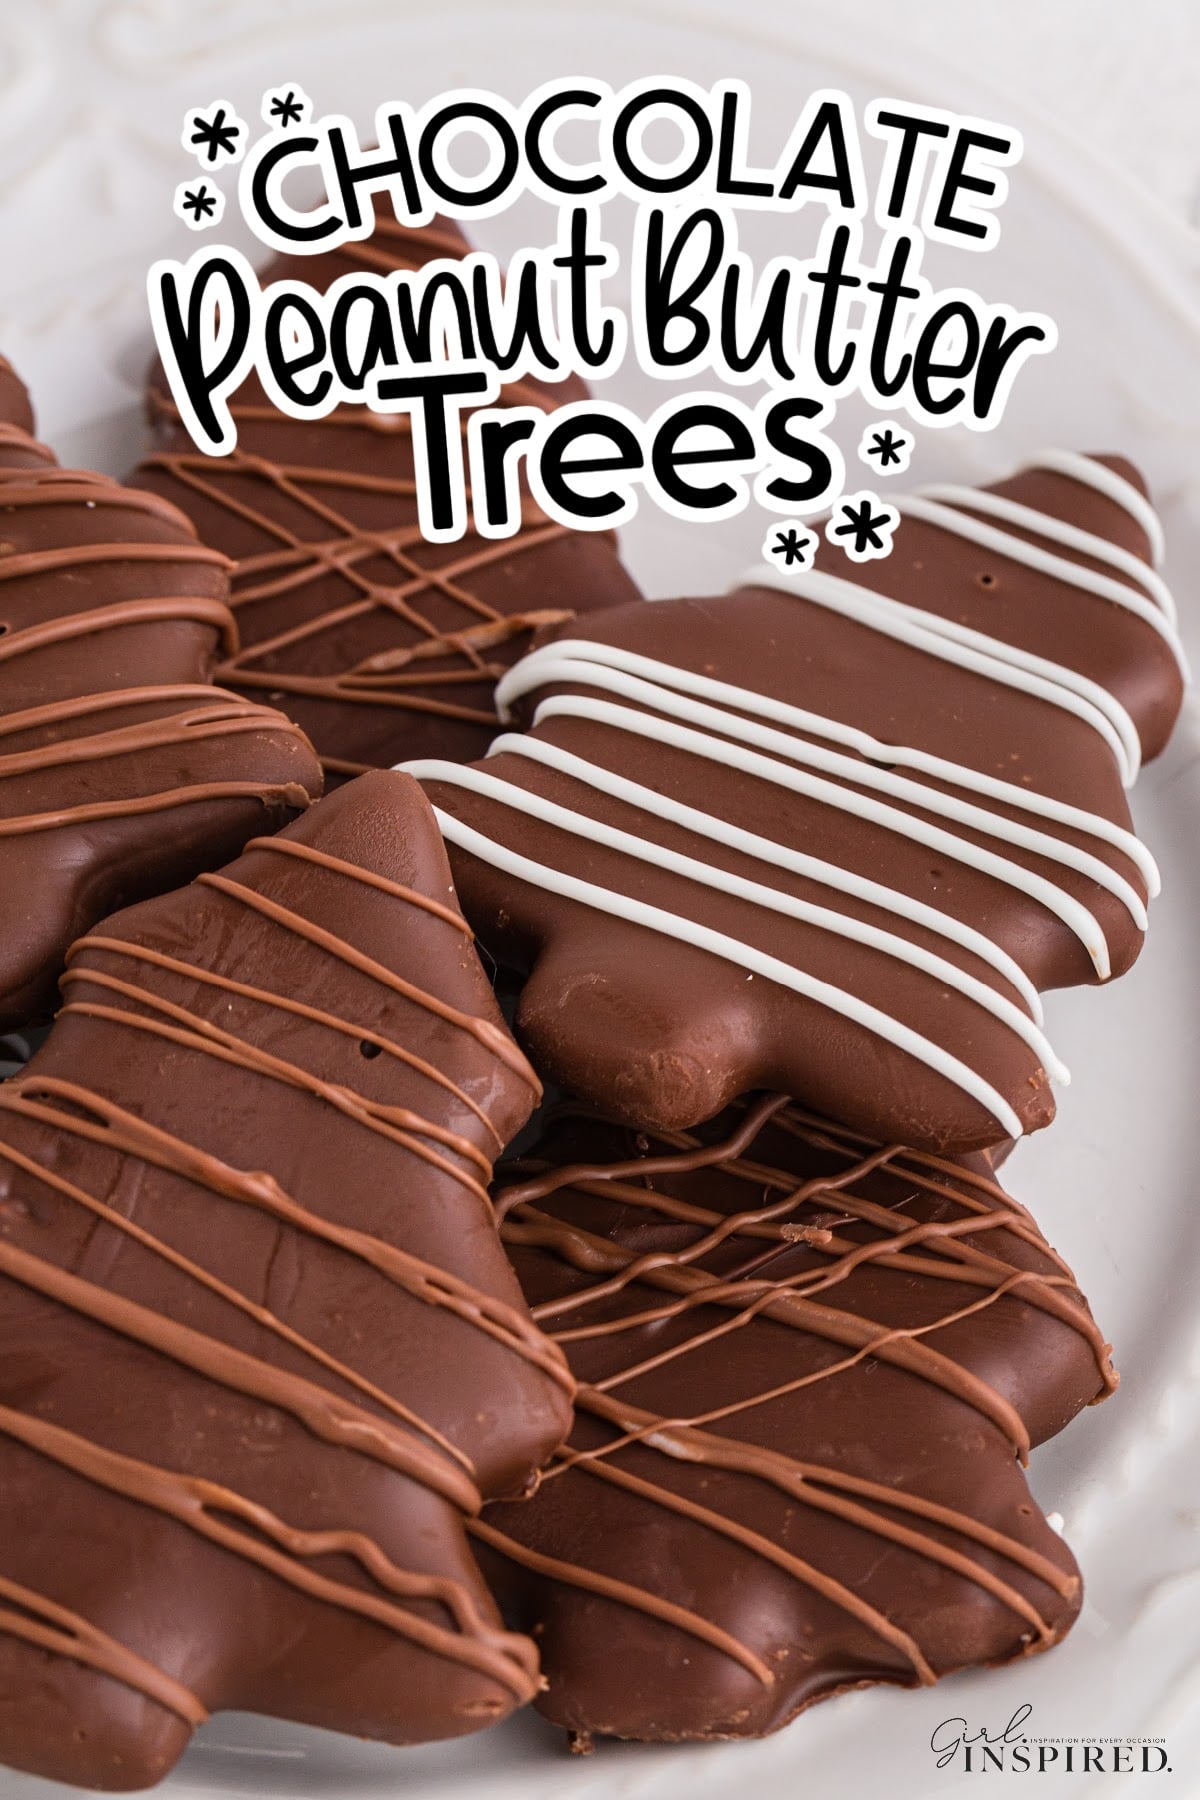
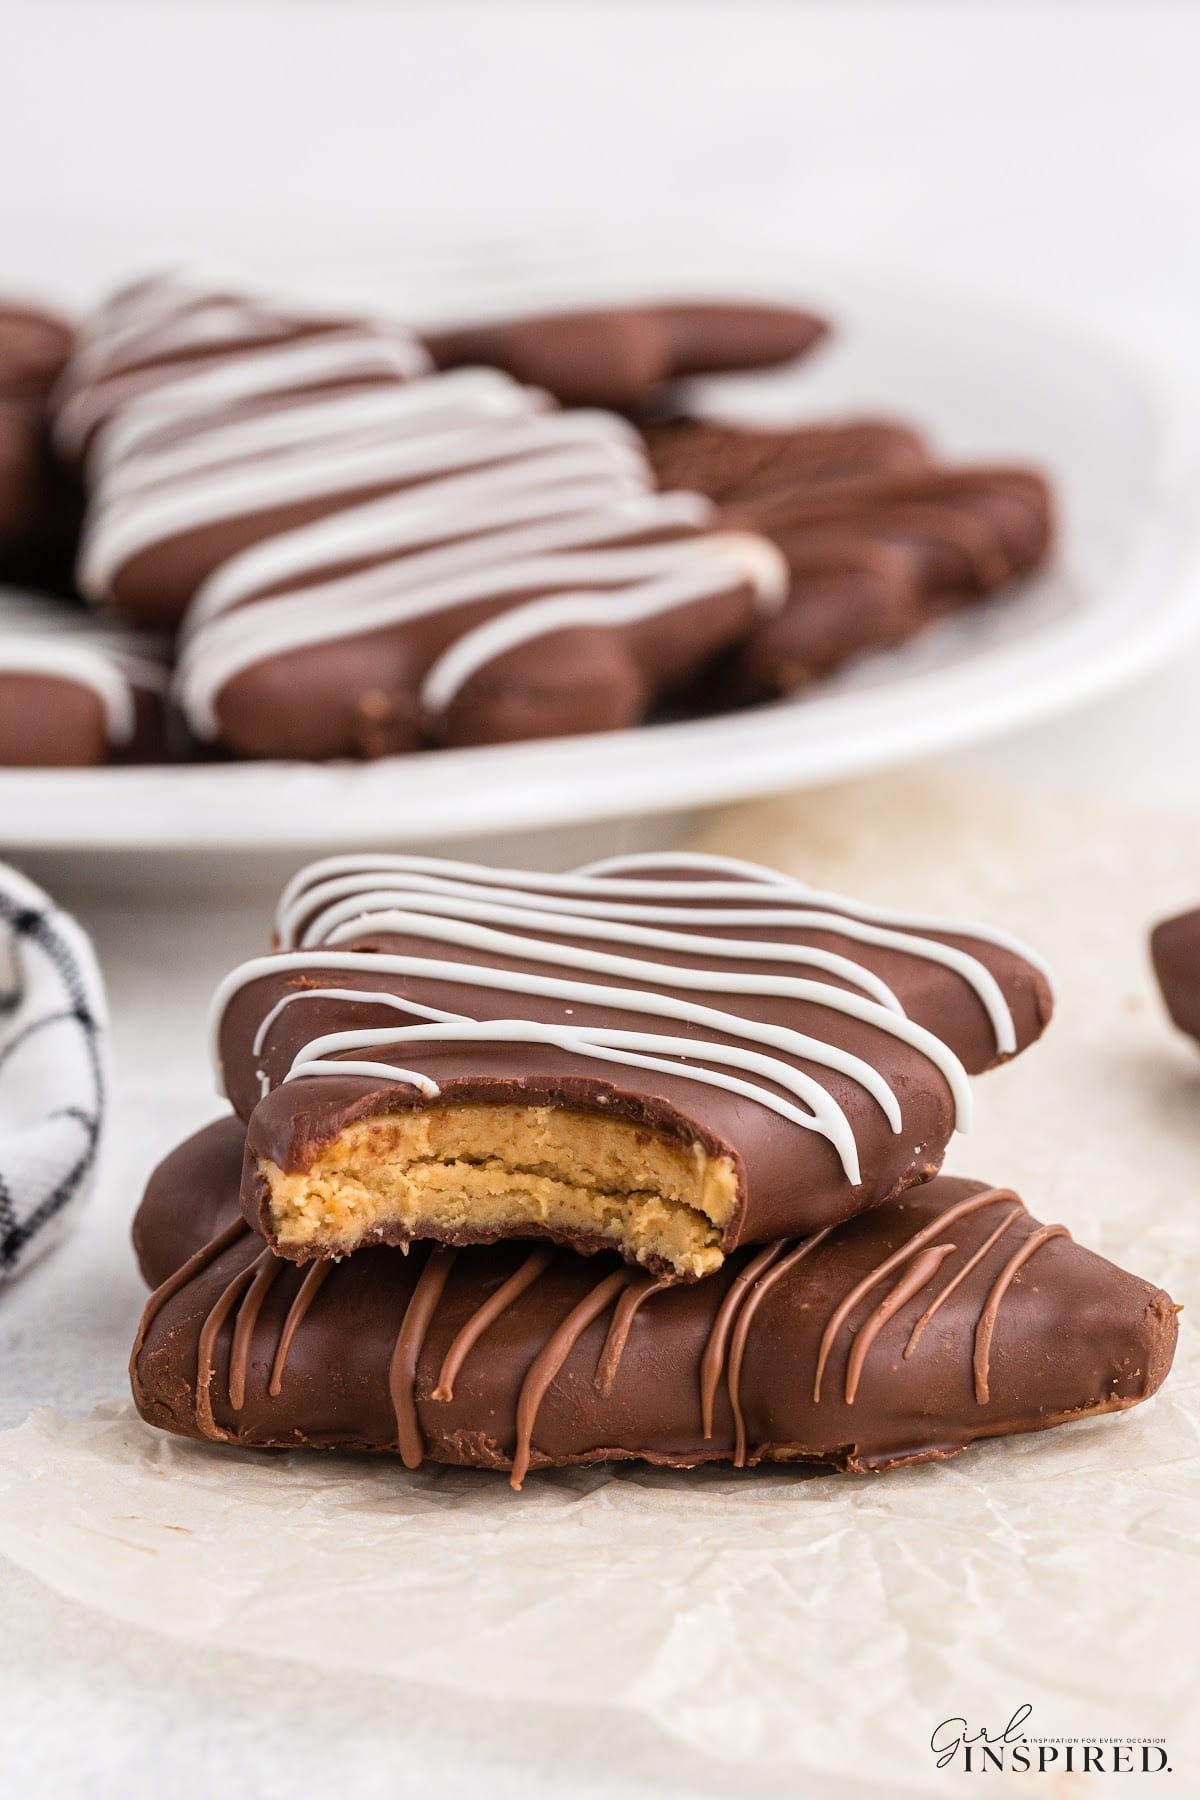
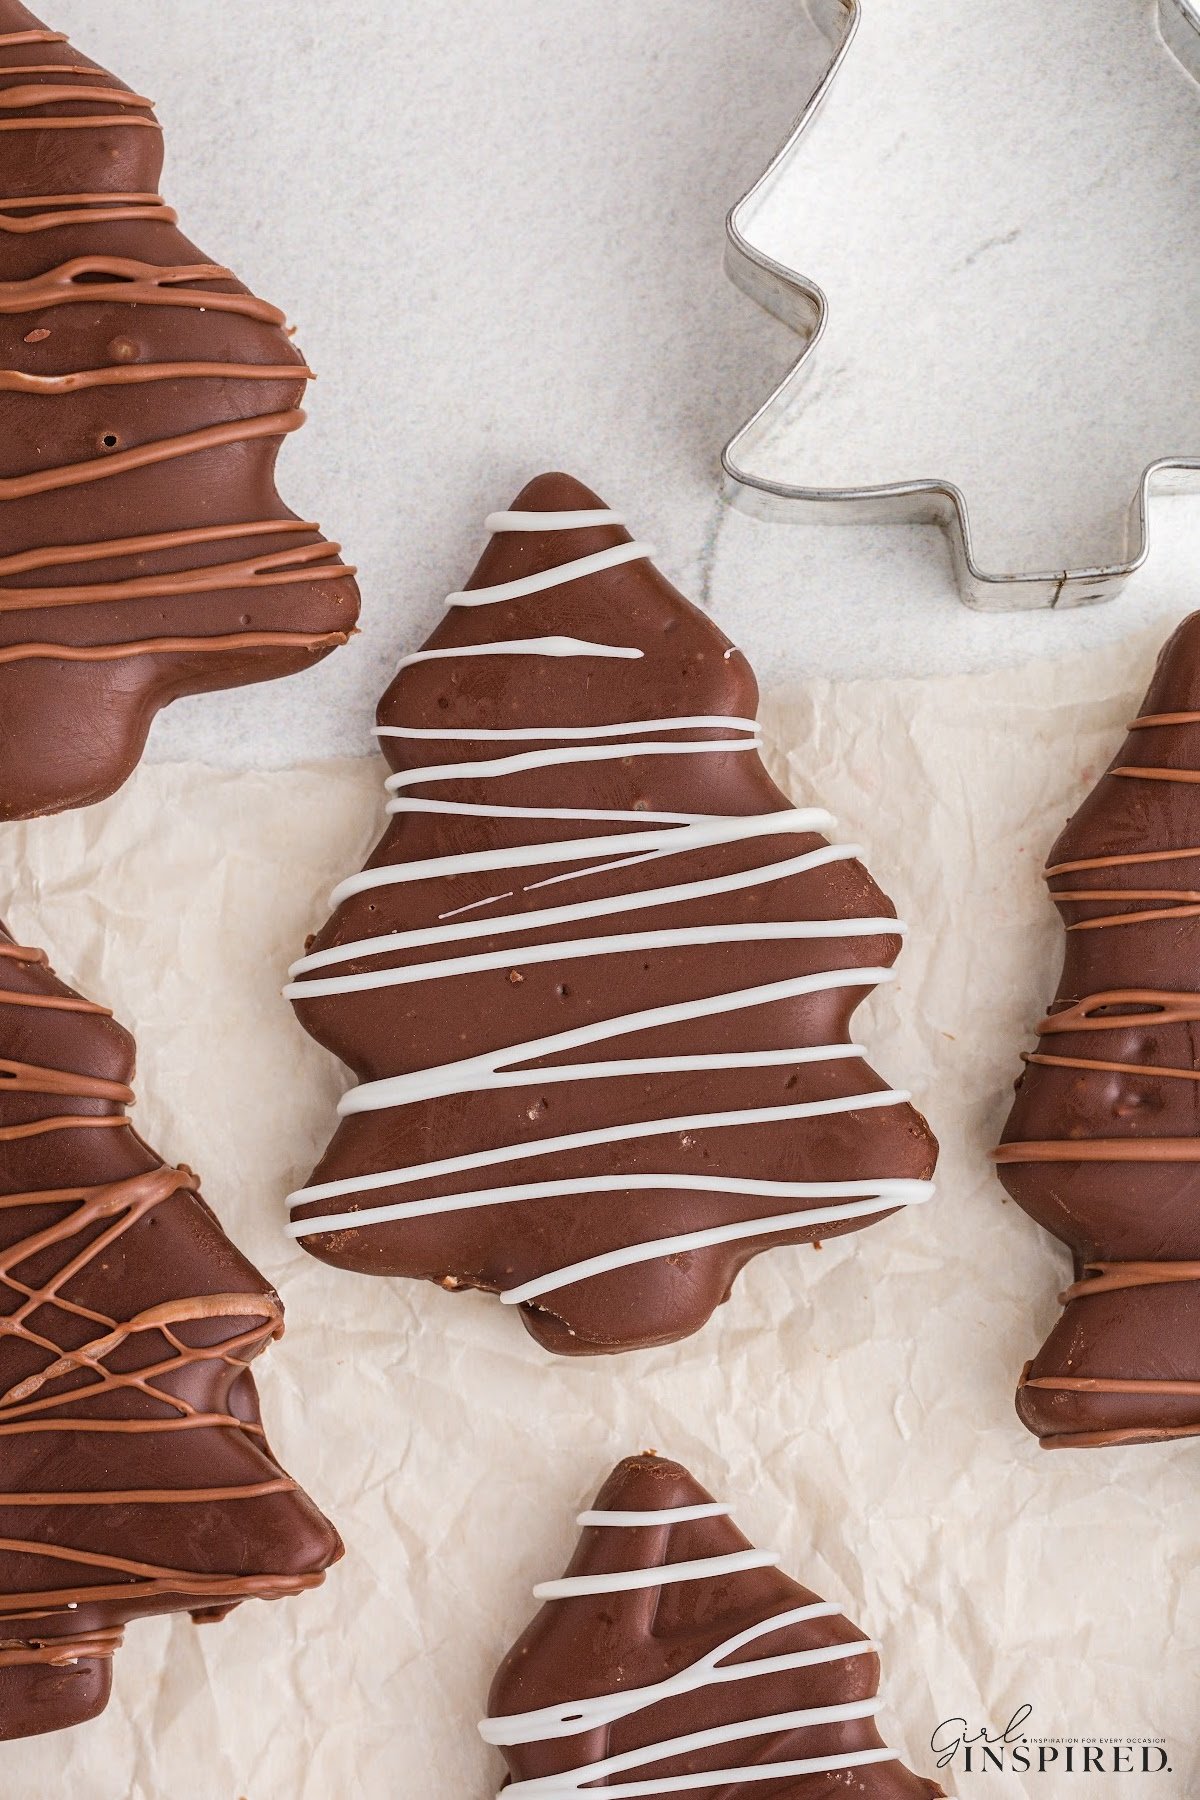
Chocolate Peanut Butter Christmas Trees take your love of your favorite Reese’s peanut butter cups and transform them into adorable Christmas tree treats that can be added to your festive dessert platters or enjoyed throughout the holidays with the family.
Apart from looking super cute, these peanut butter Christmas trees are a truly addictive sweet treat – I actually wish someone would hide them from me! Just like our copycat Reese’s eggs, Peanut Butter Chocolate Eggs (and Bunnies), or our peanut butter Valentine’s hearts, these peanut butter cup Christmas trees are a must have this time of year. The taste of smooth peanut butter in each bite is addictive!
Drizzle your peanut butter chocolate Christmas trees with white or dark melted chocolate or use colored icing writers and sprinkles to resemble bright decorations on these scrumptious treats. Either way, they’re an absolute hit with kids and adults alike and not to be missed! Add this no-bake peanut butter tree recipe to the must-make list along with your other holiday baking.
If you are making a dessert table, be sure to include our Chocolate Turtles or our Christmas Bar Cookies.
Jump to:
Why You’ll Love Making Chocolate Christmas Trees
- Tastes just like the store-bought Reese’s Peanut Butter Trees!
- Gift these this holiday season to your friends or neighbors, they will LOVE them!
- These freeze well, so you can make a large batch and save some for later.
- Pantry staples you already have at home.
🎄 Ingredients:
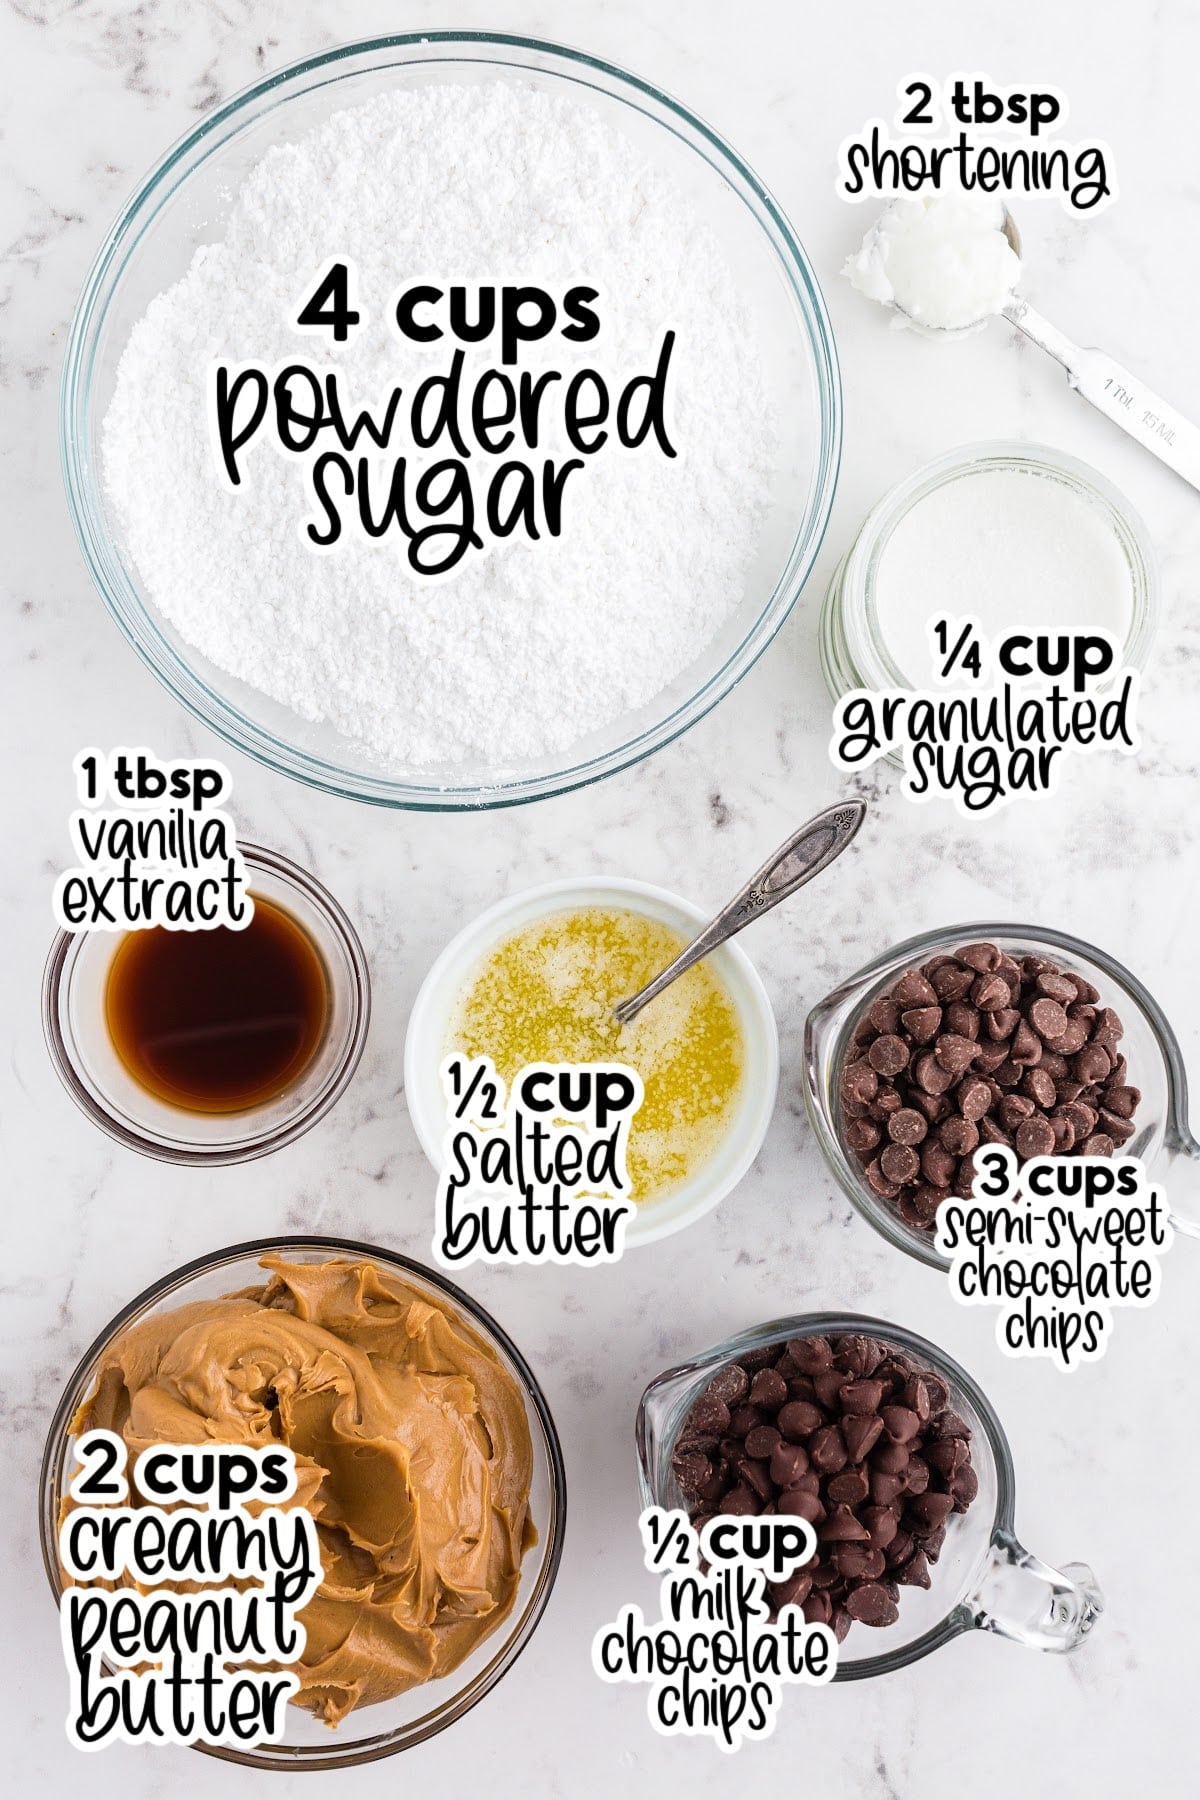
- Salted butter – melted and cooled
- Peanut butter – creamy peanut butter
- Sugar – both granulated white sugar and powdered sugar
- Vanilla extract – warms out the flavors
- Semi-sweet chocolate chips – try half of milk chocolate and half of semi-sweet chocolate or toss in some dark chocolate chips too
- Shortening – helps melt the chocolate so its smooth and creamy
For a full list of ingredients and their measurements, 📋 please view my printable recipe card at the bottom of the post.
Equipment Needed: Christmas Tree cookie cutter
Substitutions and Variations
- Try with alternative peanut butter if there are tree nuts allergies in your family. We’ve tried Sun Butter which is based from Sunflower seeds.
- Love this with Almond Butter also!
- Add some festive decoration on the tree when the chocolate has not set yet. Try red hots for Christmas tree ornaments or a candy star on the top of the tree.
- While I used salted butter, you could make these with unsalted butter but then I suggest that you add ¼ teaspoon of salt to the mix.
🔪 Instructions:
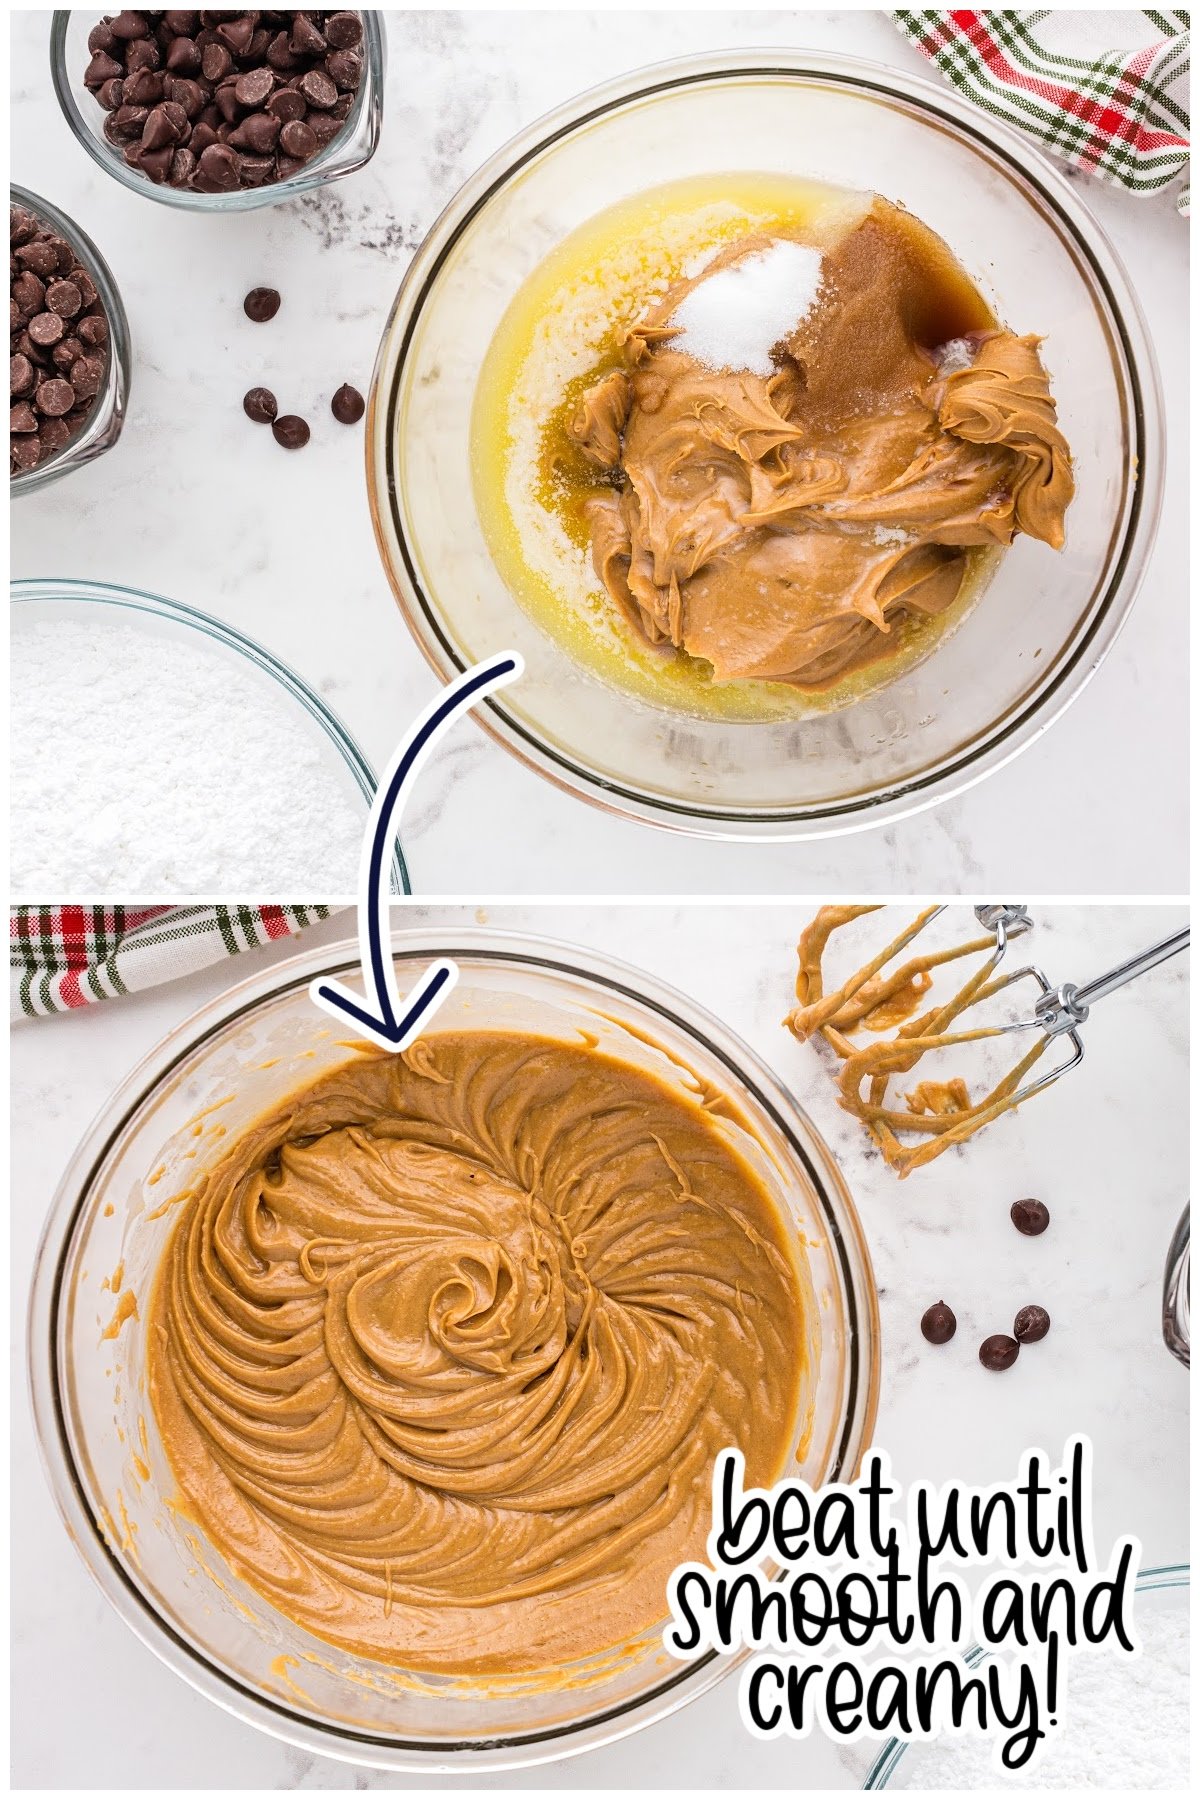
Step 1: With a hand mixer, combine peanut butter, butter, sugar, vanilla until smooth.
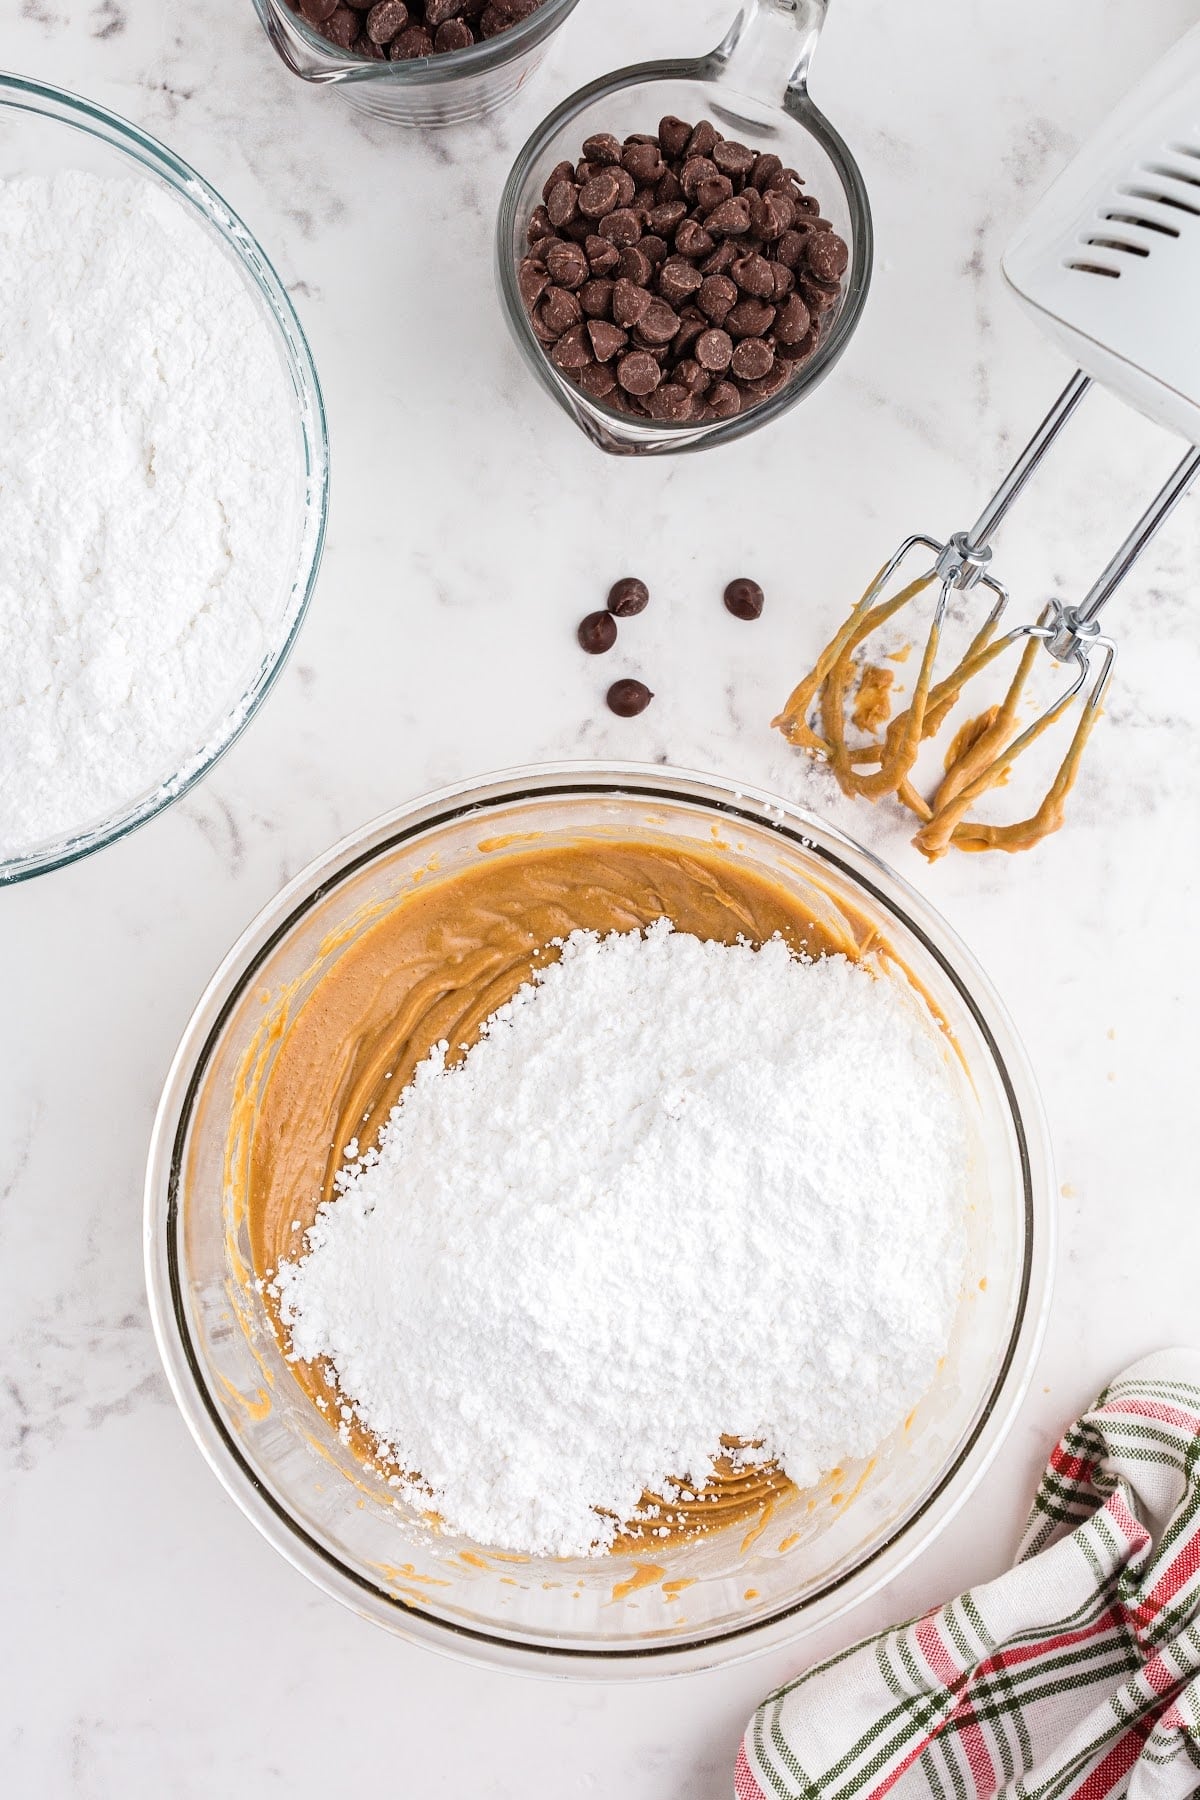
Step 2: Add in the powdered sugar to make the peanut butter filling creamy.
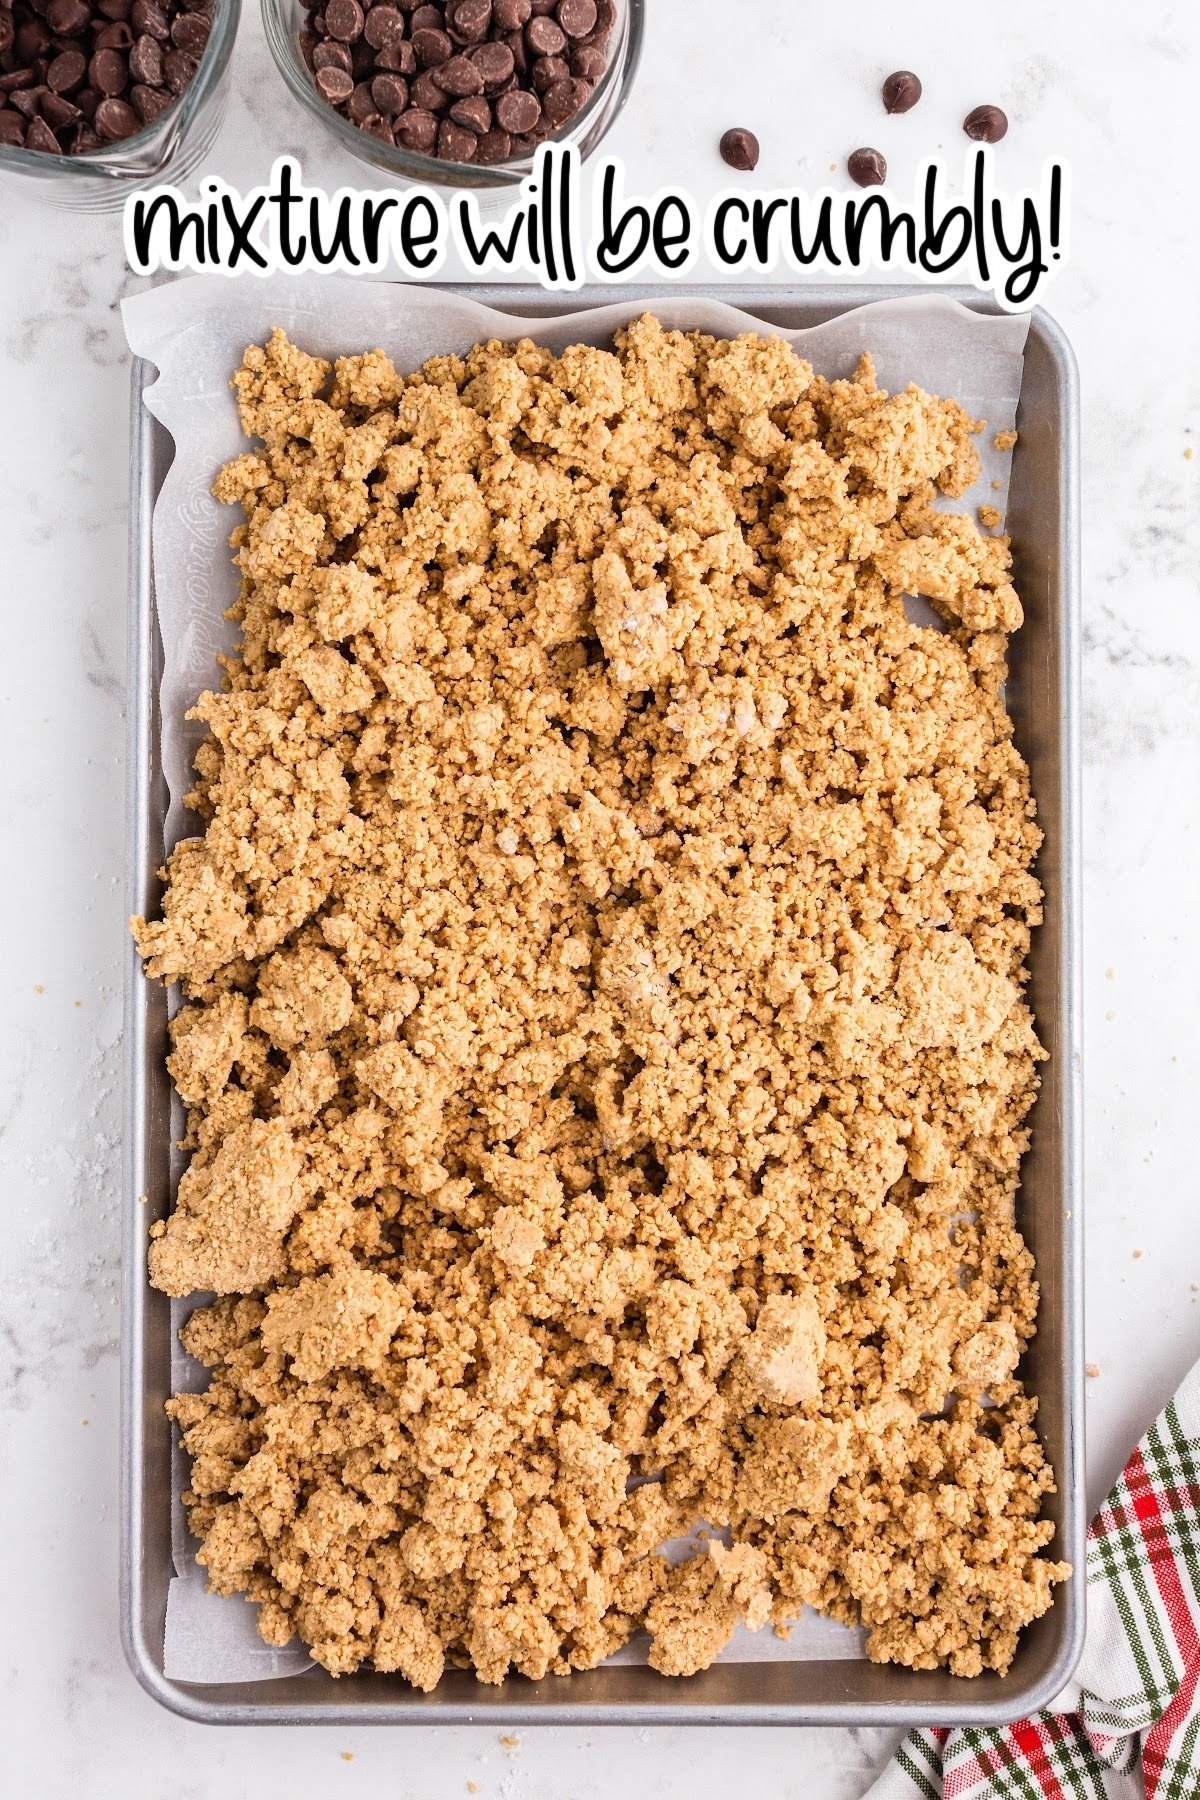
Step 3: Pour the peanut butter dough into a prepared baking dish.
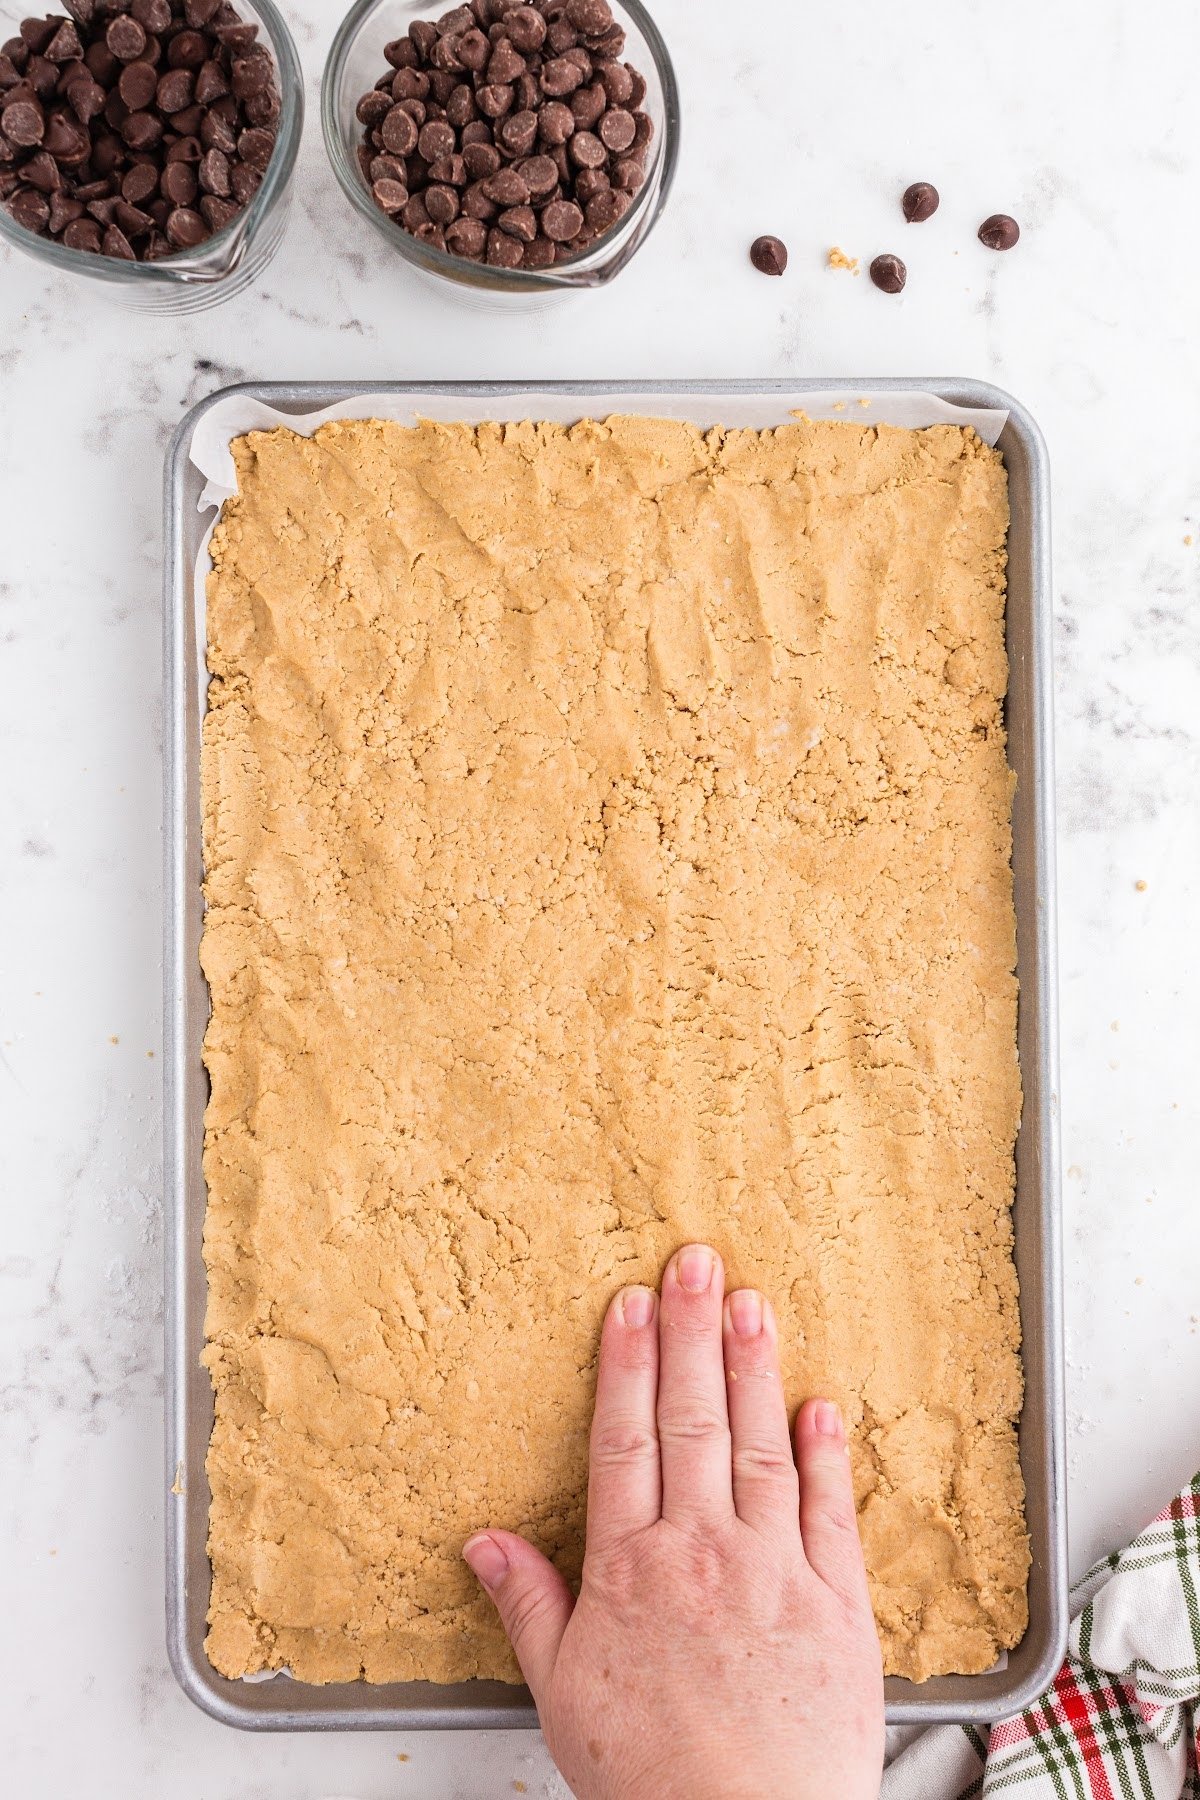
Step 4: Press the mixture down into the sheet pan – spreading it to about ½″ thickness. Place the sheet pan in the freezer for 15 minutes.
Pro Tip – Do not skip the freezing steps in this. It helps firm up the peanut butter trees so it’s easier to cut them into the tree shapes before they get too soft.

Step 5: The easiest way to remove the pressed peanut butter, lift the parchment paper to remove the chilled peanut butter layer from the pan. Place a new sheet of parchment paper on the pan
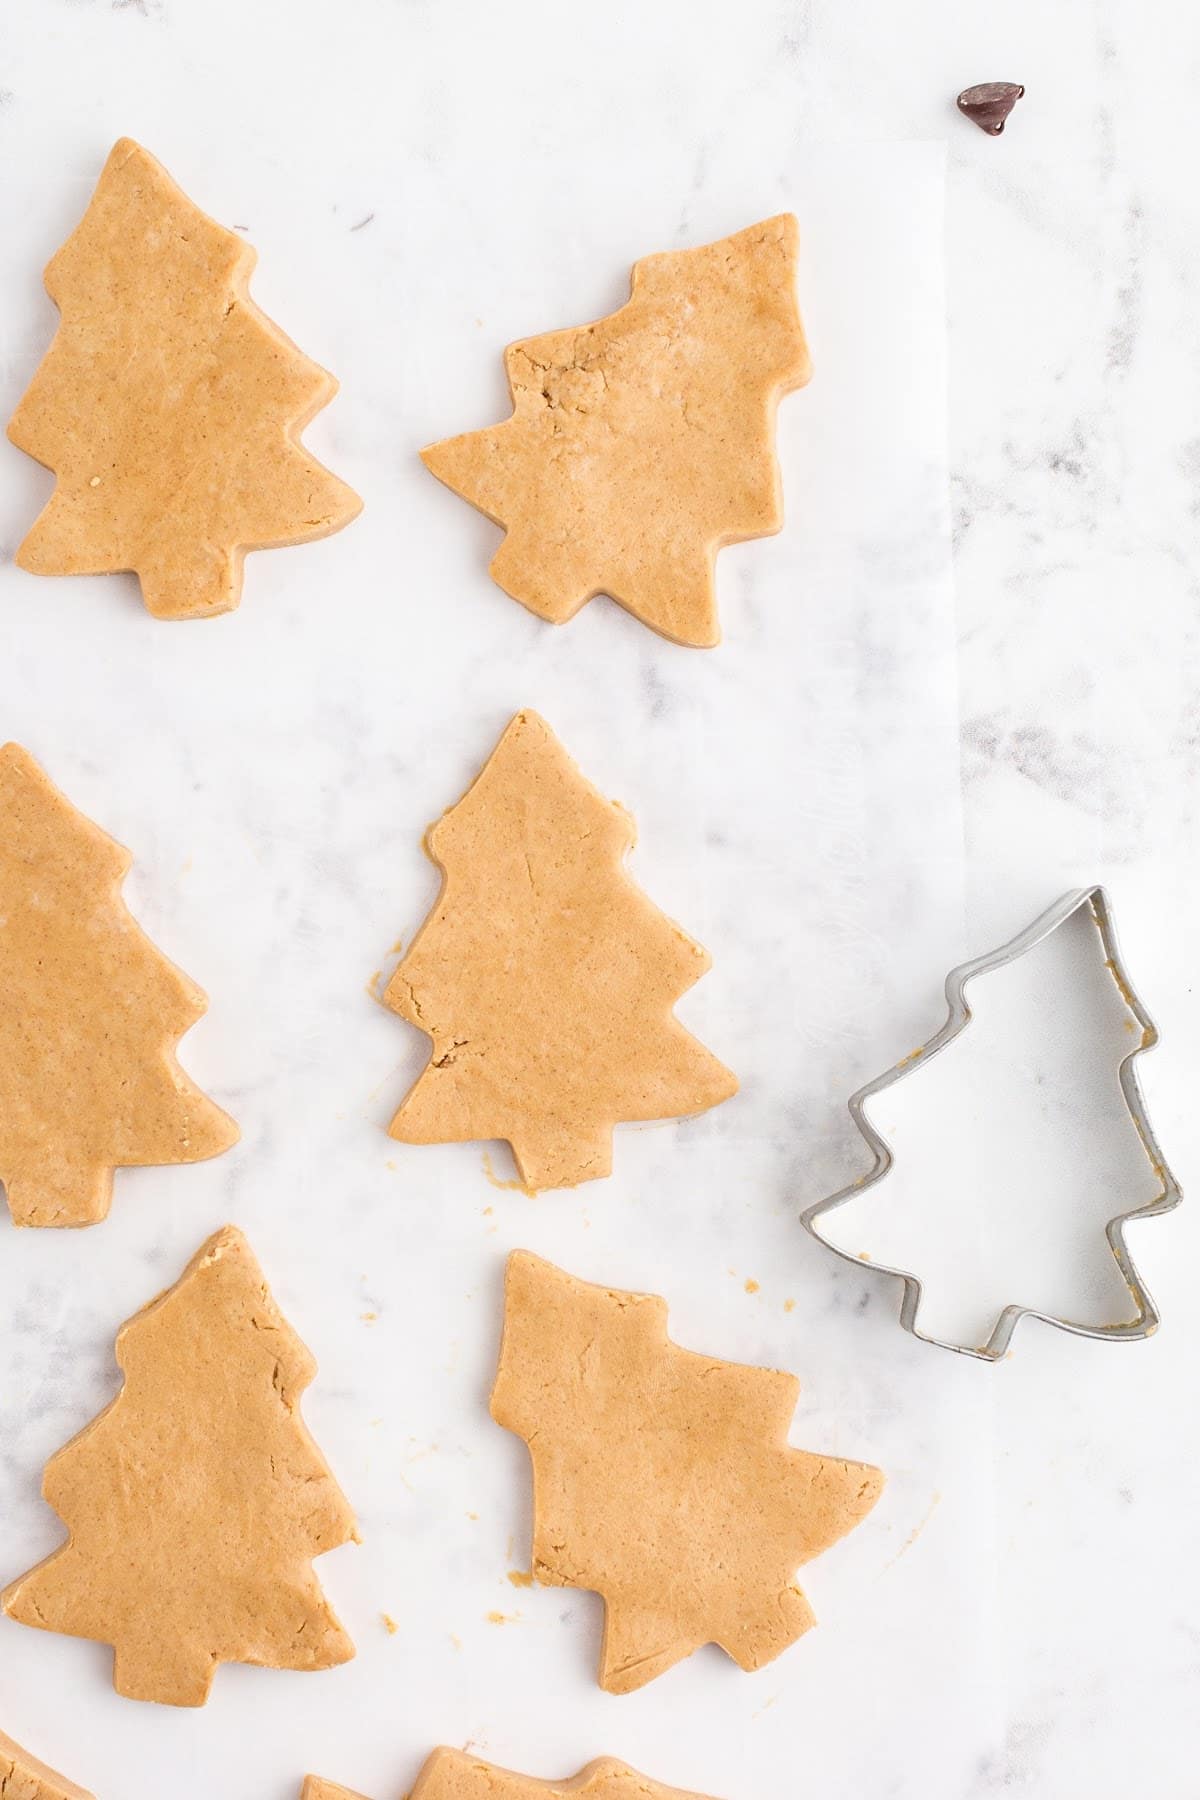
Step 6: Use a Christmas tree cookie cutter to cut out ½” thick Christmas tree shapes from the chilled peanut butter layer and place cutouts on parchment paper or wax paper.
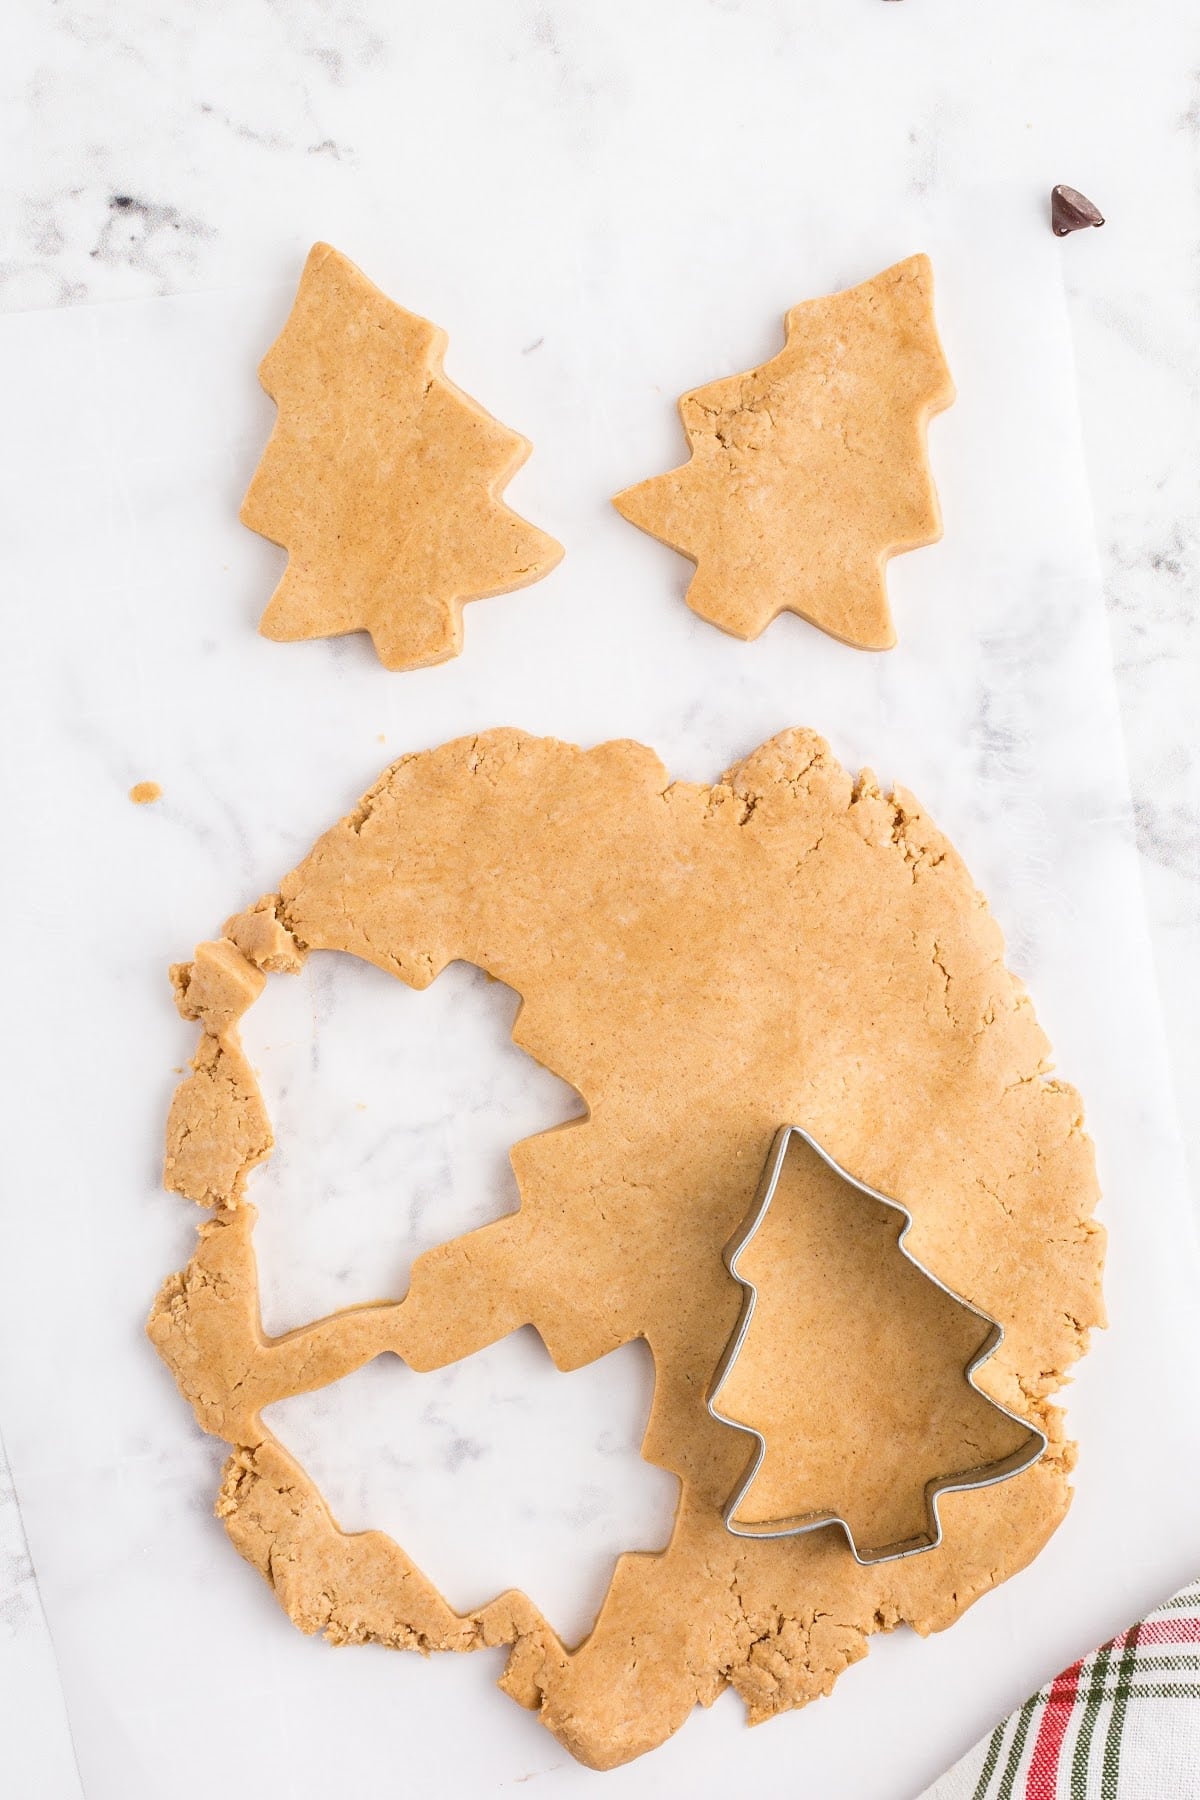
Step 7: Scoop up remnant peanut butter mixture, repress to ½” thickness and cut out additional shapes.
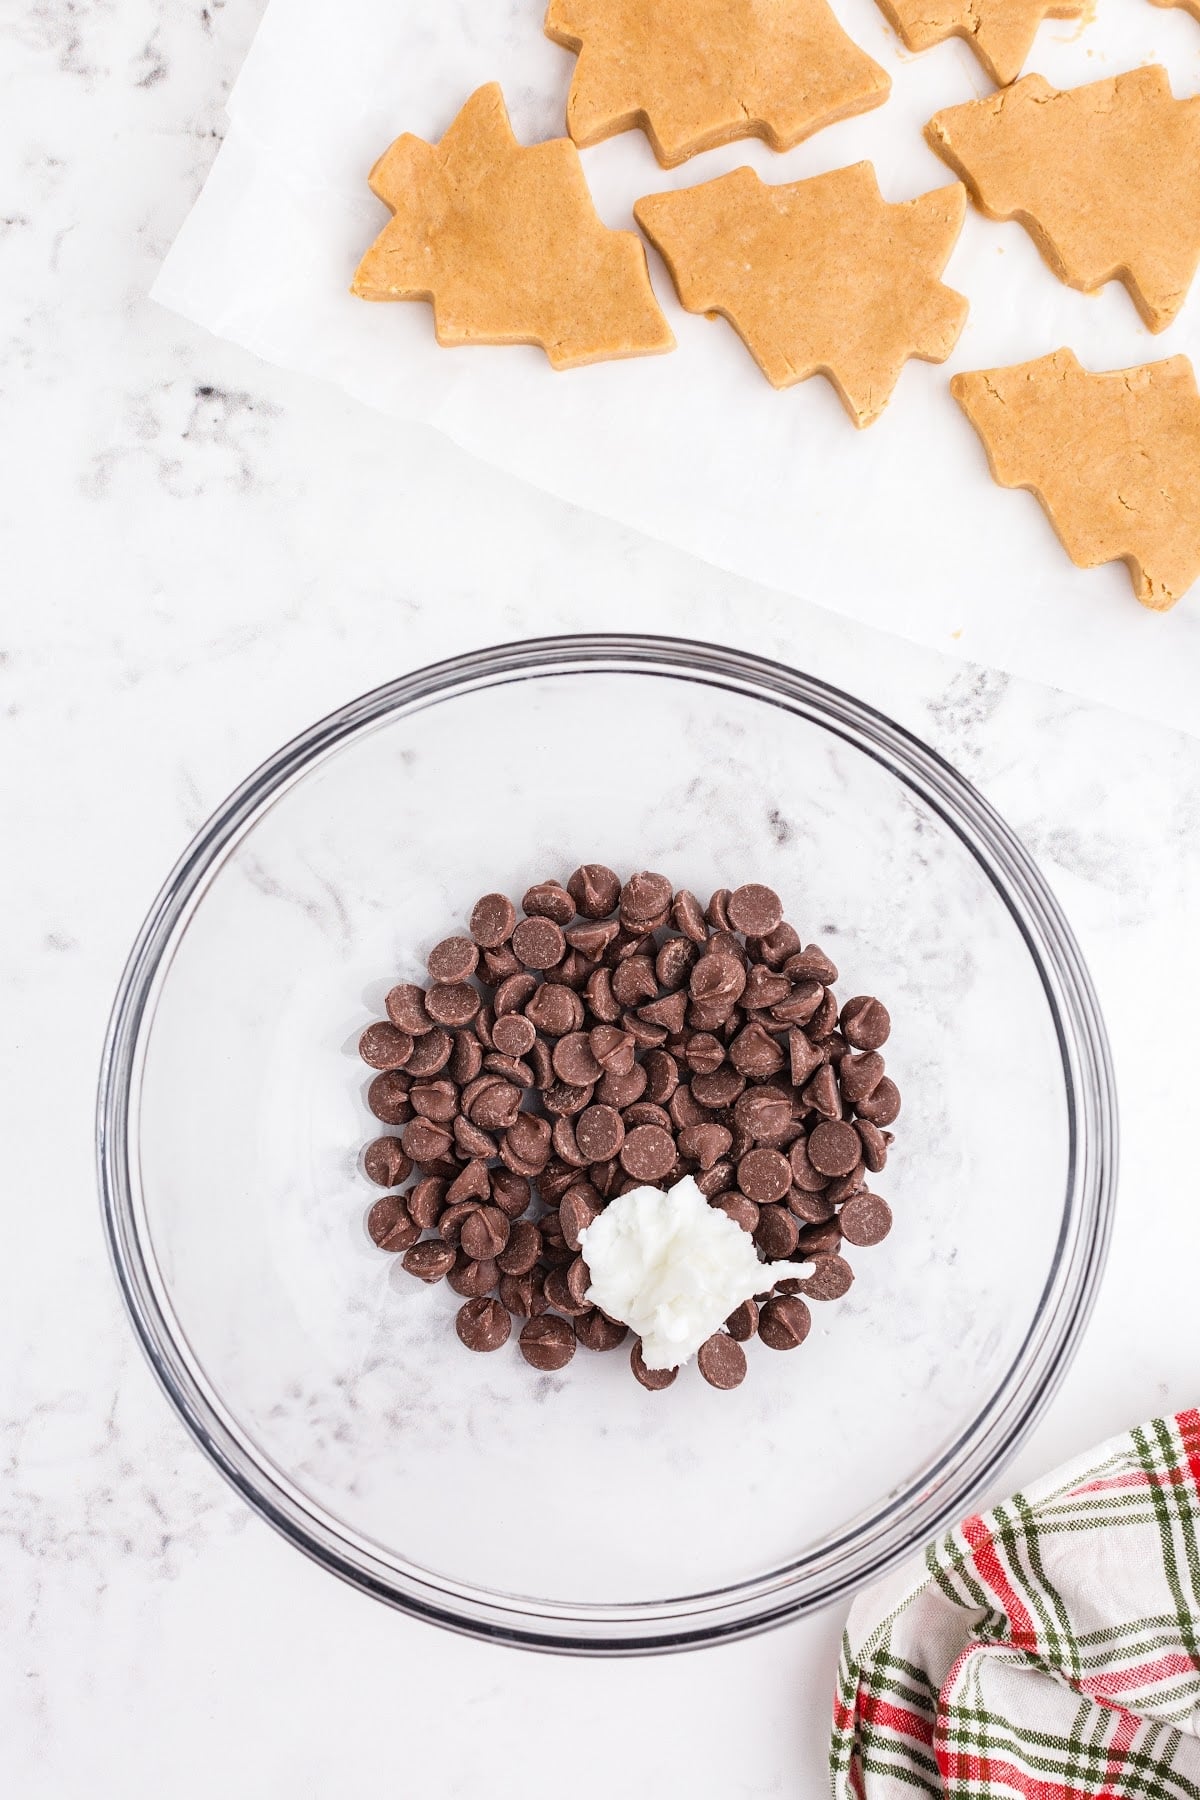
Step 8: After cutouts have chilled for 25 minutes, prepare the chocolate coating. Combine milk chocolate chips and 2 tablespoons of shortening in a heatproof bowl.
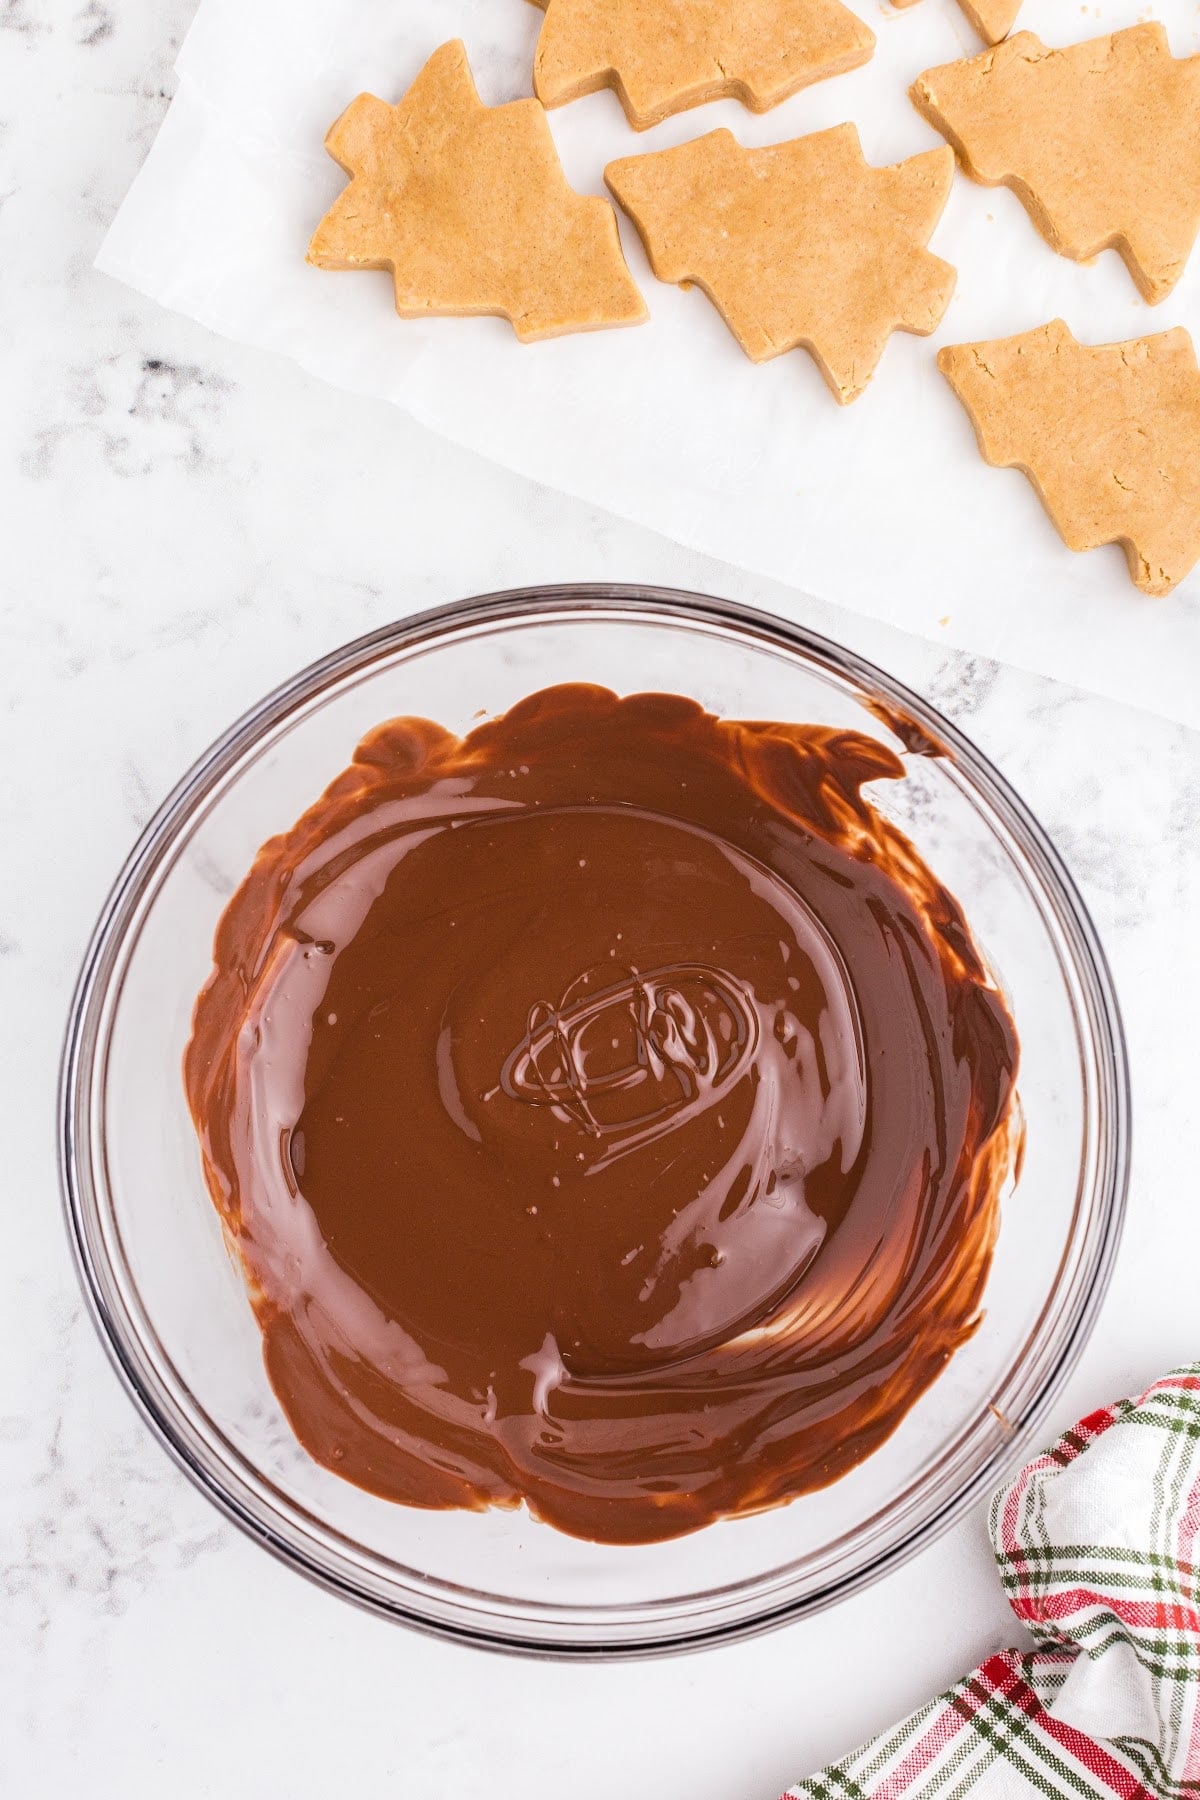
Step 9: Heat and stir in 30-second increments in the microwave until the chocolate is smooth and melted completely.
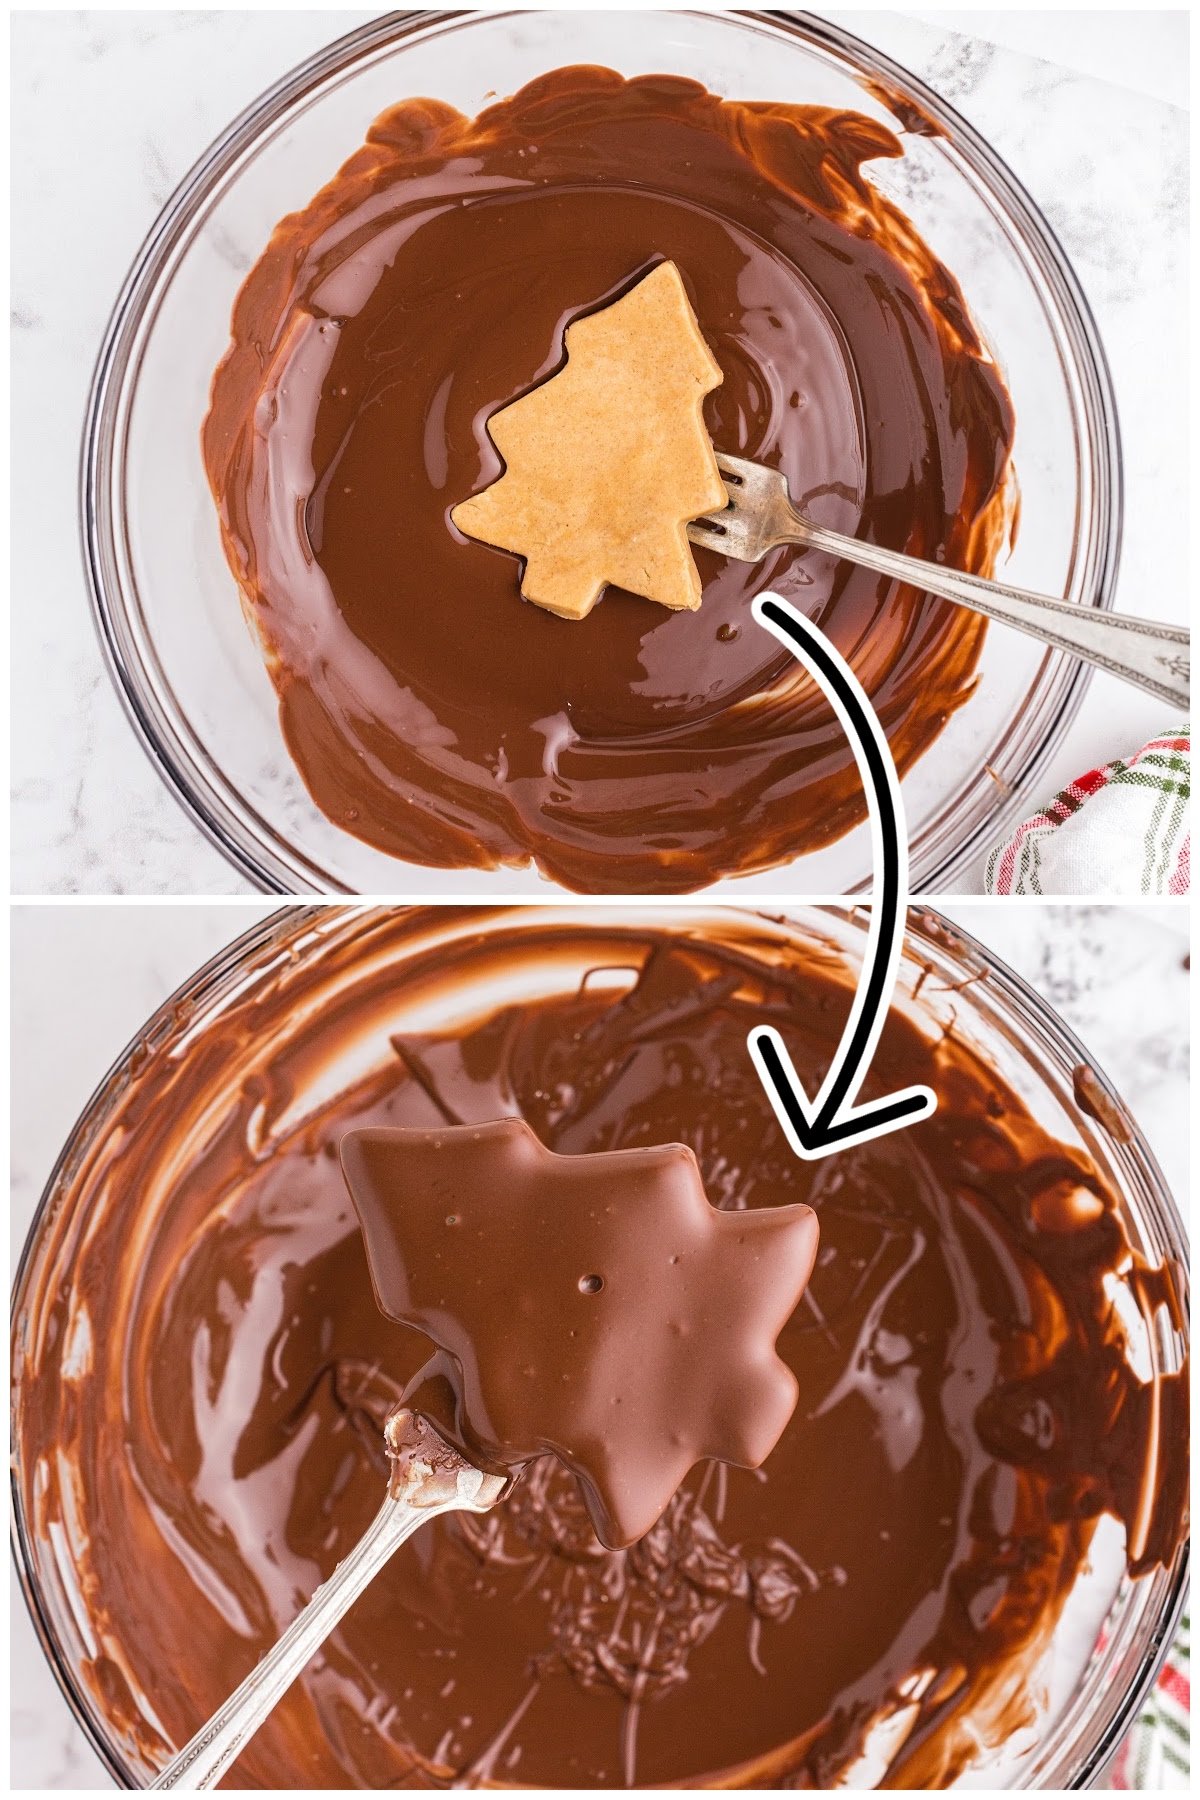
Step 10: Using a fork, lift one peanut butter cutout at a time and coat it completely with the melted chocolate. Tap excess chocolate off of the cutout and place it back onto the cookie sheet. Work in batches if the peanut butter cutout becomes soft quickly.
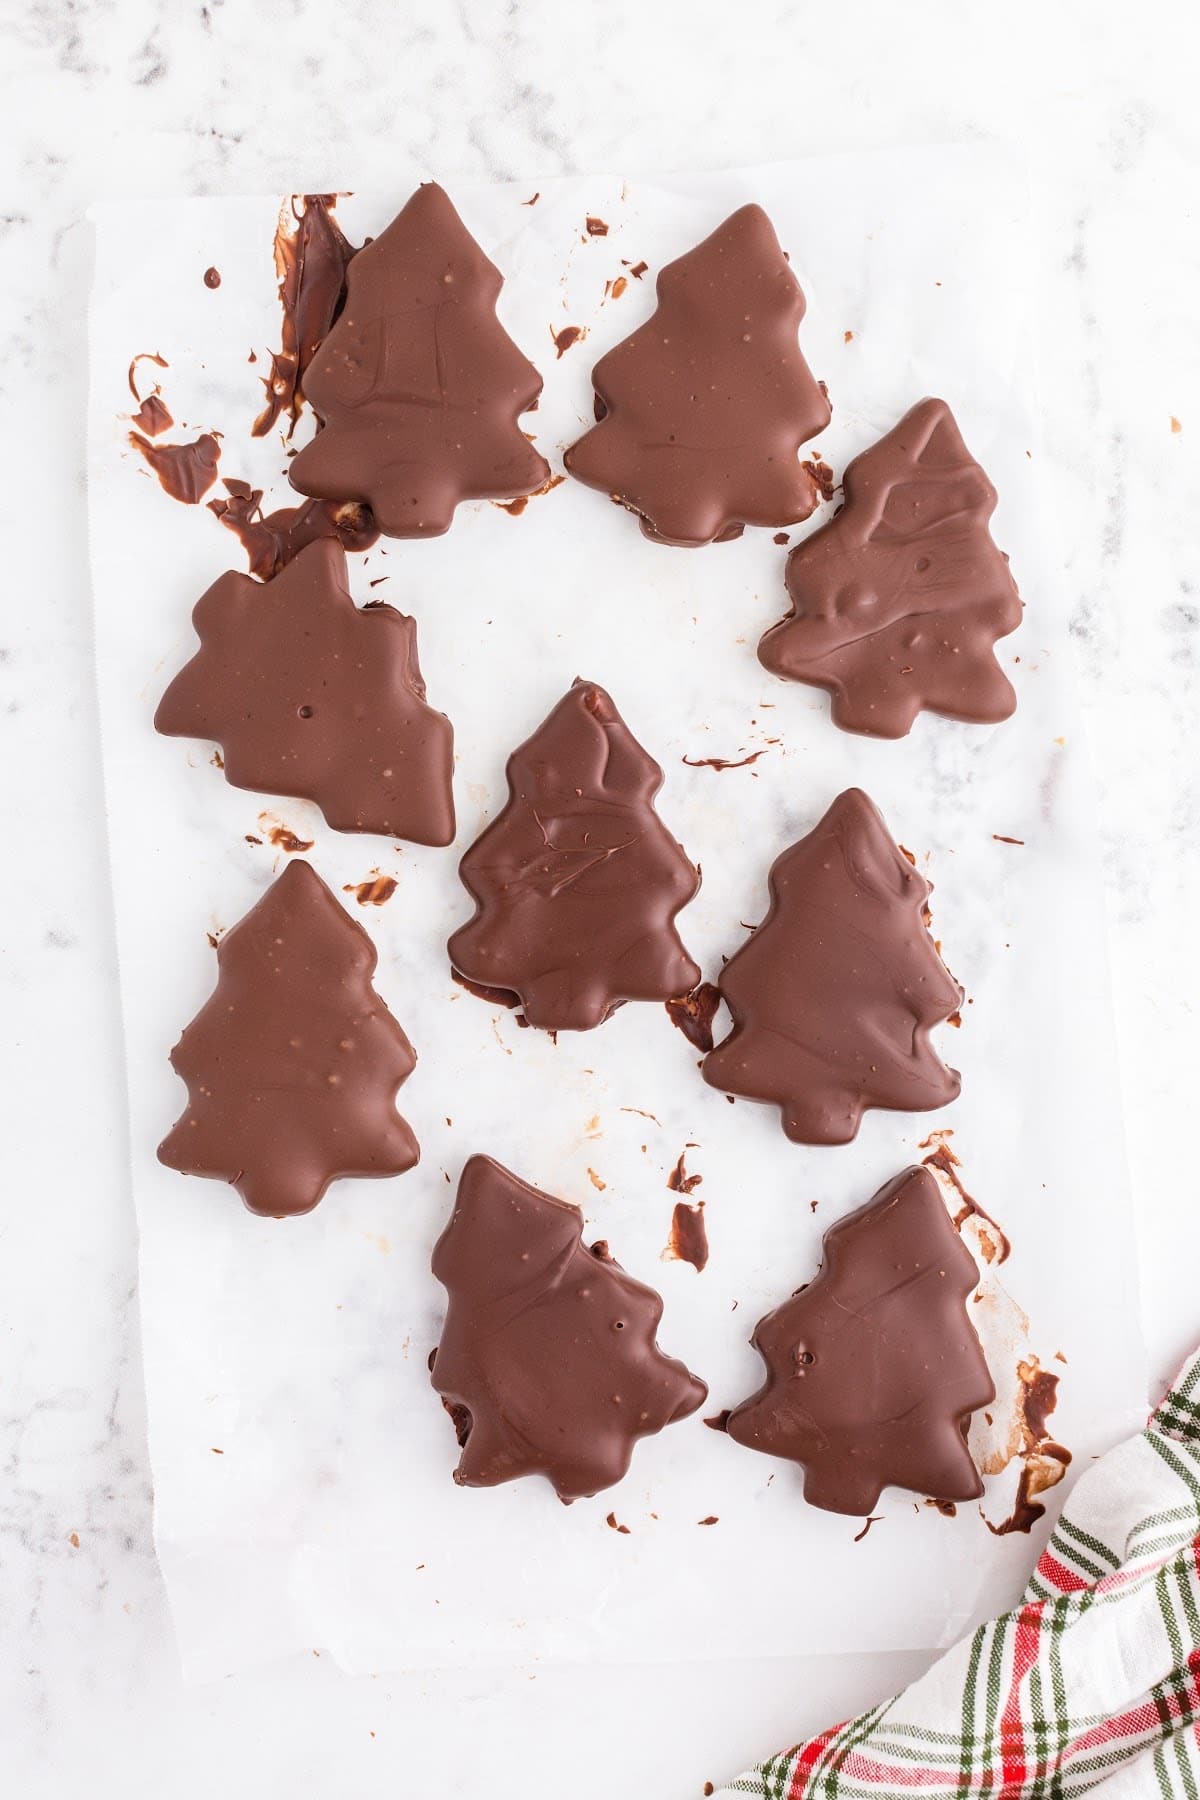
Step 11: Allow chocolate to harden.
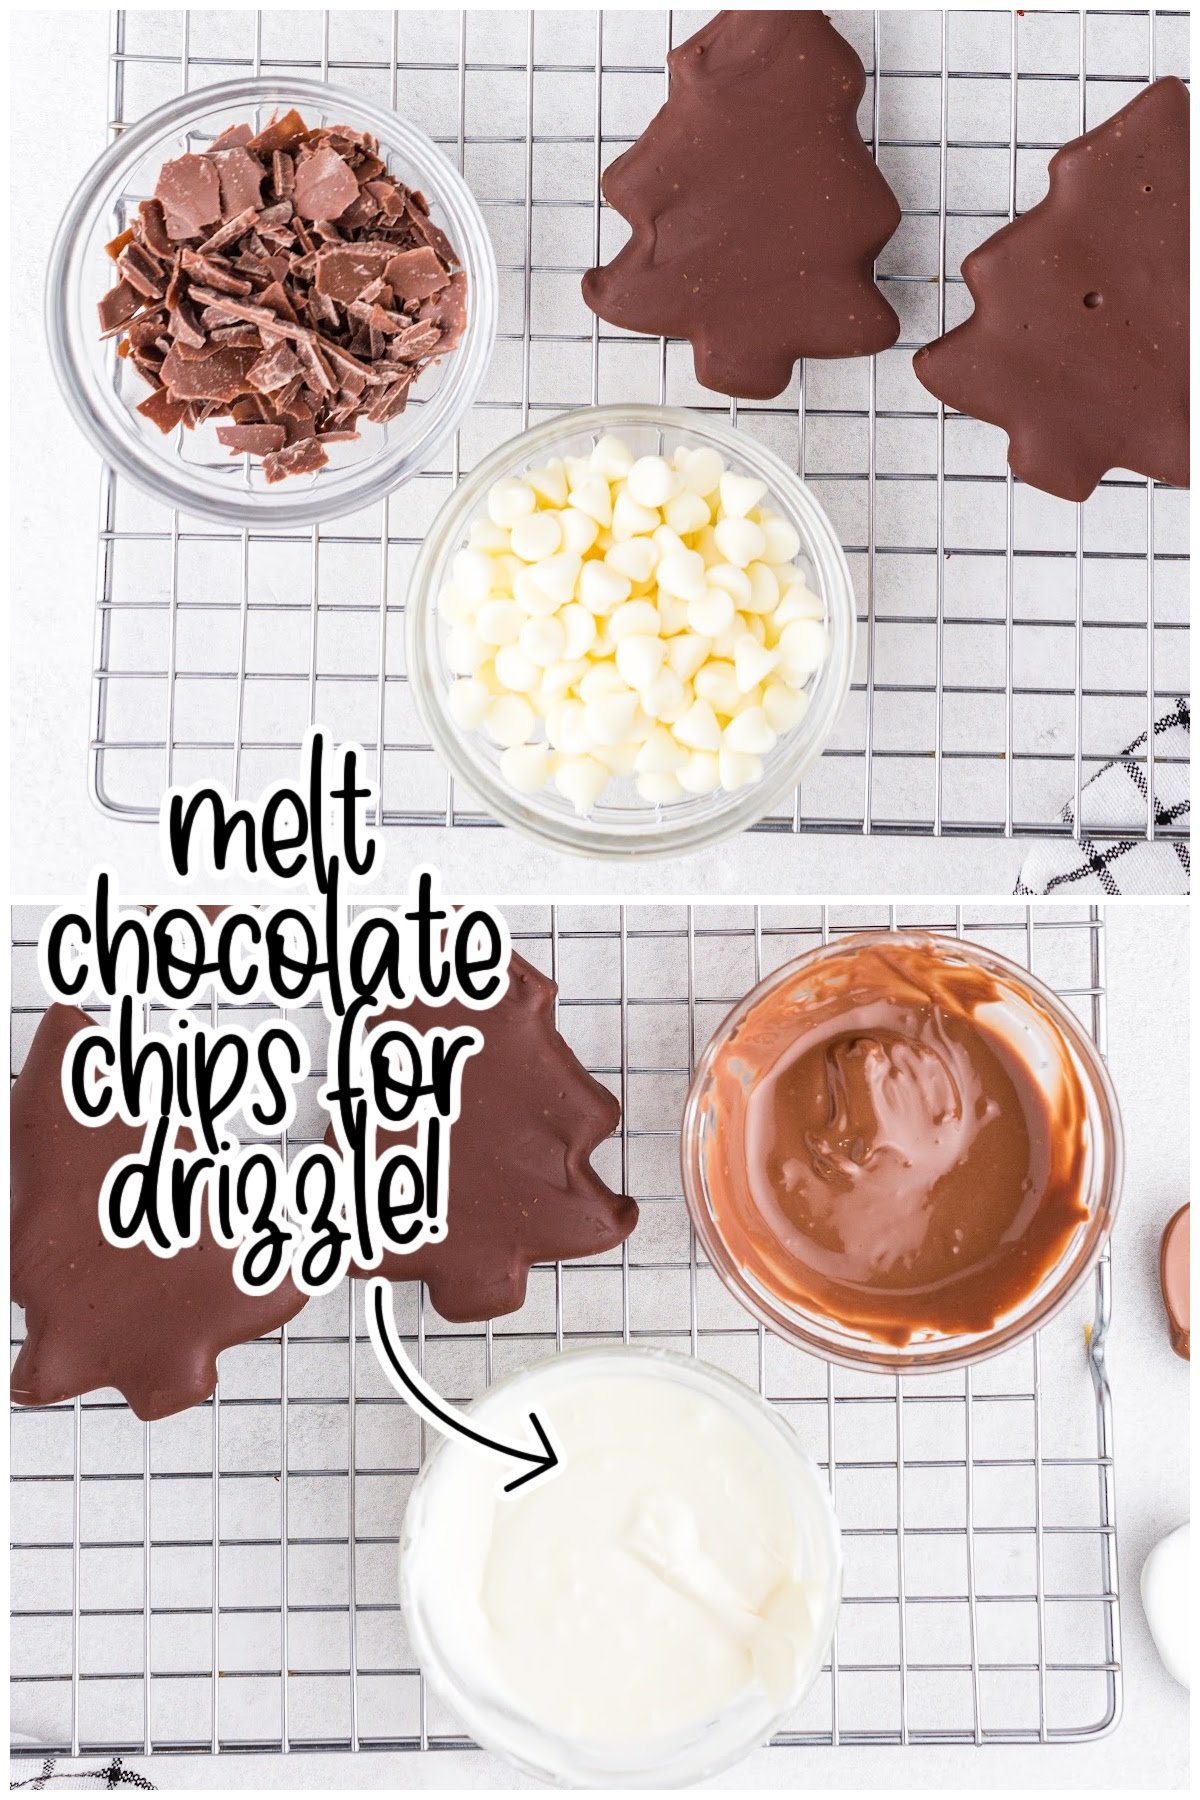
Step 12: For optional drizzle, microwave chocolate chips or chopped pieces and shortening (½ teaspoon per ½ cup) in 30 second increments until melted and smooth.
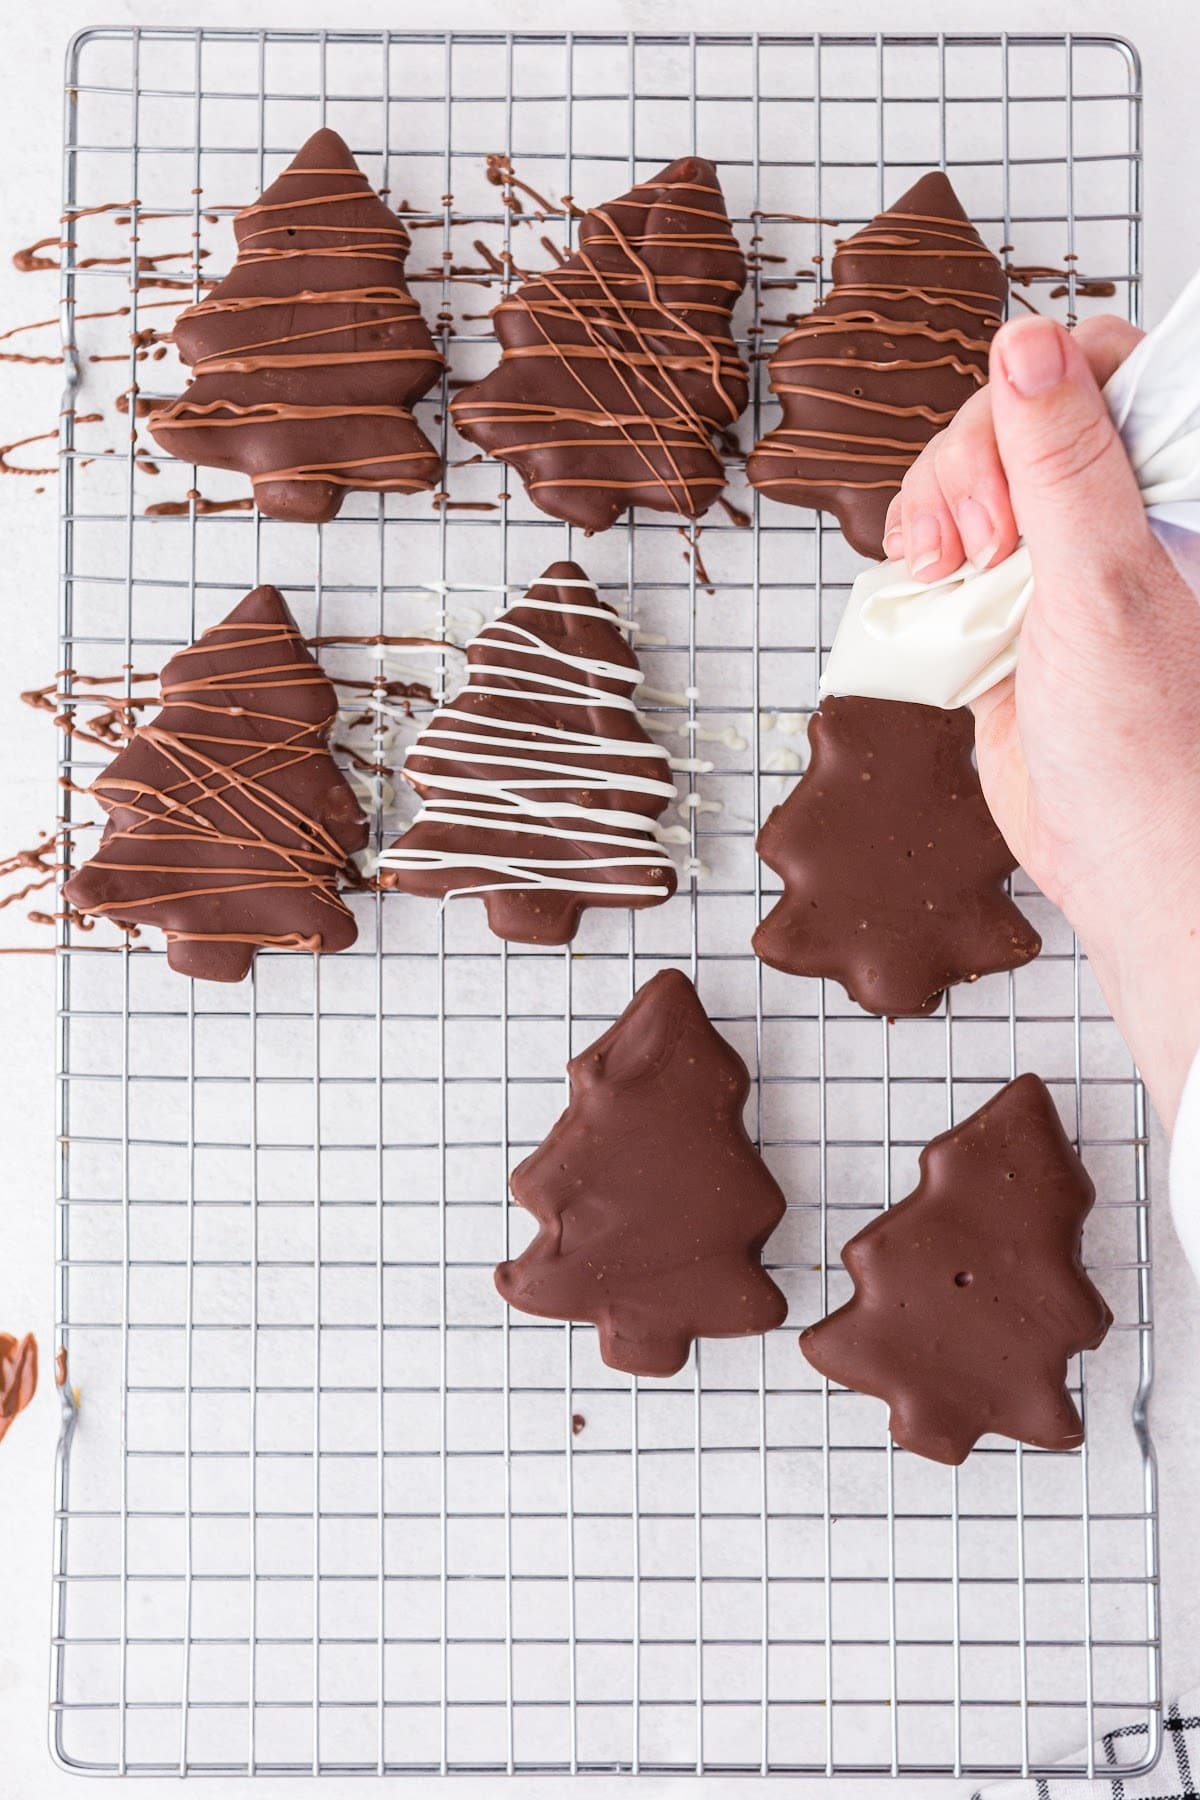
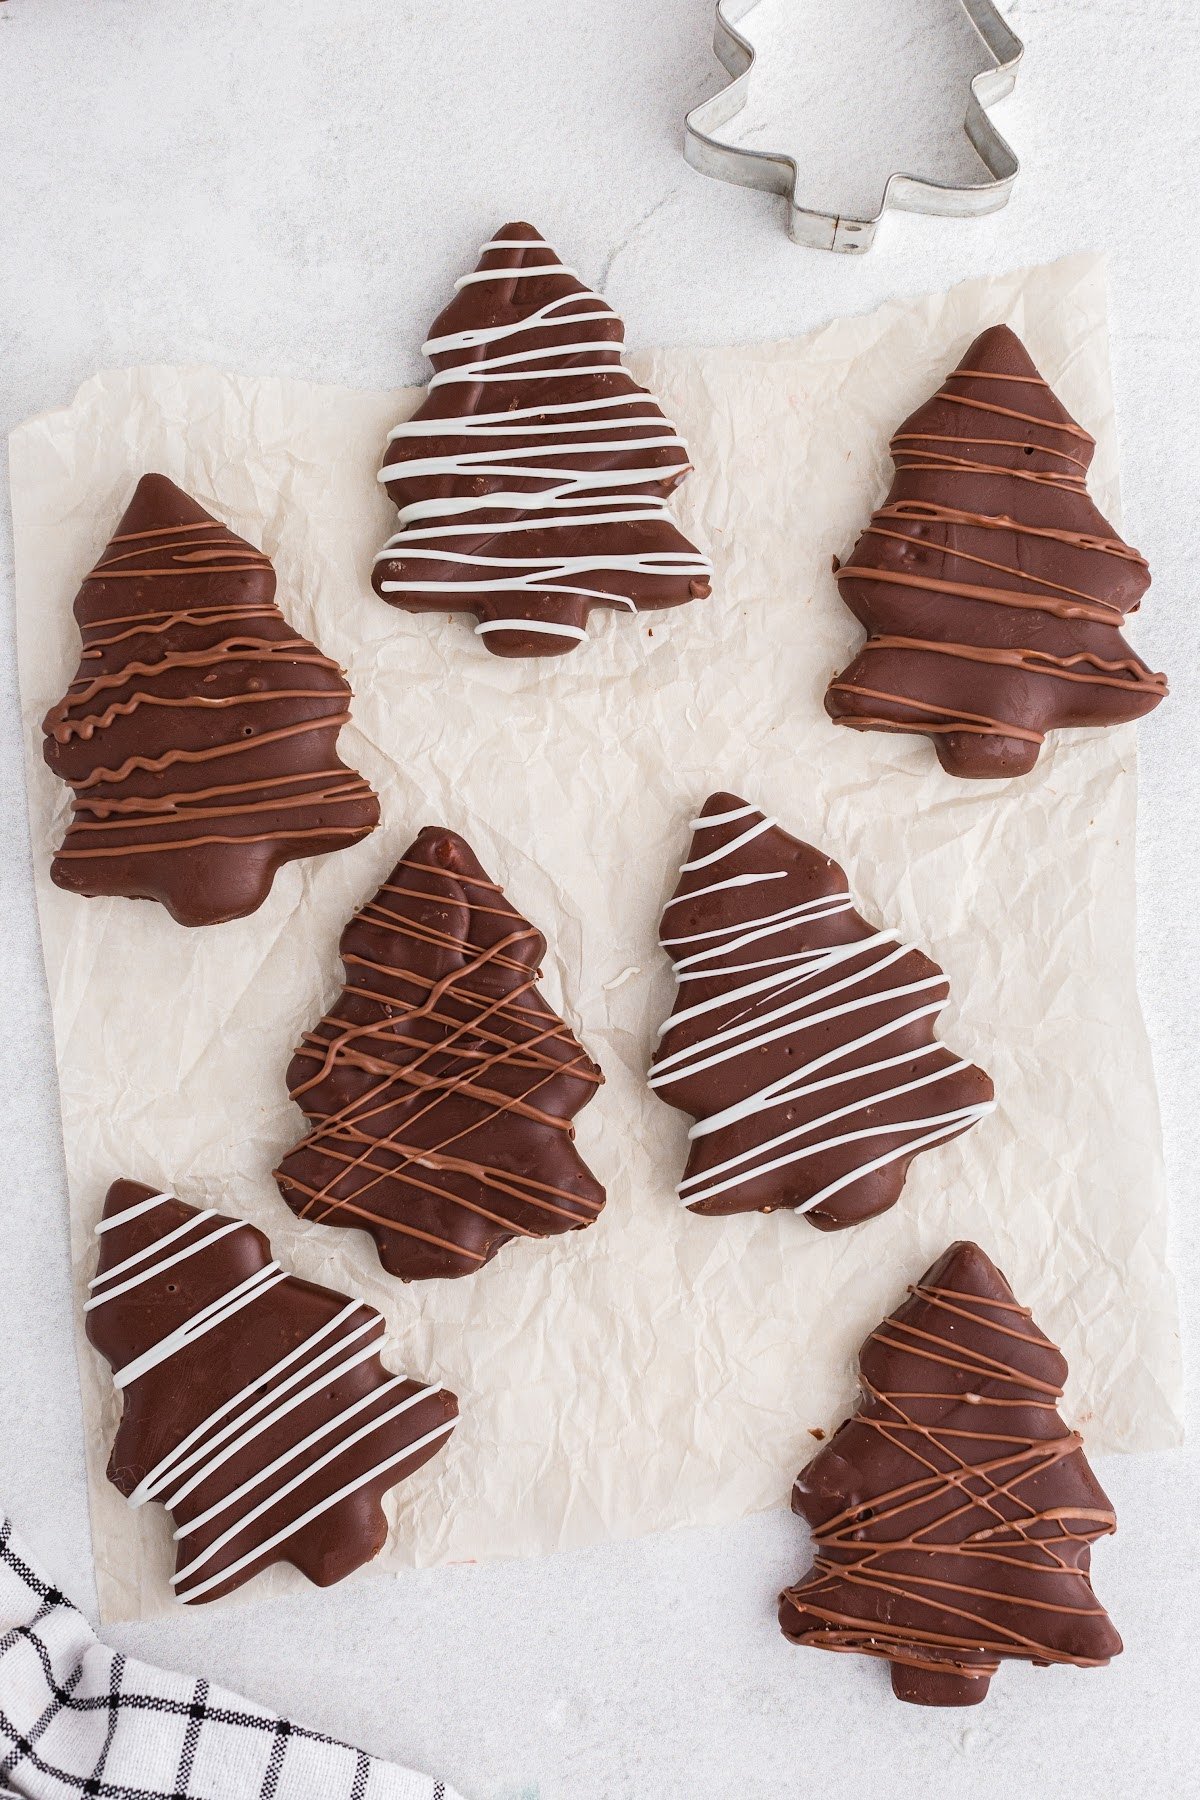
Step 13: Scoop melted creamy milk chocolate into a plastic baggy or piping bag. Snip a tiny corner off of the baggy and drizzle in a zig zag motion over chocolate coated trees. Allow chocolate to set (about 5 minutes).
Step 14: Cover and store on countertop or in refrigerator for up to 7 days. Freeze for up to 3 months, but note that discoloration of the chocolate may occur. Defrost in the refrigerator before serving.
GARNISH/SLICE/SERVE: Serve these homemade chocolate peanut butter Christmas trees at room temperature or out of the refrigerator, either way it’s DELICIOUS!!
Recipe Tips for Making Homemade Chocolate Peanut Butter Trees
- Feel free to change up the chocolate coating or drizzle as you wish for these chocolate coated Christmas trees. For instance, you could use white chocolate with some food coloring as the drizzle, making your Christmas trees represent tinsel!
- The shortening added to the melted chocolate makes it easier when it comes to coating your Christmas trees. It also helps to prevent the “bloom” (or discoloration) on the chocolate when stored and makes the chocolate soft for that melt-in-your-mouth experience!
- You can reheat chocolate in short bursts to keep it smooth and easy to use for coating the trees.
- If you would like to use candy molds to make these, you will want to coat the inside of the molds with the melted chocolate and then choose the size of your cookie cutter so that the trees are a bit smaller and can nestle inside the molds. Coat with more chocolate and then pop the whole mold into the fridge to firm up. Firm trees will easily pop out of the molds. You can even use the freezer to get your candies extra cold.
Easy Ways To Use Leftover Melted Chocolate
It’s likely that you may end up with some leftover melted chocolate once dipping your peanut butter chocolate christmas trees. If that is the case, it’s an ideal time to whip up some extra christmas desserts that won’t require too much time or effort on your part. Here are some ideas you can try:
- Take hard pretzels and dip them fully in melted chocolate or in part;
- Grab some fresh strawberries and dip those into the remaining melted chocolate;
- Make a chocolate coated nut mix by dipping any of your favorite nuts into the remaining melted chocolate.
- Use your melted chocolate to line some hot cocoa molds which you can then fill with hot cocoa mix and mini marshmallows!
- Grab a wooden popsicle stick and an empty clean ice tray, fill the ice tray cubes with the remaining melted chocolate and stick the wooden popsicle stick into it, propping the stick against something while it sets. When ready to serve, fill a mug with hot steaming milk and swirl your chocolate stick into the milk, making a decadent hot chocolate.
Recipe FAQs
These chocolate-covered holiday treats can either be stored at room temperature or in the refrigerator for 5-7 days.
I like to line my container with a sheet of parchment paper so that the treats don’t stick to the container or each other.
I haven’t specified what type of peanut butter to use for these Peanut Butter Chocolate Christmas Trees. If you want to use natural peanut butter, go for it although this treat is intended to be decadent and by no means pretends to be suitable for any strict diet!
Most homemade treats using peanut butter tend to use the processed variety since it won’t separate from the oils and therefore holds up better in storage. Natural peanut butter can also leave your mouth feeling quite dry which is something I don’t want in my holiday treats!
While you can freeze these Christmas tree treats for up to 3 months, the chocolate notoriously discolors when stored for any extended amount of time in the freezer. You may also find that the chocolate “sweats” when it’s removed from the freezer. Don’t get me wrong, we will EAT them, but they’re not as pretty, and frankly, they’re too delicious to last that long anyway. So if you’re planning to set these out for guests, just keep them in an airtight container on a cool corner of the countertop or in the refrigerator.
If you’re eating these at home with your immediate family, then that shouldn’t be an issue, but if you intend to use these as festive holiday treats served to friends and extended family or as cute gifts, then I suggest that you don’t make them so far in advance.
If you freeze your peanut butter chocolate Christmas trees, do so in an airtight container, lined with parchment paper (placing wax paper between any stacked chocolate Christmas trees too). You can then thaw them overnight in the refrigerator prior to serving.
Other Delicious Holiday Treats to Enjoy

If you tried this How to Make Chocolate Peanut Butter Christmas Trees Recipe or any other recipe on my website, please leave a 🌟 star rating and let me know how you liked it in the 📝 comments below.

Chocolate Peanut Butter Christmas Trees
Ingredients
Peanut Butter Filling
- ½ cup salted butter melted and cooled
- 2 cups creamy peanut butter
- ¼ cup granulated sugar
- 1 tablespoon vanilla extract
- 4 cups powdered sugar
Chocolate Coating
- 3 cups semi-sweet chocolate chips or half of milk chocolate and half of semi-sweet chocolate
- 2 tablespoons shortening
Drizzle
- ½ cup milk chocolate chips or small pieces
- ½ cup white chocolate chips or small pieces
- 1 teaspoon shortening divided
Instructions
- Line a jelly roll or half sheet pan with parchment paper and set aside.
- Using a hand mixer or stand mixer, beat together melted butter, peanut butter, granulated sugar, and vanilla extract in a mixing bowl until smooth and creamy.
- Beat the powdered sugar into the peanut butter mixture.
- Transfer the peanut butter mixture (it will be crumbly) into the prepared jelly roll pan.
- Press the mixture down into the sheet pan – spreading it to about ½" thickness. Place the sheet pan in the freezer for 15 minutes.
- Lift the parchment paper to remove the chilled peanut butter layer from the pan. Place a new sheet of parchment paper on the pan.
- Use a Christmas tree cookie cutter to cut out ½” thick Christmas tree shapes from the chilled peanut butter layer.
- Place cutouts on a parchment-lined sheet pan. Freeze for 30 minutes.
- Scoop up remnant peanut butter mixture, repress to ½” thickness and cut out additional shapes.
- After cutouts have chilled for 25 minutes, prepare the chocolate coating.
- Combine milk chocolate chips and 2 tablespoons of shortening in a heatproof bowl.
- Heat and stir in 30-second increments in the microwave until the chocolate is smooth and melted completely.
- Using a fork, lift one peanut butter cutout at a time and coat it completely with the melted chocolate. Tap excess chocolate off of the cutout and place it back onto the cookie sheet.
- Work in batches if the peanut butter cutout becomes soft quickly.
- Allow chocolate to harden.
- For optional drizzle, microwave chocolate chips or chopped pieces and shortening (½ teaspoon per ½ cup) in 30 second increments until melted and smooth.
- Scoop melted chocolate into a plastic baggy or piping bag. Snip a tiny corner off of the baggy and drizzle in a zig zag motion over chocolate coated trees. Allow chocolate to set (about 5 minutes).
- Cover and store on countertop or in refrigerator for up to 7 days. Freeze for up to 3 months, but note that discoloration of the chocolate may occur. Defrost in the refrigerator before serving.
Would you like to save this?
Notes
- Feel free to change up the chocolate coating or drizzle as you wish for these chocolate coated Christmas trees. For instance, you could use white chocolate with some food coloring as the drizzle, making your Christmas trees represent tinsel!
- The shortening added to the melted chocolate makes it easier when it comes to coating your Christmas trees. It also helps to prevent the “bloom” (or discoloration) on the chocolate when stored and makes the chocolate soft for that melt-in-your-mouth experience!
- You can reheat chocolate in short bursts to keep it smooth and easy to use for coating the trees.
- If you would like to use candy molds to make these, you will want to coat the inside of the molds with the melted chocolate and then choose the size of your cookie cutter so that the trees are a bit smaller and can nestle inside the molds. Coat with more chocolate and then pop the whole mold into the fridge to firm up. Firm trees will easily pop out of the molds. You can even use the freezer to get your candies extra cold.
Nutrition
Make this recipe?
Share it with me on Instagram @girlinspired1 and follow on Pinterest for more!


Leave A Reply!