


These Apple Hand Pies are the perfect hand-held treat. Flaky pie crust and warm apple pie filling come together in mere minutes to make these nostalgic sweets! Topped with crunchy sanding sugar or an old-fashioned sugar glaze, they are always a crowd pleaser.

Thirty minutes is all you need to make these flaky, golden brown, hand held apple pies. Make them ahead of time, ready to be reheated for a convenient midweek dessert with vanilla ice cream or to be enjoyed fresh out of the oven.
With so many options of canned pie filling to use, this recipe is versatile enough to cater to varied preferences! Easy hand-held pastries are my favorite – try these Strawberry Rhubarb Hand Pies for a delicious deep fried alternative. Some of our other favorite individual serving desserts include Double Chocolate Cupcakes, Kahlua Cheesecake bites, and Lunch Lady Peanut Butter Bars.
Jump to:
Fun Fact
What are Hand Pies?
Hand pies are small pie dough rounds (cut out from a refrigerated pie crust roll or homemade pie crust dough) that contain either a sweet (apple pie or strawberry rhubarb, for example) or savory (like our chicken pot pie hand pies) filling and are crimped together and baked. Homemade hand pies are ideal as a snack, light meal or side dish, depending on their filling.
In this case, an apple hand pie recipe offers a sweet treat without being overly decadent or rich.
🥟 Ingredients:

- Apple Pie Filling: We use canned apple pie filling, but you can make your own – see substitutions section below.
- pie dough: Use a homemade butter pie crust or you can also use store-bought crust (2)
- Egg Yolk: for getting that gorgeous rich golden sheen on the baked pie
- Sanding Sugar: used to decorate the top of the pies
For a full list of ingredients and their measurements, 📋 please view my printable recipe card at the bottom of the post.
Substitutions and Variations
- This recipe is ideal for an array of different canned pie fillings (apple, blueberry hand pies or even cherry hand pies).
- I don’t recommend using traditional fresh apple filling unless you simmer the apple mixture on the stovetop with plenty of sugar and a bit of water. The apples needs to be cooked down before the filling goes into the hand pie; it will be too runny and the apples will not have time to cook in the oven.
- A great homemade alternative to canned pie filling are these fried cinnamon apples.
- Baked apple hand pies can be coated in course sugar or drizzled with a simple sugar glaze or even something more decadent like brown sugar caramel sauce! Put some caramel sauce on the inside to make caramel apple hand pies.
- Add in some warm spices such as cinnamon and nutmeg for added flavor or an apple pie spice mixture.
- If you are making your own filling from scratch, you can use Honey crisp apples, Gala apples, or Granny Smith apples for this recipe.
- Stir in a drop of lemon juice to the apple pie filling or the sugar glaze to balance the sweetness.
- If your apple pie filling isn’t sweet enough, add in some brown sugar.
🔪 Instructions:
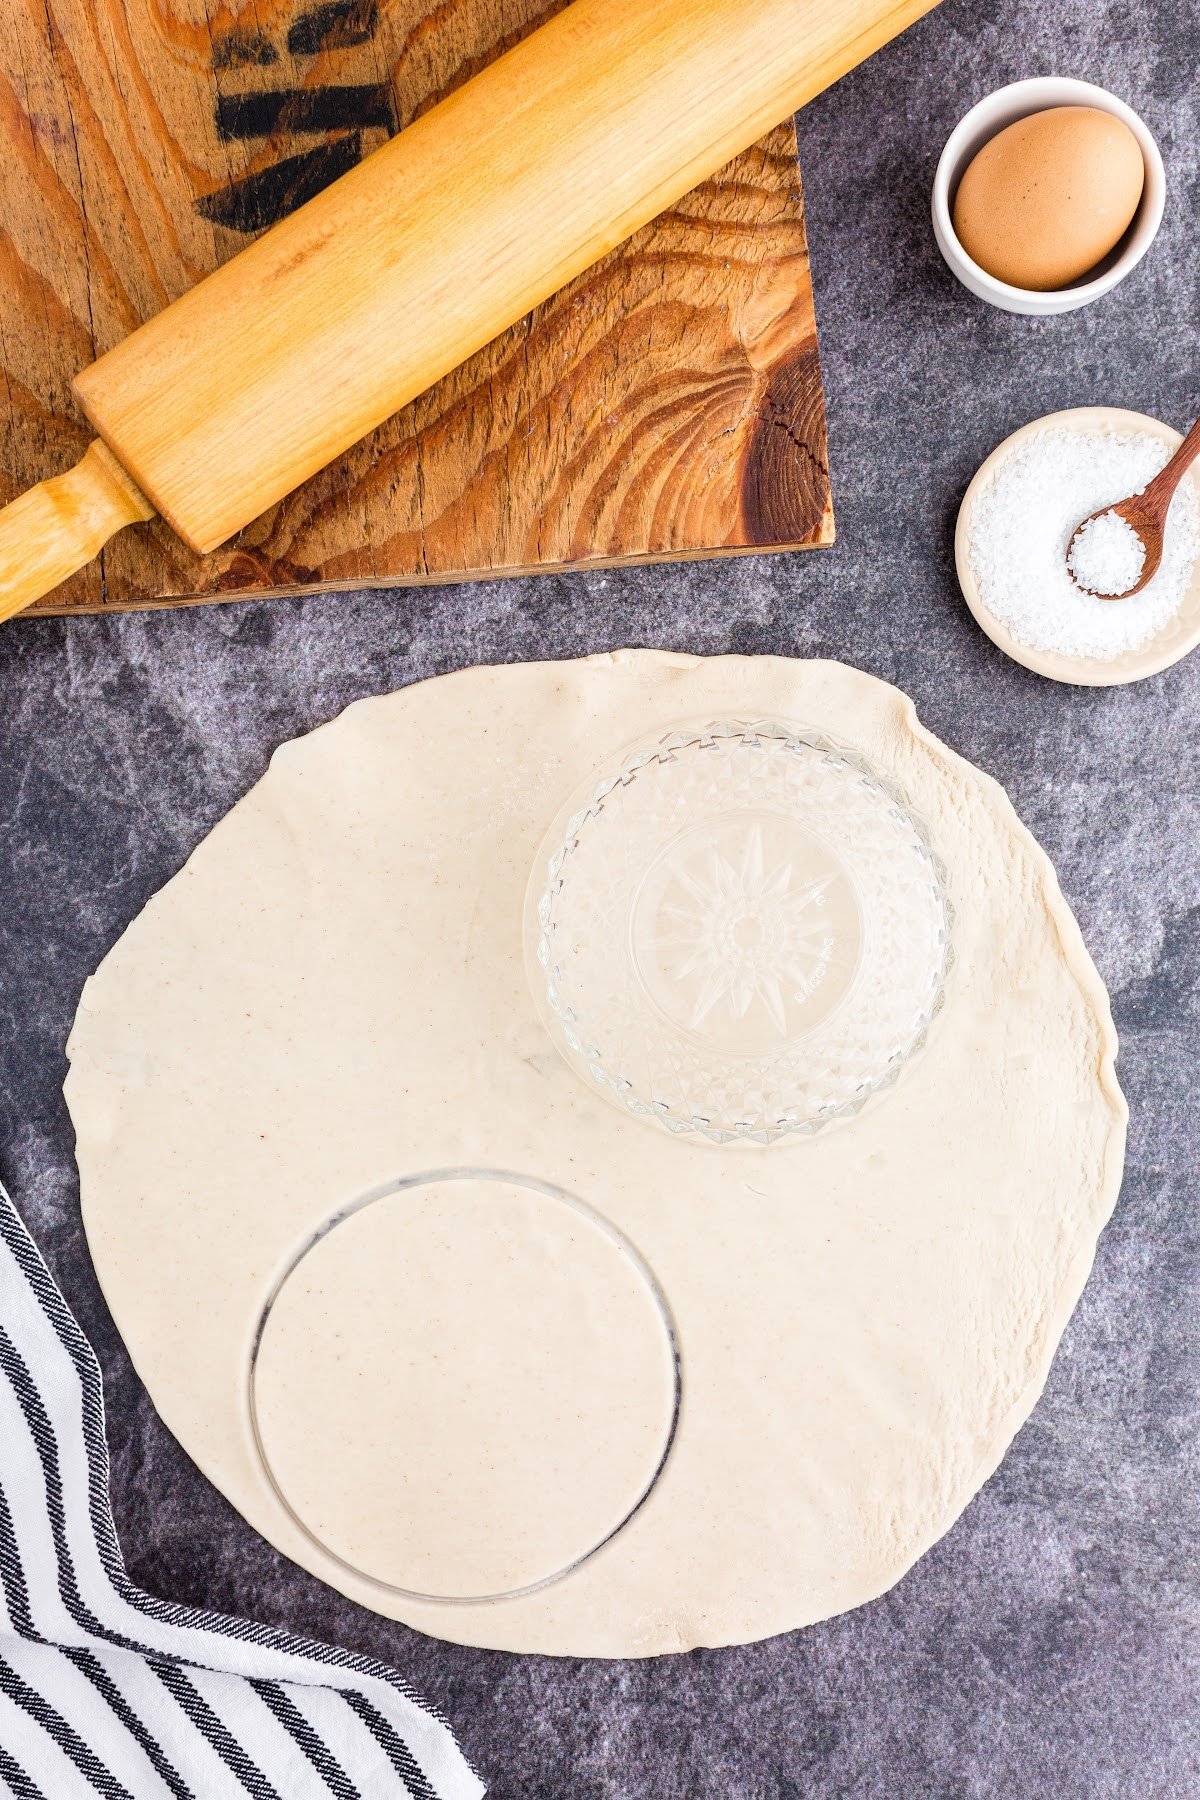
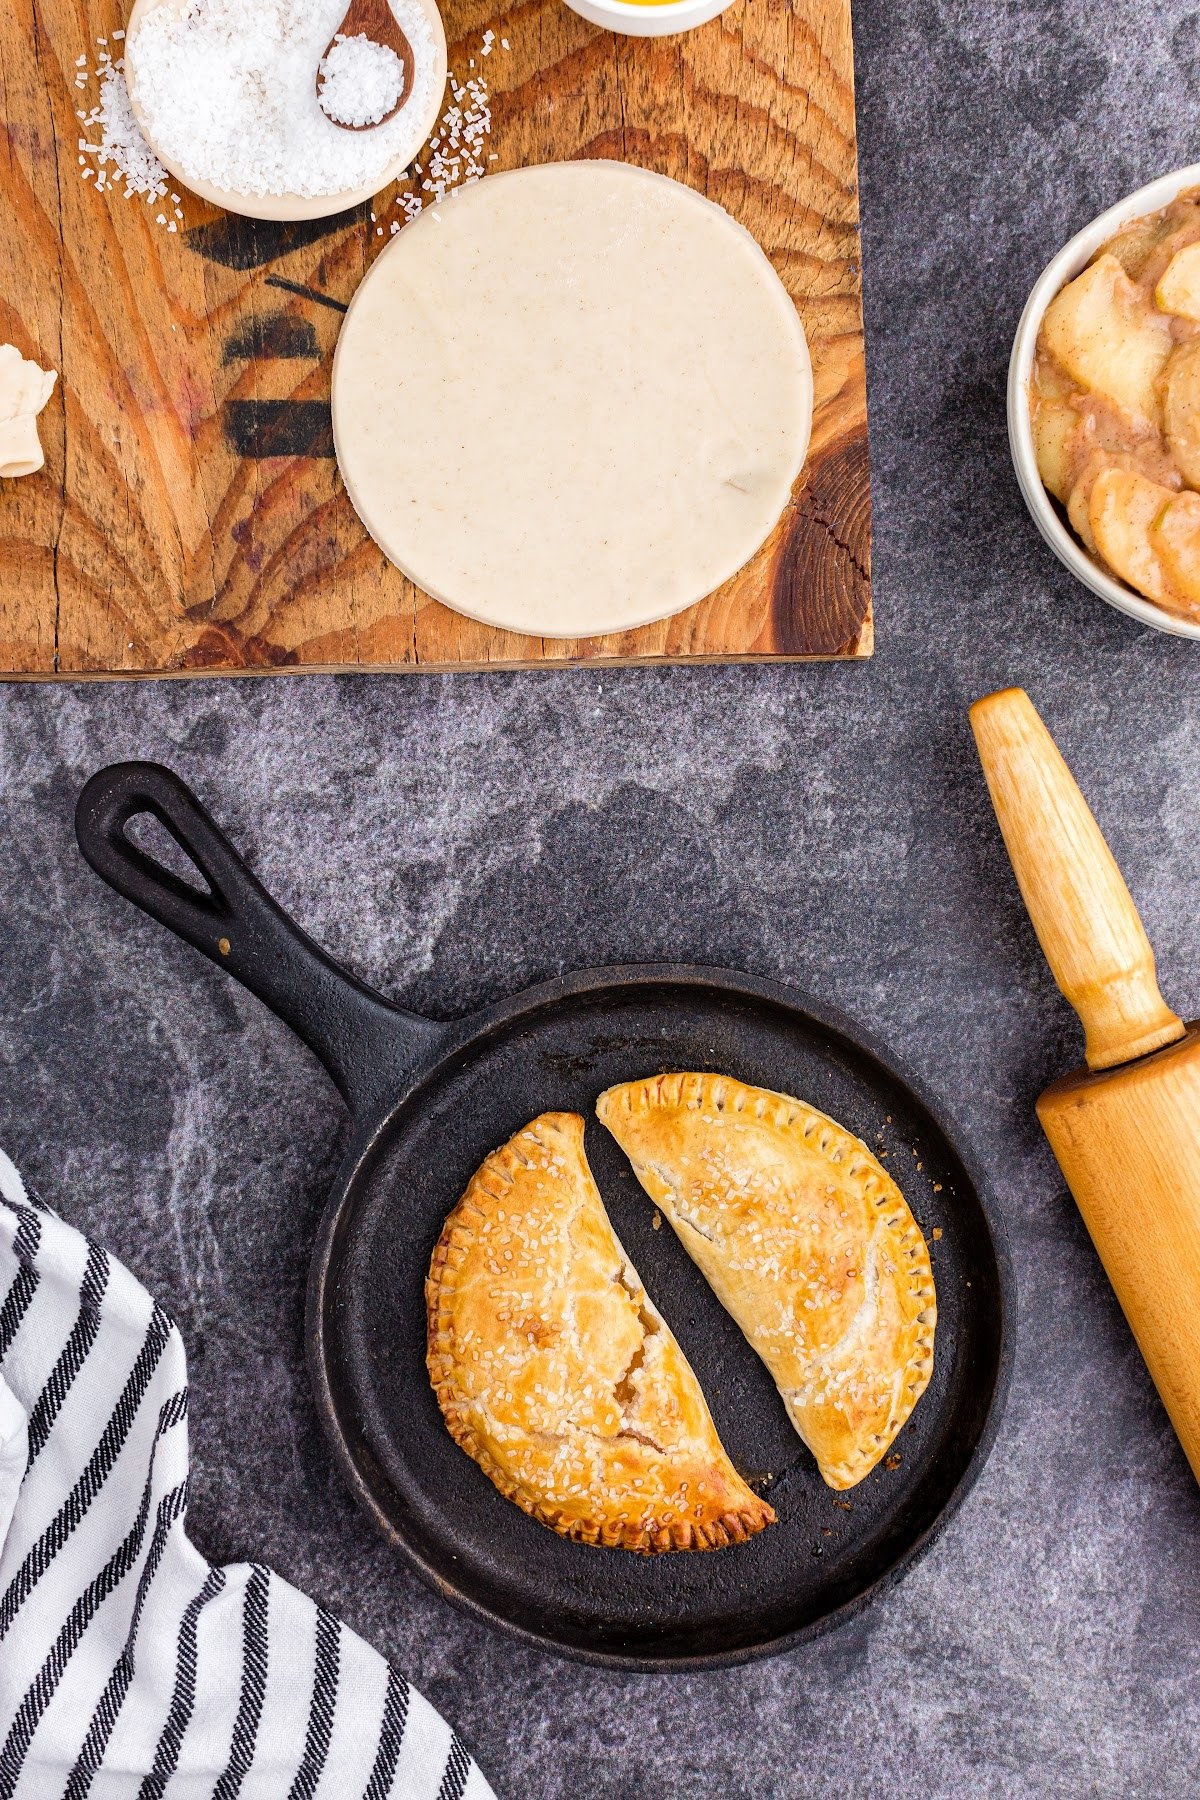
Step 1: With a rolling pin, roll out the crust and cut 5″-6″ rounds from the dough.
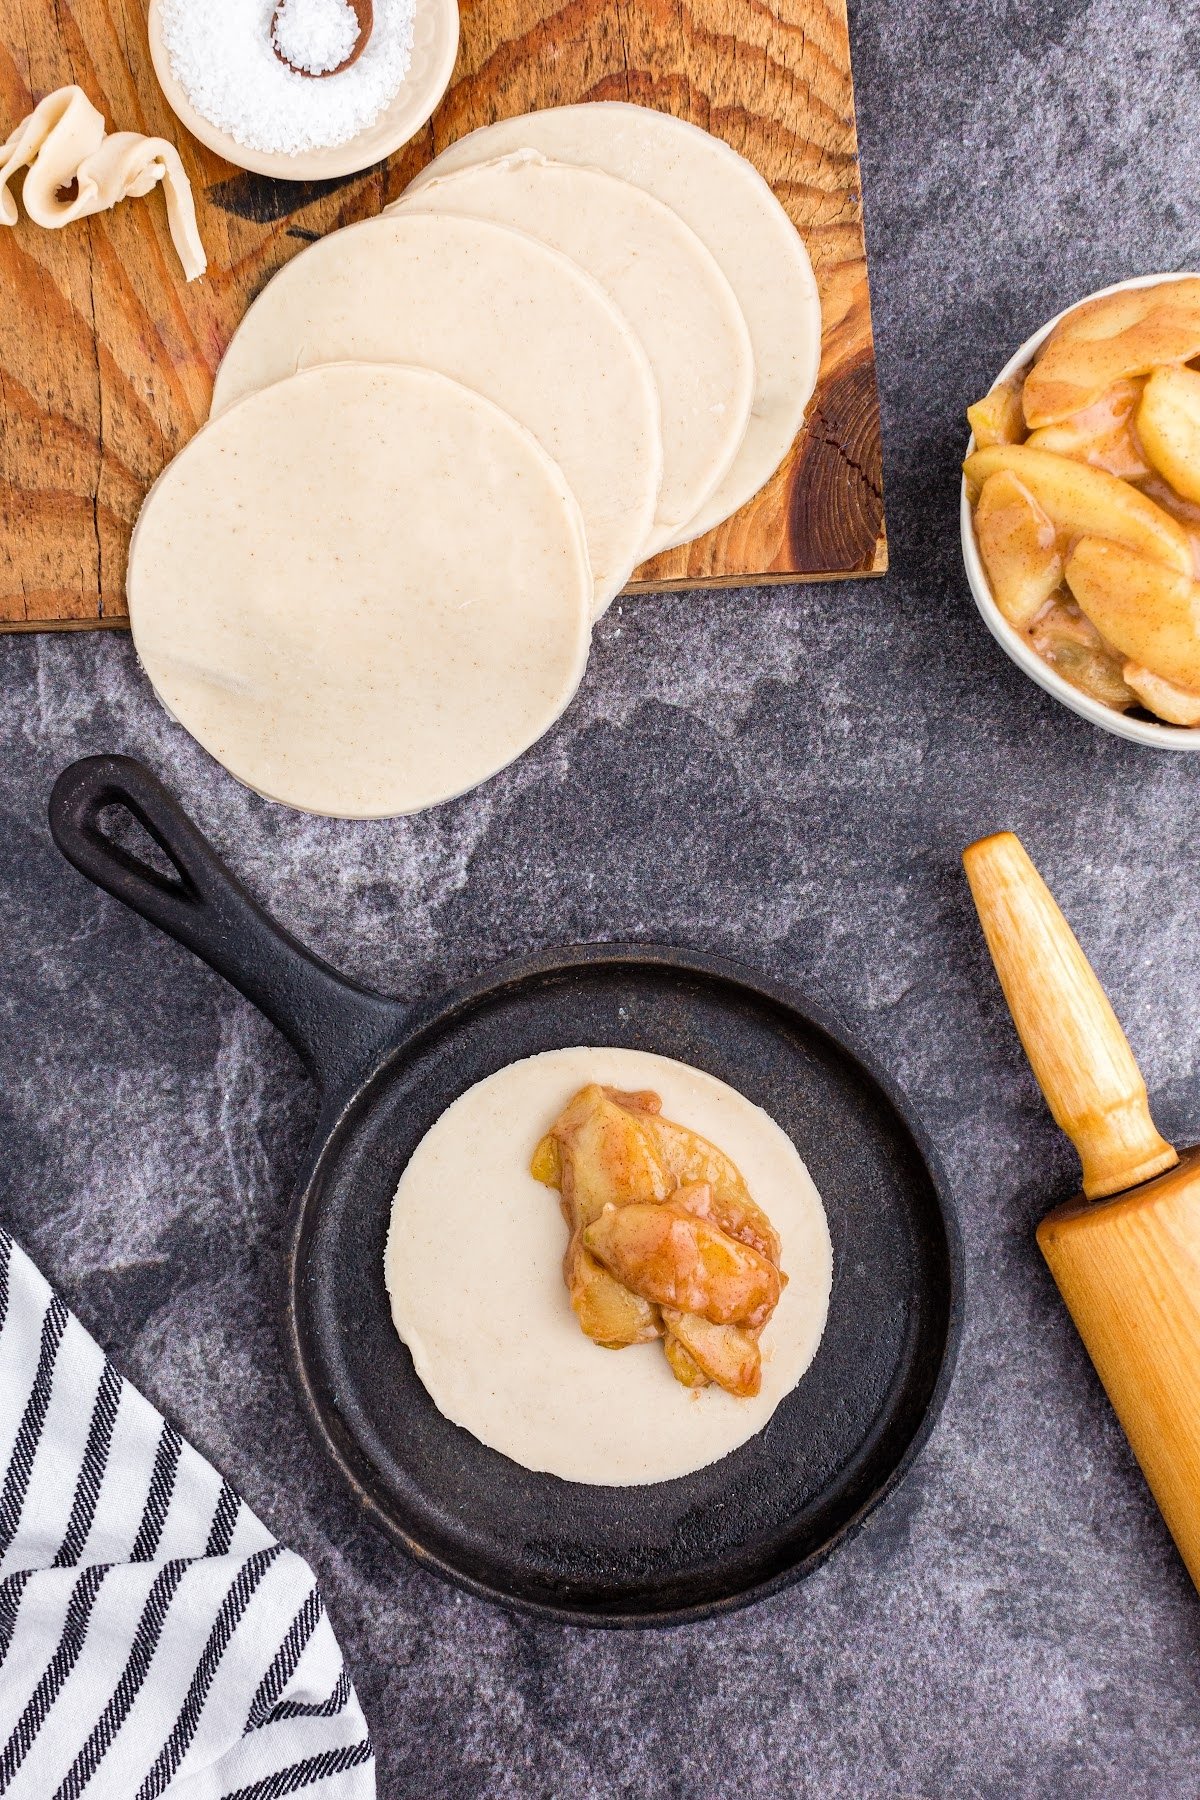
Step 2: Place a scoop of the fried apples or apple pie filling in each pie crust.
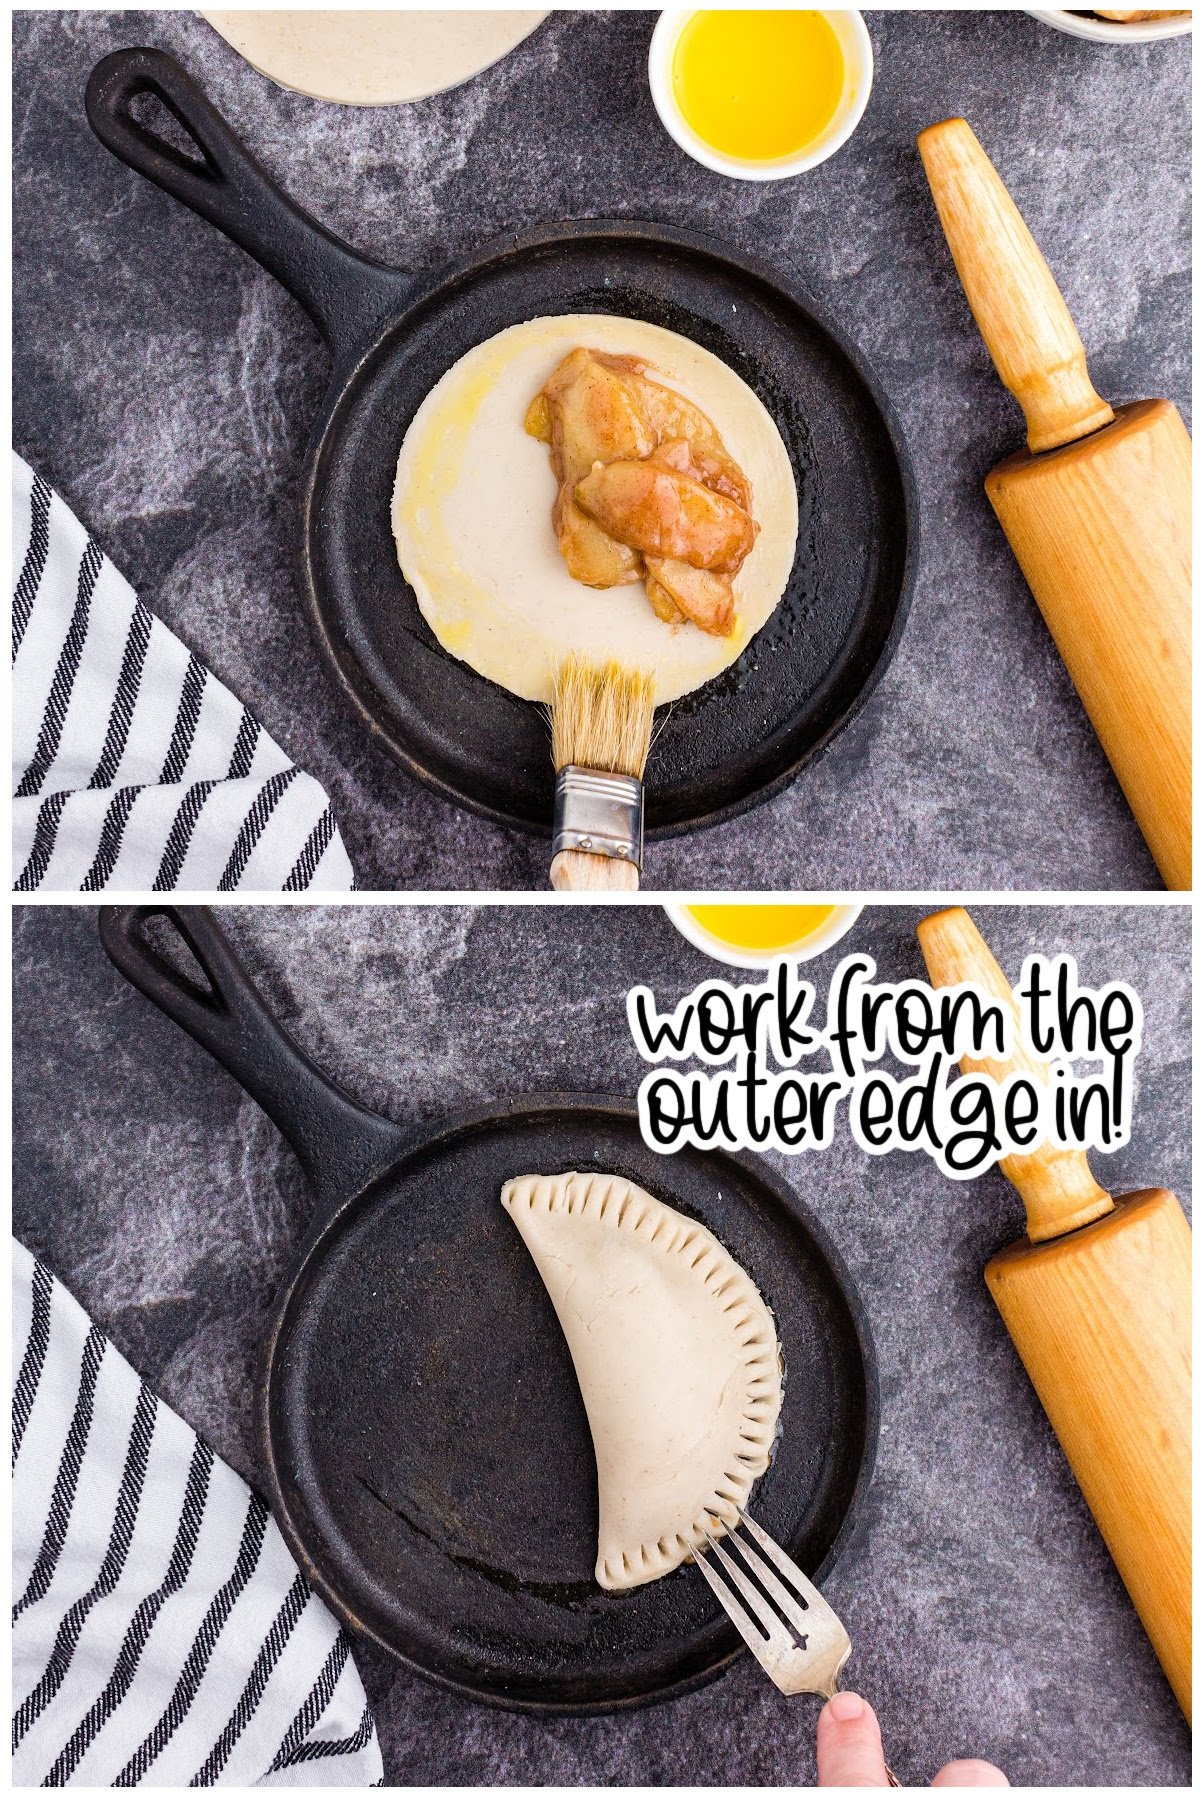
Step 3: Moisten the perimeter of the crust with beaten egg yolk to help the dough seal together. Then fold the pie crust round in half and use a fork to crimp the edges of the dough together.
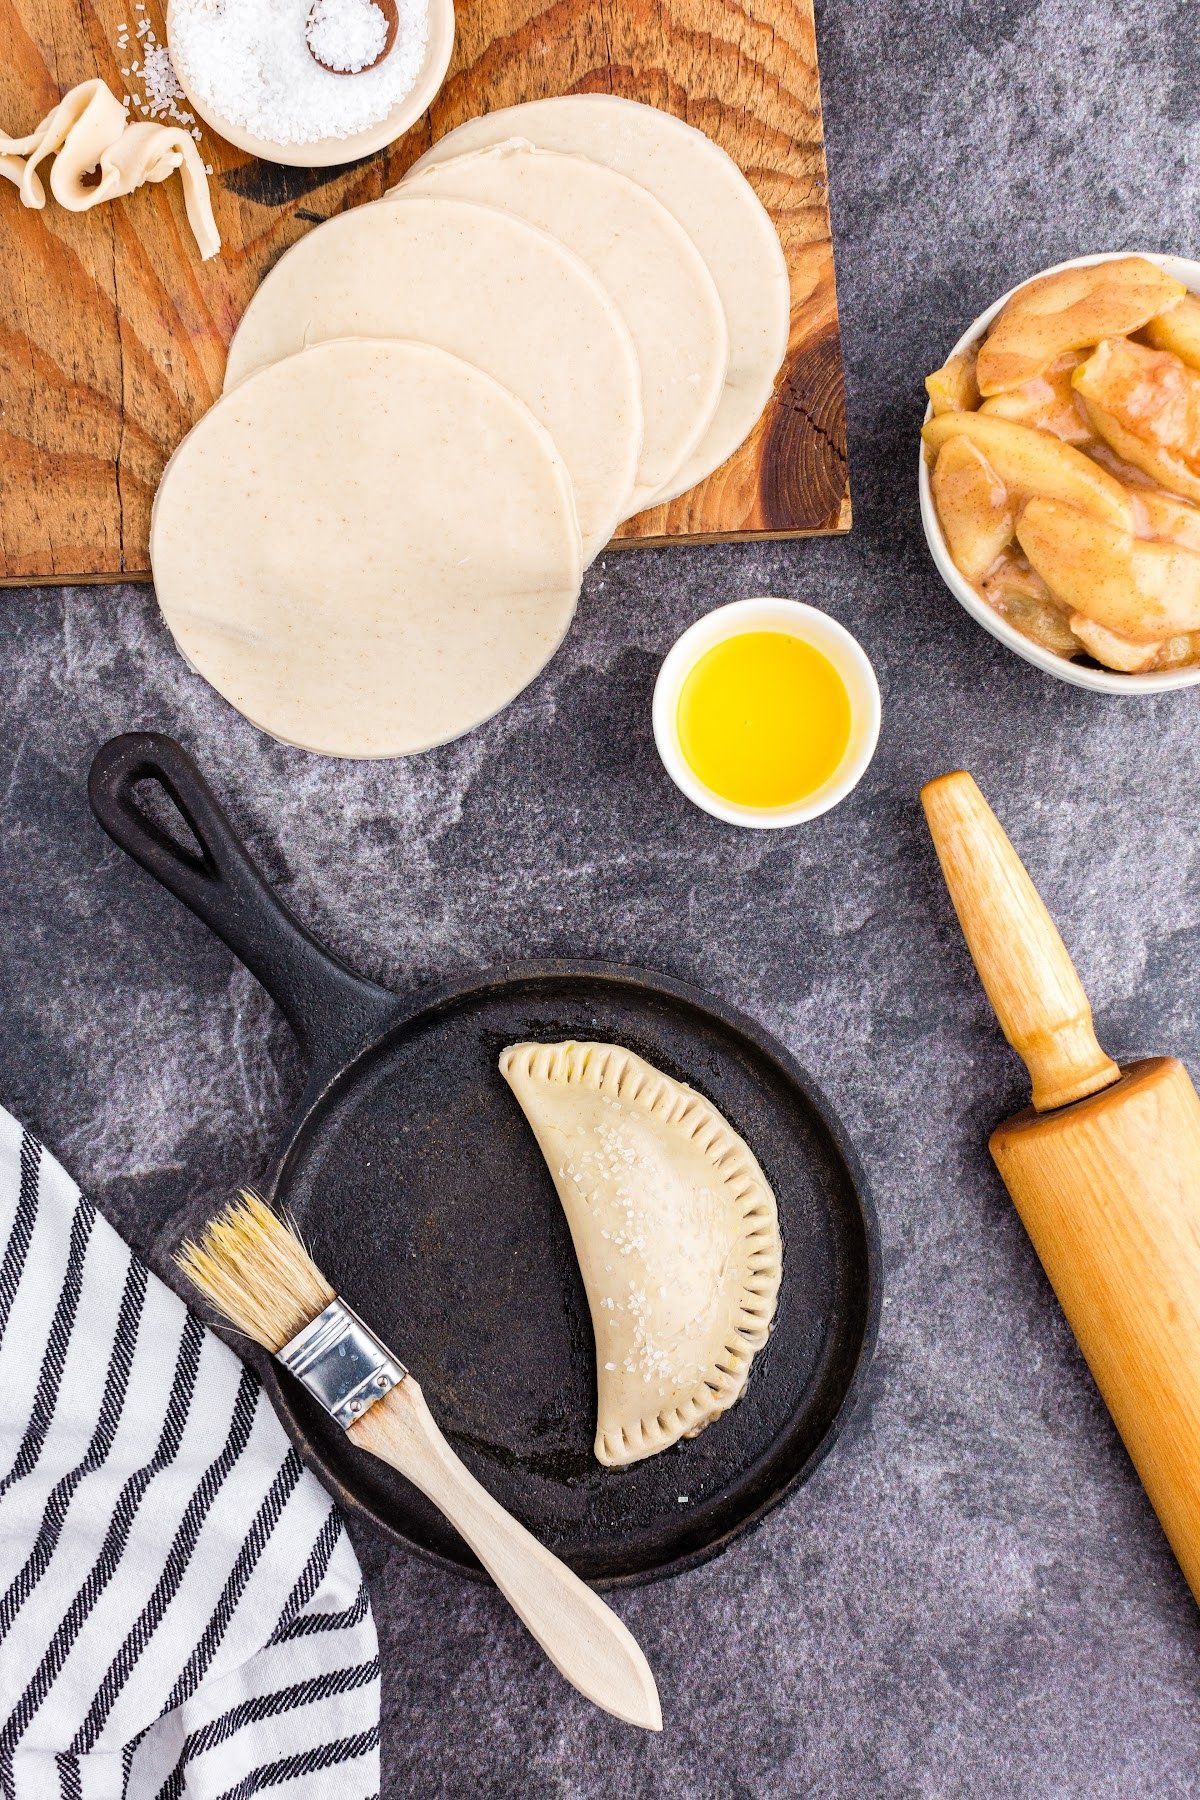
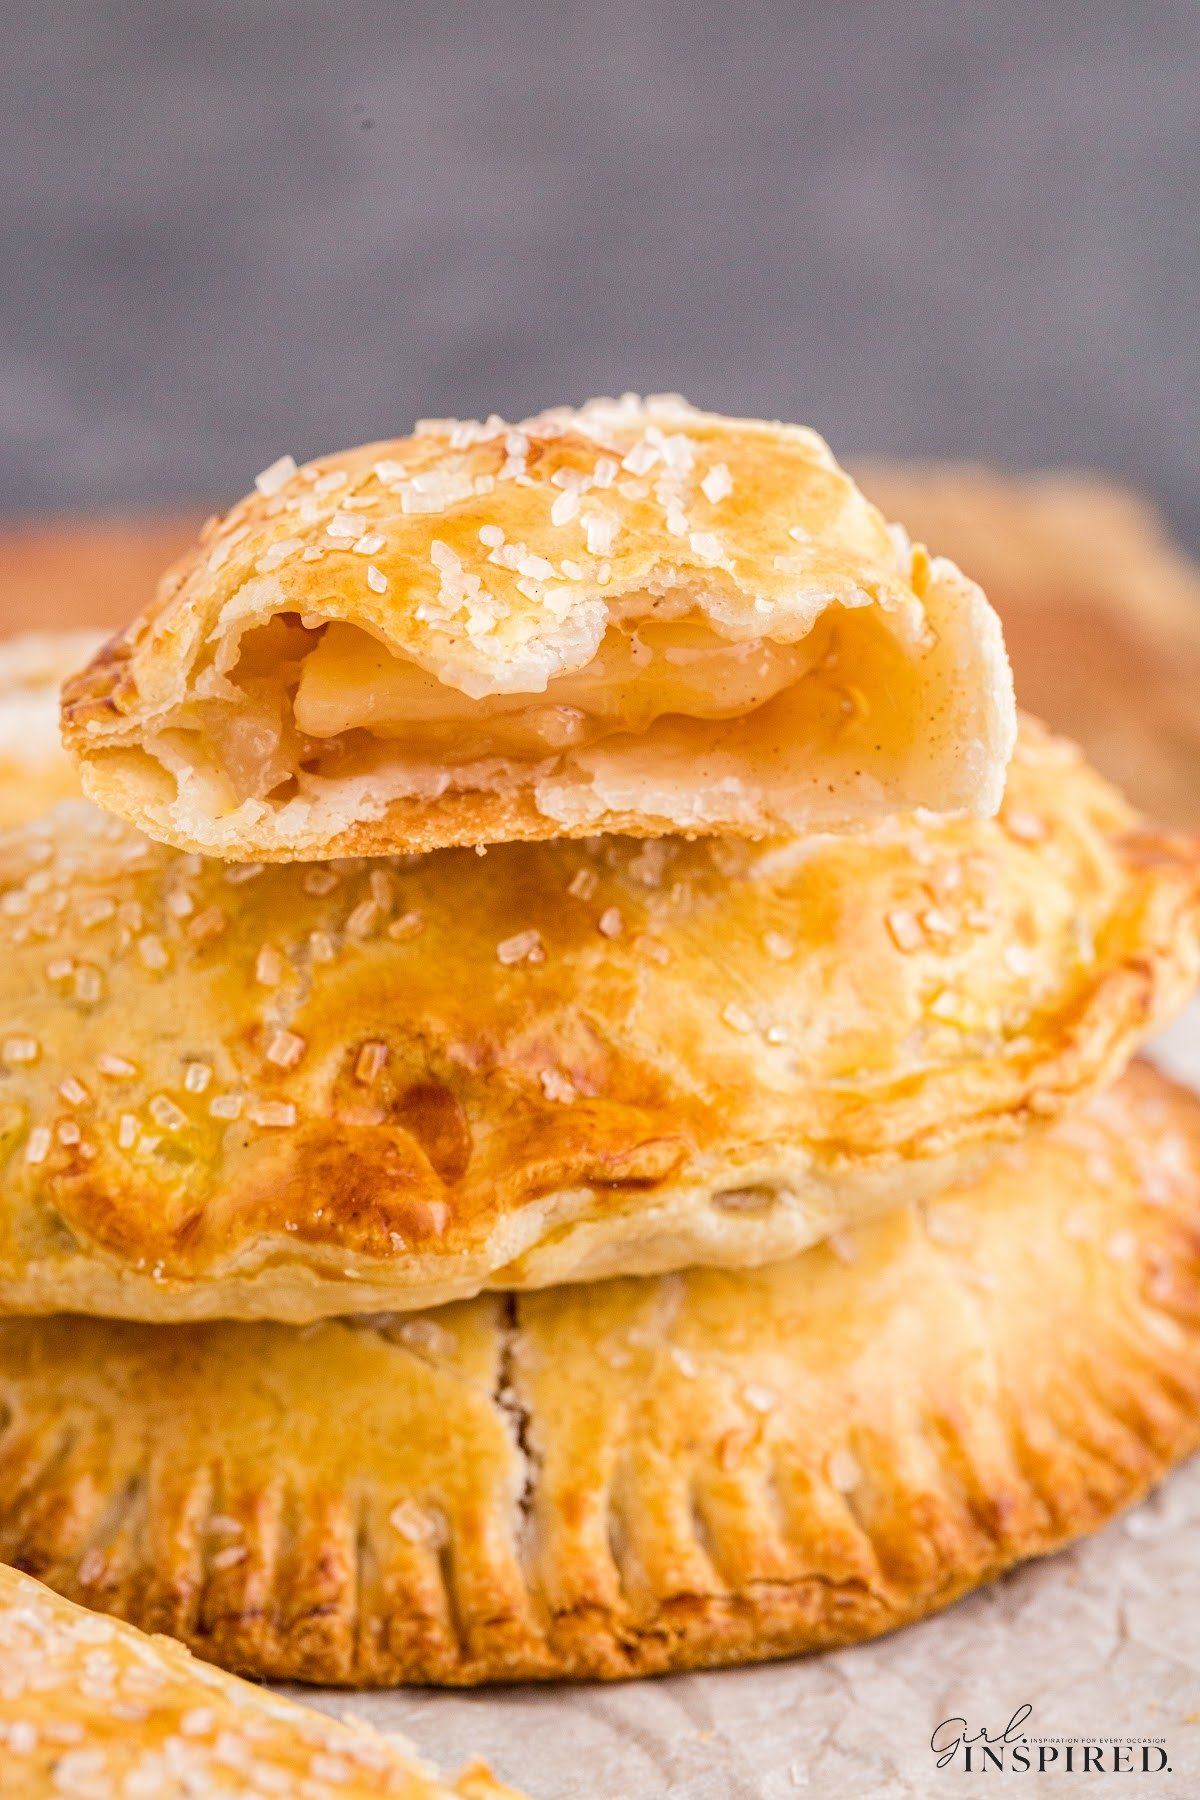
Step 4: Brush the crimped hand pies with the egg wash and place them on a parchment paper lined cookie sheet or oven-proof pan. Sprinkle the top of each pie with sanding sugar or coarse sugar, if desired.
Step 5: Bake the assembled hand pies until they are deep golden brown. If all the hand pies do not fit on one baking sheet, bake them in batches.
SERVE: Serve with vanilla ice cream for an extra yummy treat.

Baking Tips for Handheld Apple Pies:
- The egg wash provides a lovely golden brown finish to the pies and also helps to seal the edges of the pie dough so that the pie filling doesn’t spill out during baking or eating. Make sure that the edges of the dough are clear of any excess flour or pie filling to ensure that a good seal is achieved.
- Different egg wash sheens can be achieved by using: an egg white wash, a whole egg mixed with a teaspoon of water, a brush with milk, or a brush with vodka!
- Use only a couple tablespoons of filling mixture in each crust. Any more will overfill the mini pies.
- Your pie dough needs to be thick enough so that it doesn’t split while baking. If you can handle your unbaked pie without the dough splitting then it will likely be sturdy enough to hold up while baking.
- You can seal the edges of your hand pie dough by pinching the edges with your fingers or crimping with a fork. If you use a fork, make sure that you get a good press to properly seal the crust edges without puncturing the pie dough.
- Powdered sugar and a few drops of water can be used as a sugar glaze to coat the hand pies instead of the sanding sugar garnish. To get that nostalgic hand pie look, add several layers of glaze to the baked pie crust, allowing the layers to dry between the coats.
- The pie crust used should be at room temperature to make it more pliable for easier assembling. At the same time you don’t want your dough too warm. Remove the pie crust from the refrigerator while preparing the other ingredients so that it’s at an ideal temperature to work with after about 15 minutes.
- I’ve used a small bowl as a template for my pie crusts, but you can use a small plate or a large biscuit cutter instead.
Recipe FAQs
These mini apple pies are the most delicious when eaten right away although you do have the option of storing them in an airtight container at room temperature or in the refrigerator for up to 2-3 days.
When ready to enjoy, simply reheat them in the oven, air fryer, or in a toaster oven.
Yes, definitely! To extend the shelf life of your little pies, once fully assembled, wrap them individually in plastic wrap. You can store them unbaked or fully baked in the freezer for up to 4 months.
I prefer to freeze my apple hand pies by first placing them on a baking sheet uncovered for about 2-3 hours till frozen. Once frozen, you can either store them in a freezer bag or in an airtight container.
Thaw overnight on the countertop and then reheat them in the oven or a toaster oven.
Yes, you can! These mini apple hand pies can be cooked in the air fryer for 10 minutes at 350℉. It’s as simple as assembling your pies as you would to bake in the oven, lightly spray the air fryer basket with nonstick cooking spray and place your hand pies in the air fryer.
Make sure that the pies are not layered on top of each other. Depending on how many you intend on making and the size of your air fryer basket, you may need to bake them in batches.
More Yummy Sweets to Try


If you tried this Apple Hand Pies recipe or any other easy recipes on my website, please leave a 🌟 star rating and let me know how you liked it in the 📝 comments below.

Apple Hand Pies
Ingredients
- 21 oz. can apple pie filling
- 2 pie crusts homemade or store bought
- 1 egg yolk slightly beaten
- 1 tablespoon water
- 2 tablespoons coarse sanding sugar
Instructions
- Preheat the oven to 450°F.
- Prepare pie crusts. If using pre-made crust, remove from packaging. Roll one crust out at a time – it should be AT LEAST 1/16th inch thick. It is important to keep the crusts thick enough to hold the pie filling. For pre-made crusts, do not roll any thinner than they came in the package. Use a bowl (4-inch diameter used here), placed upside down, to cut out circles from the dough. Gently gather together the scraps, roll out just enough to cut additional circles of the same thickness.
- Place three crust circles onto a baking sheet sprayed with non-stick cooking spray or lined with parchment paper.
- Place a scoop of the apple pie filling into the center of the circle.
- Use a fork to beat the egg yolk slightly and mix with 1 tablespoon of water.
- Brush a bit of the egg wash around the edge of the circle to help seal the sides. Fold the pie crust in half to form a semi-circle. Press down (work from the outer edge in) and then crimp with your fingers or a fork to seal the edges.
- Brush the exposed sides of the hand pie with the egg wash. Sprinkle desired amount of coarse sugar over the egg wash.
- Bake for 10-12 minutes or until the pies are golden brown and the crust is crispy. (The filling does not need to be cooked so we’re really just cooking the crust here.)
- Storage:
- Best if eaten right away. Leftover hand pies can be stored in an airtight container, on the countertop, or in the refrigerator for 2-3 days. Reheat in the oven or in a toaster oven for best results.
Would you like to save this?
Notes
- Can be cooked in the Air Fryer – 350°F for 10 minutes – do not use egg wash.
- When baked in the oven, the egg wash gives these hand pies a lovely golden sheen. Be careful not to overfill the hand pies when assembling.
- The crust shouldn’t be rolled too thin otherwise it can split while baking.
- Pinching the crust edges seems to work better than crimping with a fork.
- Add a simple glaze to the tops of the baked hand pies by mixing powdered sugar and a few drops of water.
- Allow the raw crust to sit a room temperature before rolling out so that it’s more pliable.
- Be careful not to poke holes into the assembled hand pies while crimping with a fork or the filling will ooze out.
- Storage: Best if eaten right away. Leftover hand pies can be stored in an airtight container on the countertop or in the refrigerator for 2-3 days. Reheat in the oven or in a toaster oven for best results.
- 5″ rounds will yield about 10 pies while 6″ rounds will yield about 8 pies.
Nutrition
Make this recipe?
Share it with me on Instagram @girlinspired1 and follow on Pinterest for more!


Leave A Reply!