
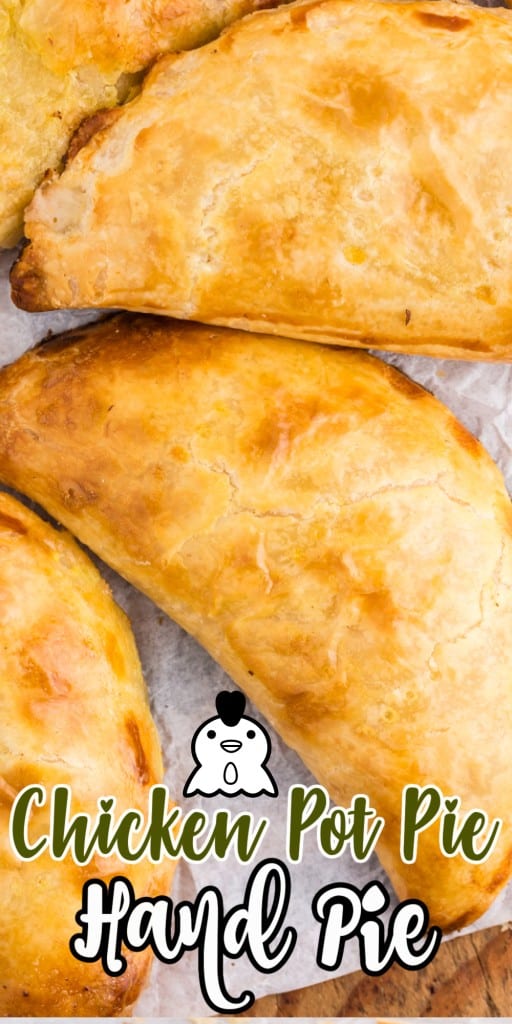


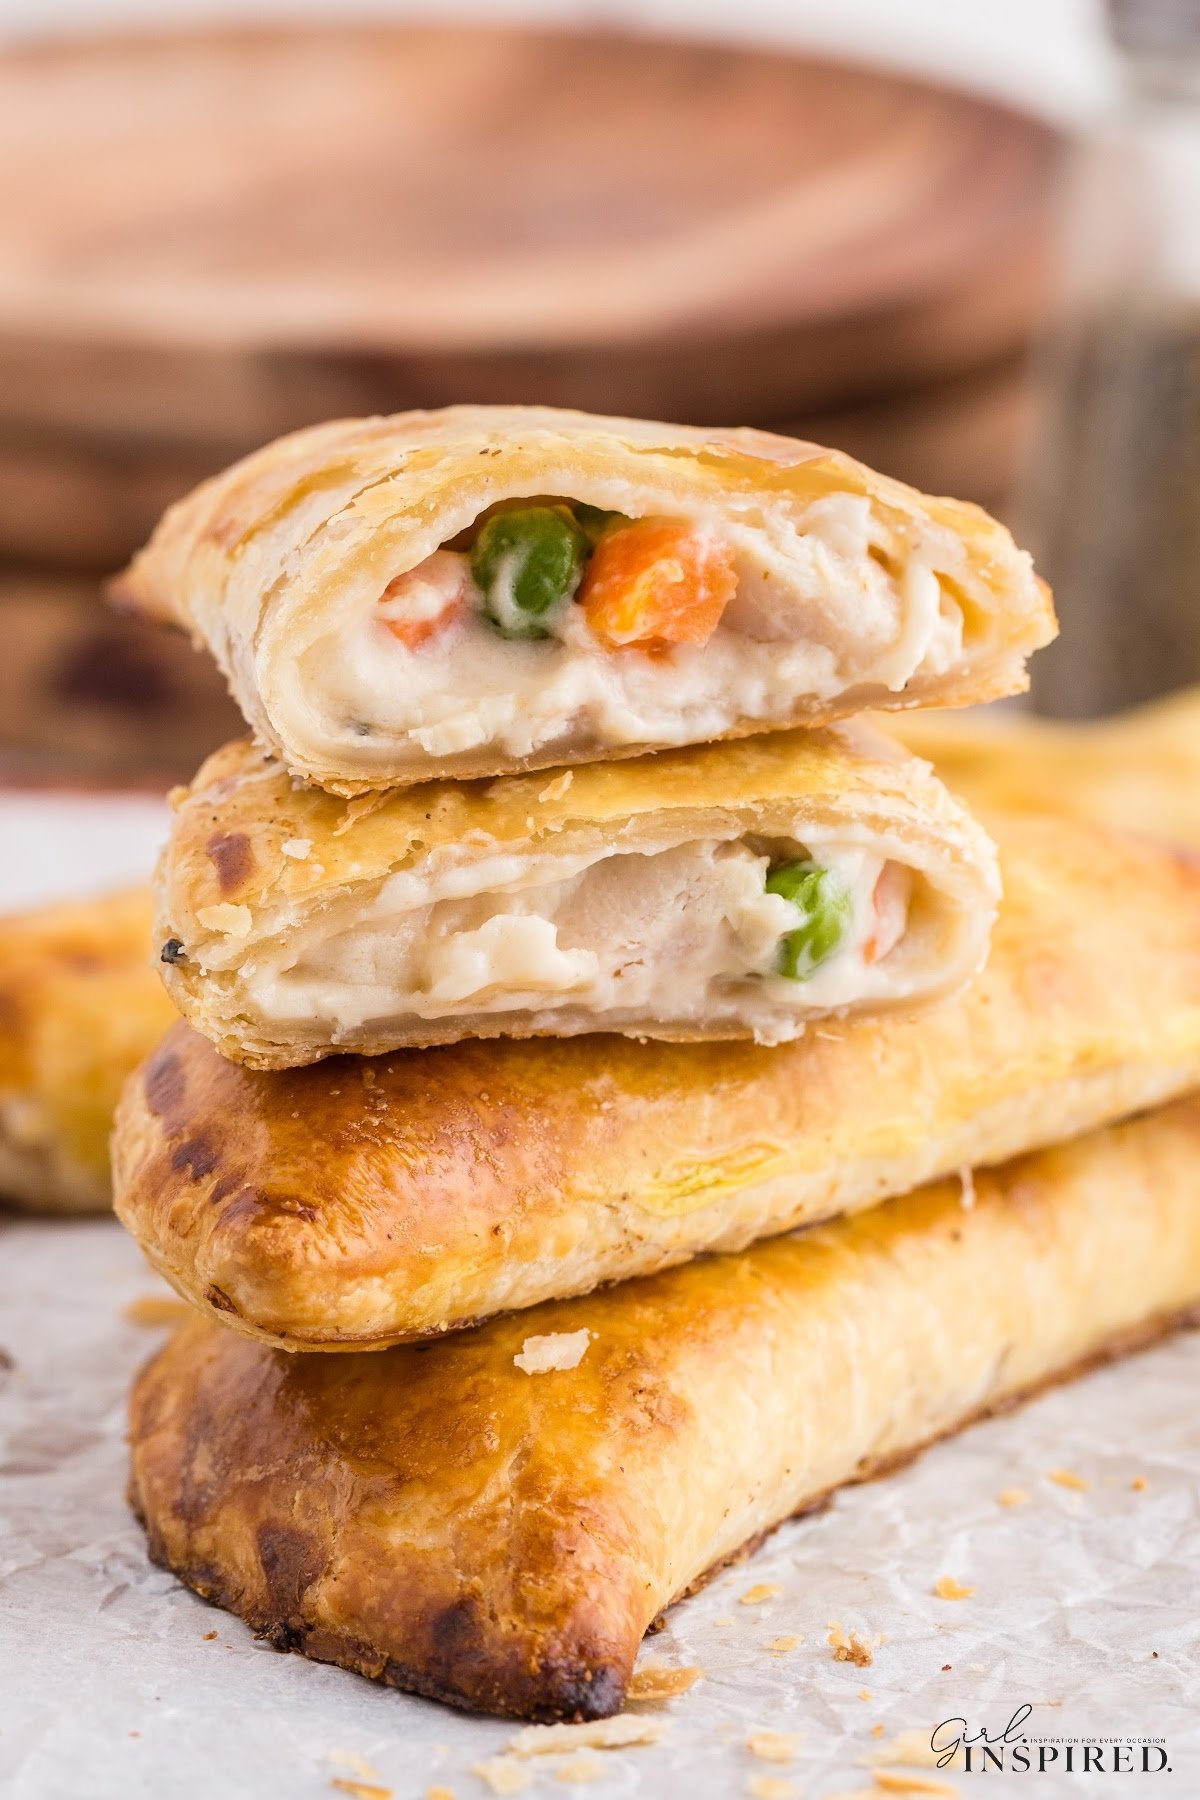
These Chicken Pot Pie Hand Pies are a fantastic lunchbox, picnic, or on-the-go meal for all savory pie lovers out there! Use refrigerated rolled pie crusts to save you time filled with a creamy filling of tender chicken and vegetables.
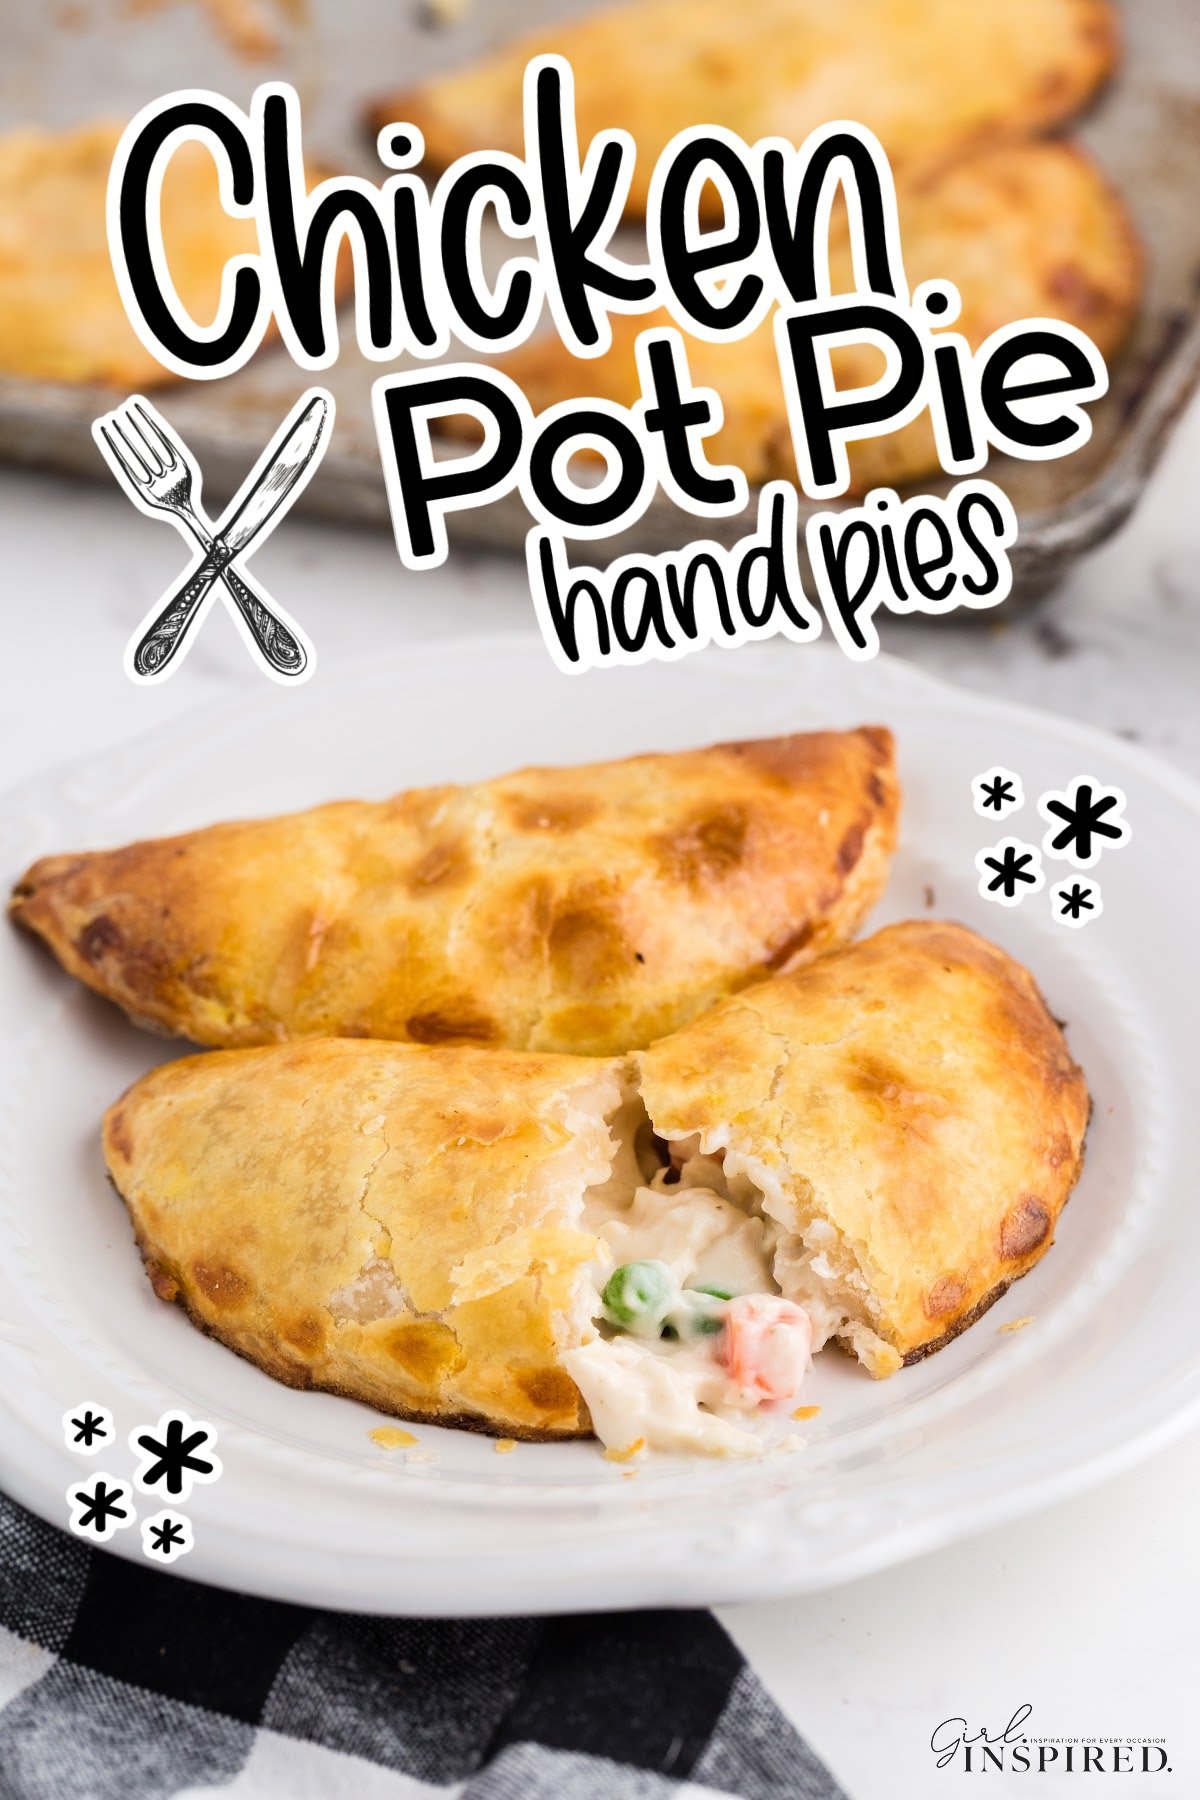
These homemade chicken pot pie hand pies are a delicious twist on our classic easy chicken pot pie. Instead of the chicken pot pie filling stuffed into a regular pie base and served in slices, the filling is added to individual hand pies, offering convenient single pie servings that can be enjoyed at the table for a perfect meal or on the go!
Enjoy your chicken pot hand pies as a main meal served with a green salad or 24 hour fruit salad or as a convenient snack when you’re on the move. They are also a huge hit with kids which is always a win in my books!
For a more traditional dinner, try our Easy Chicken Pot Pie recipe and if you’re in the mood for meal prep, stock your freezer with these Freezer Chicken Pot Pies.
For more hand-held chicken-licious recipes, check out these Buffalo Chicken Meatballs and our oh-so-popular Southern Fried Chicken.
Jump to:
🥧 Ingredients:
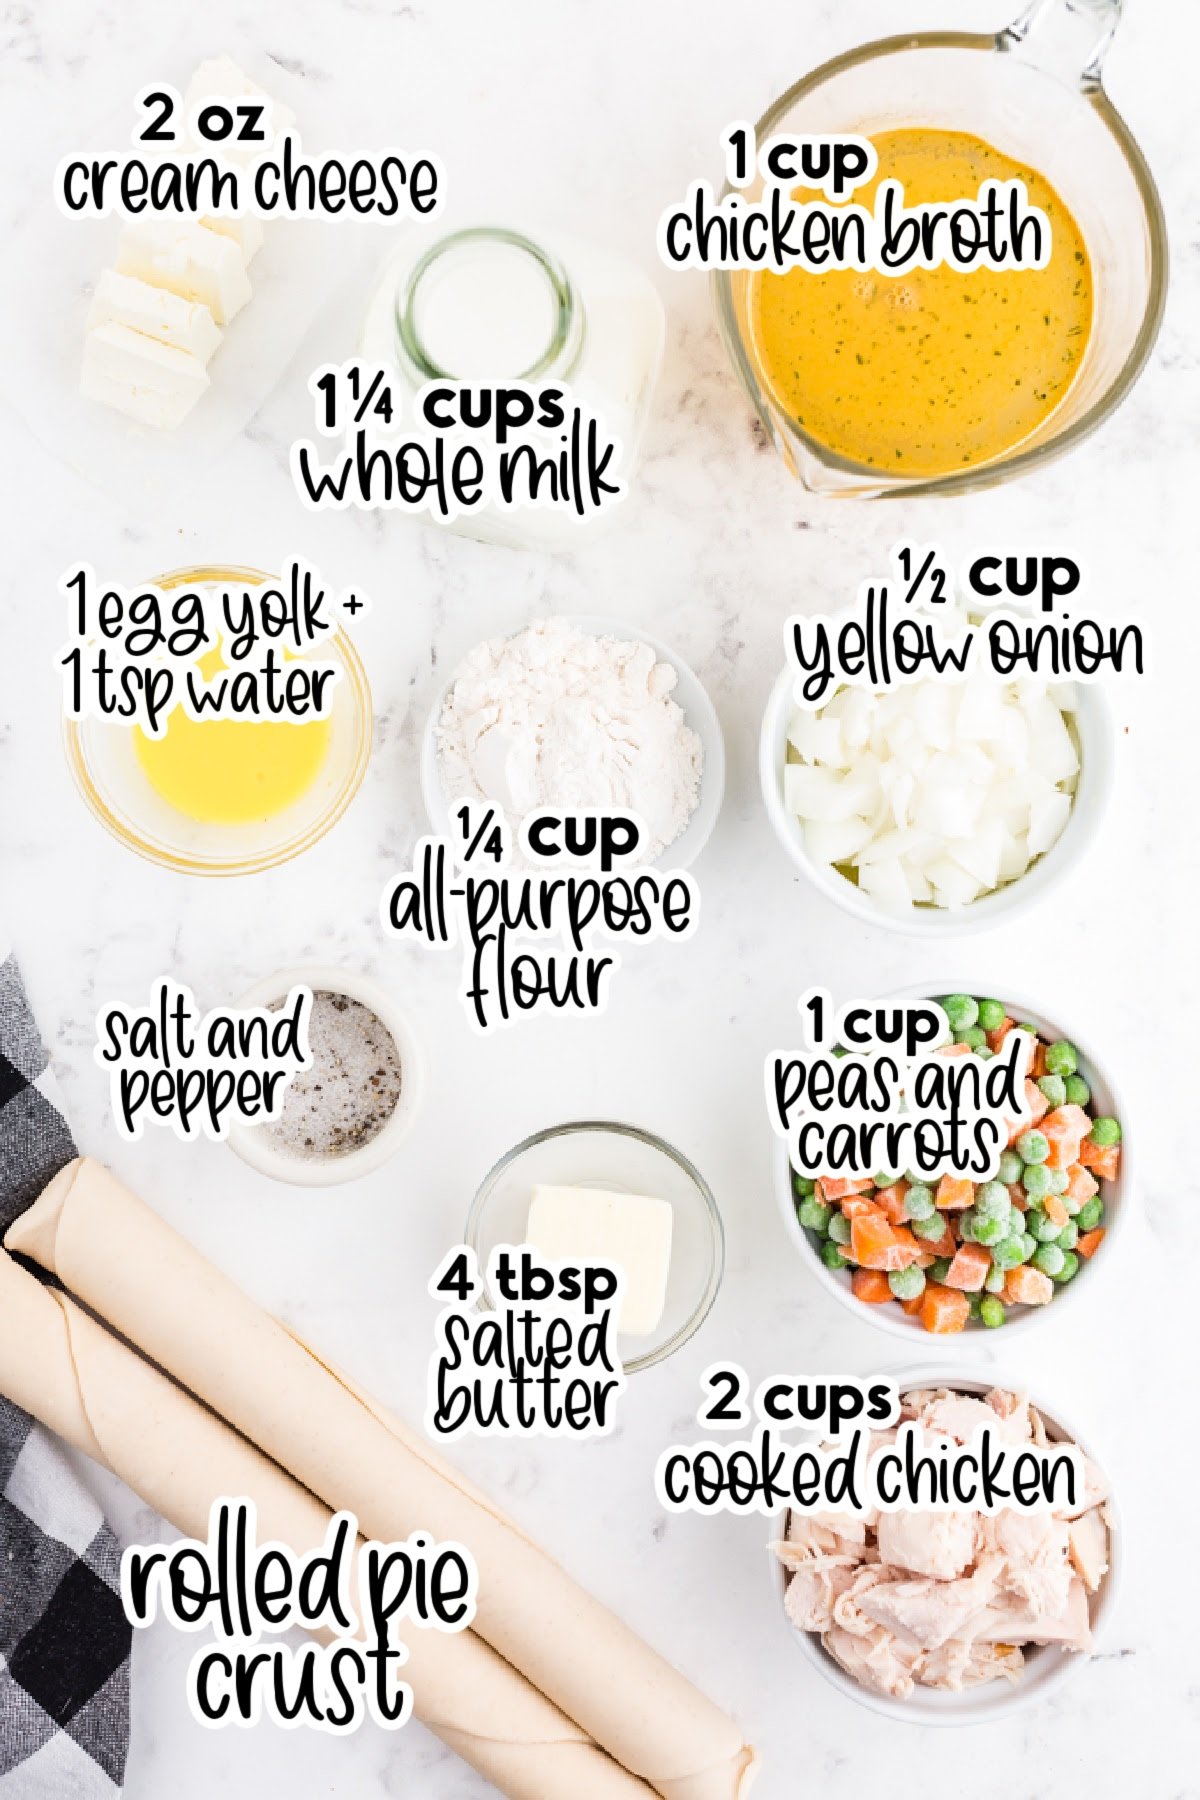
- salted butter – for cooking the onion and making the roux (the base of the pie filling)
- yellow onion – onion will not cook if put into the pie filling raw so take a minute to saute it first.
- all-purpose flour – our thickener for the hand pie filling, browning the flour in the butter adds flavor and then will thicken the milk base
- whole milk – using a lower fat milk is an option, the filling may end up thinner and not as creamy and rich
- chicken broth, chicken stock, or water plus chicken bouillon
- cream cheese – we use just a small amount of cream cheese to add richness and creaminess to the pot pie filling
- frozen peas and carrots – so easy and convenient to use frozen veggies – you can use the mix that includes corn if you prefer. Or you can use fresh vegetables that have been steamed for 9-10 minutes on medium-high heat
- diced cooked chicken – use this instant pot chicken breast recipe to quickly cook up some chicken, use leftover chicken or even a store-bought rotisserie chicken
- refrigerated rolled pie crusts – again, definitely use homemade pie crust if you have the time to prepare it.
- egg wash – used to seal the pie dough so that the filling doesn’t seep out; the egg wash also gives a nice golden sheen to the exterior of the pies.
For a full list of ingredients and their measurements, 📋 please view my printable recipe card at the bottom of the post.
Substitutions and Variations
- Don’t hold back if you want to make a batch of hand pies with different fillings – just make sure that you label your pot pies in separate containers if you’re making them ahead of time or storing them for later consumption.
- If you have the time, I highly recommend a homemade butter pie crust for these hand held chicken pot pies.
- Consider adding small potato chunks to the filling. They will need to be pre-cooked.
- Other fillings that would work beautifully with these hand pies include:
- Steak and kidney (an English tradition)
- Pepper steak – use my Philly cheesesteak casserole filling and stuff it into a pie!
- Ground beef and vegetables
- Shredded turkey and vegetables
- Vegetarian hand pies with your favorite veg and potato cubes
- Chicken Curry is amazing in a hand pie as well.
🔪 Instructions:
PREP: Prepare pie crust – if using store bought pie crust, set the package out about 30 minutes before preparing hand pies so that it will unroll without cracking. Preheat oven to 450°F.
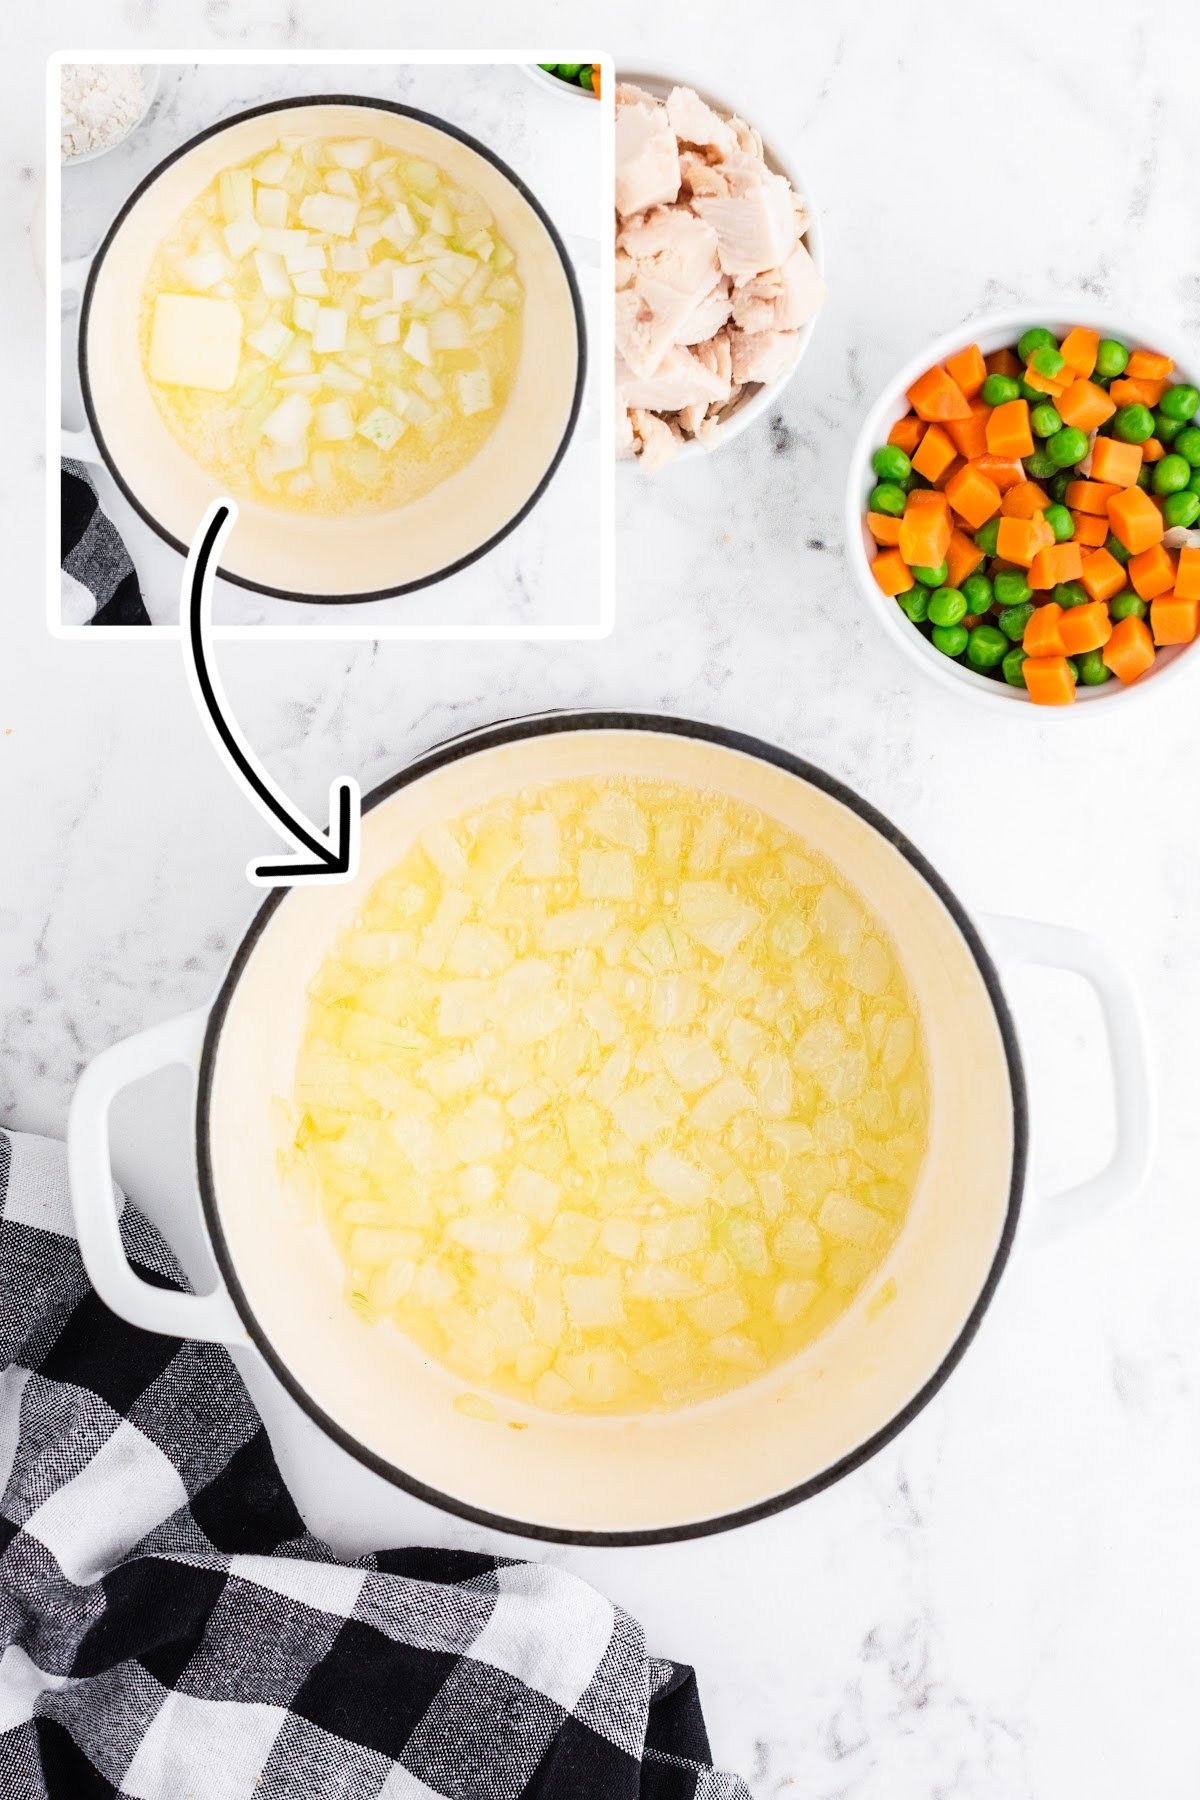
Step 1: In a medium saucepan, melt butter over medium heat. Add diced onions and sauté until onion is translucent (3-4 minutes).

Step 2: Add flour, salt, and pepper. Cook, stirring constantly, until flour mixture begins to brown (3-4 minutes).
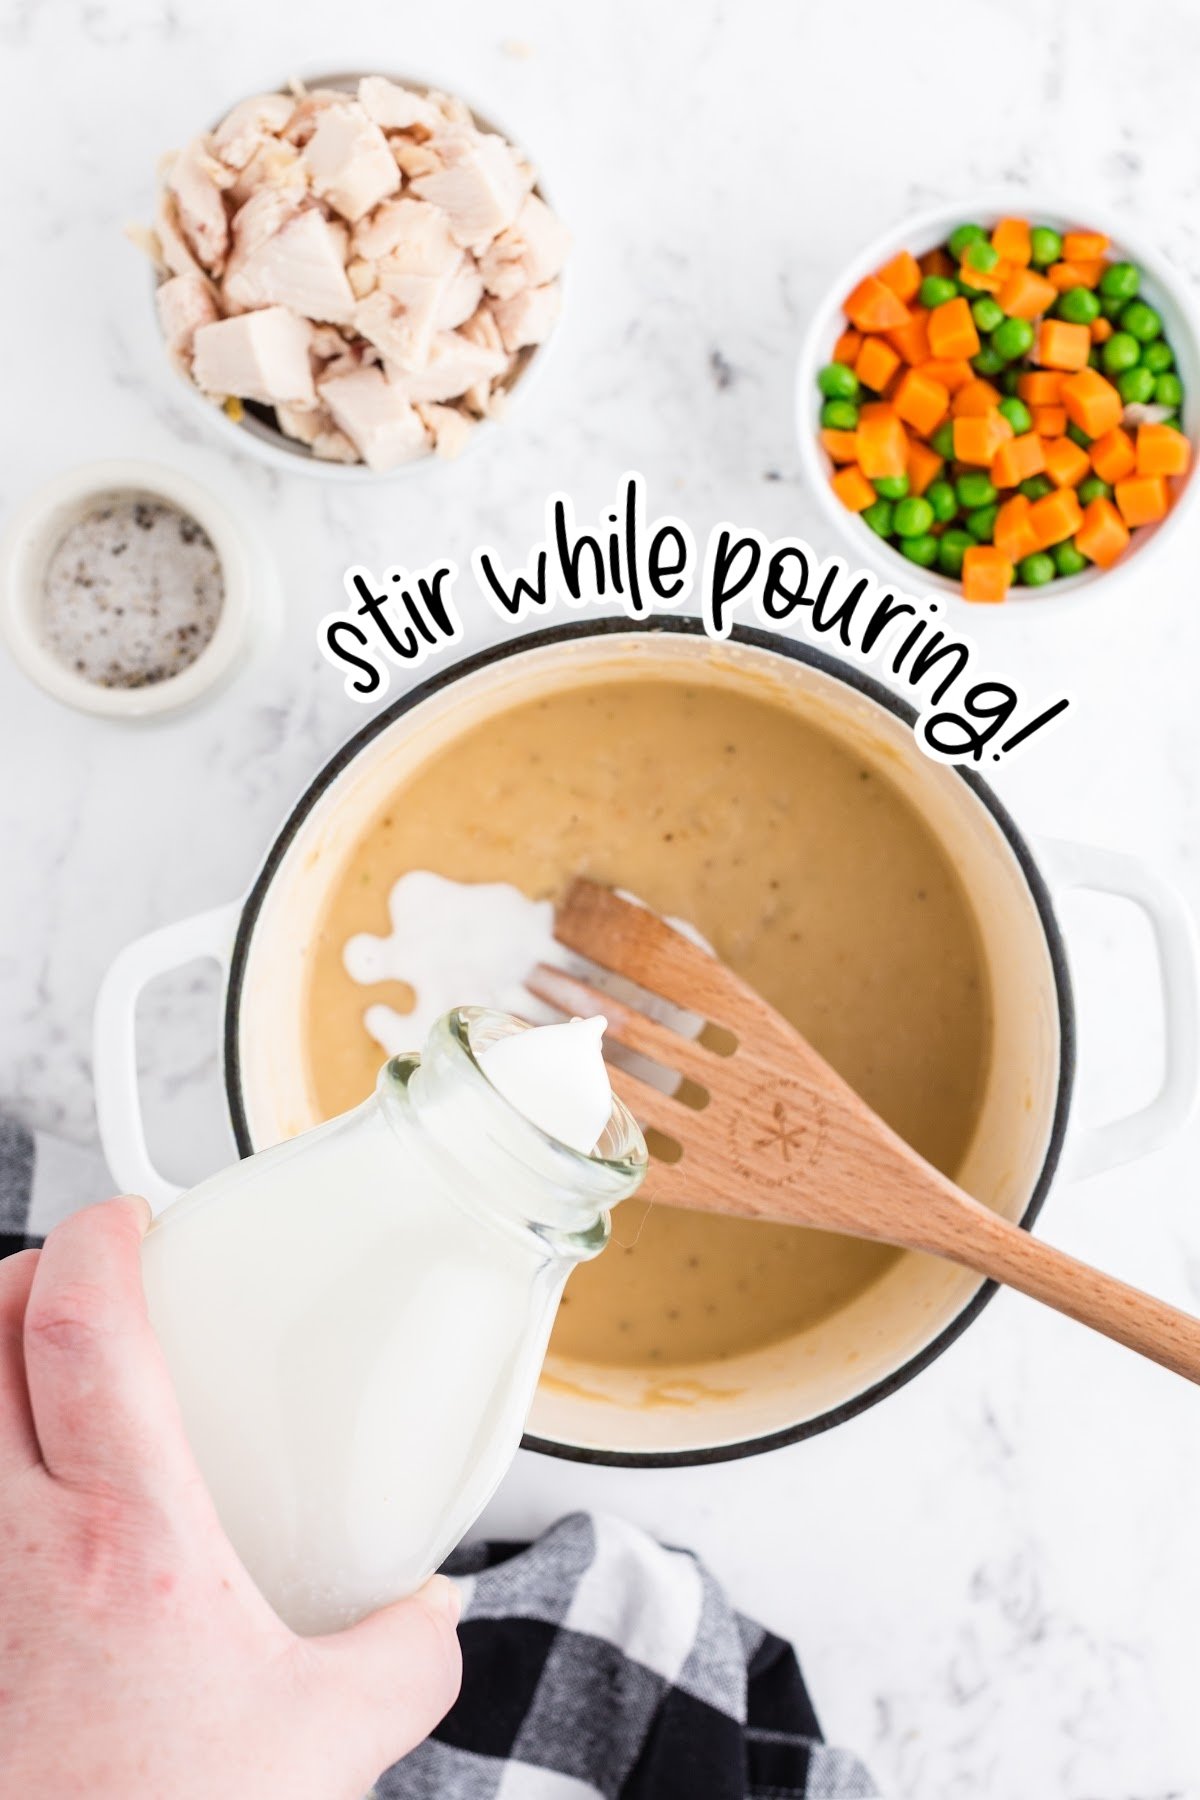
Step 3: Slowly stir or whisk chicken broth and whole milk into the flour mixture. Stir constantly while pouring just a bit at a time to make a smooth mixture.

Step 4: Continue cooking over medium heat, stirring constantly to ensure milk does not burn on the bottom of the pan, Cook until mixture begins to bubble and thicken slightly (about 5 minutes). Remove from heat.
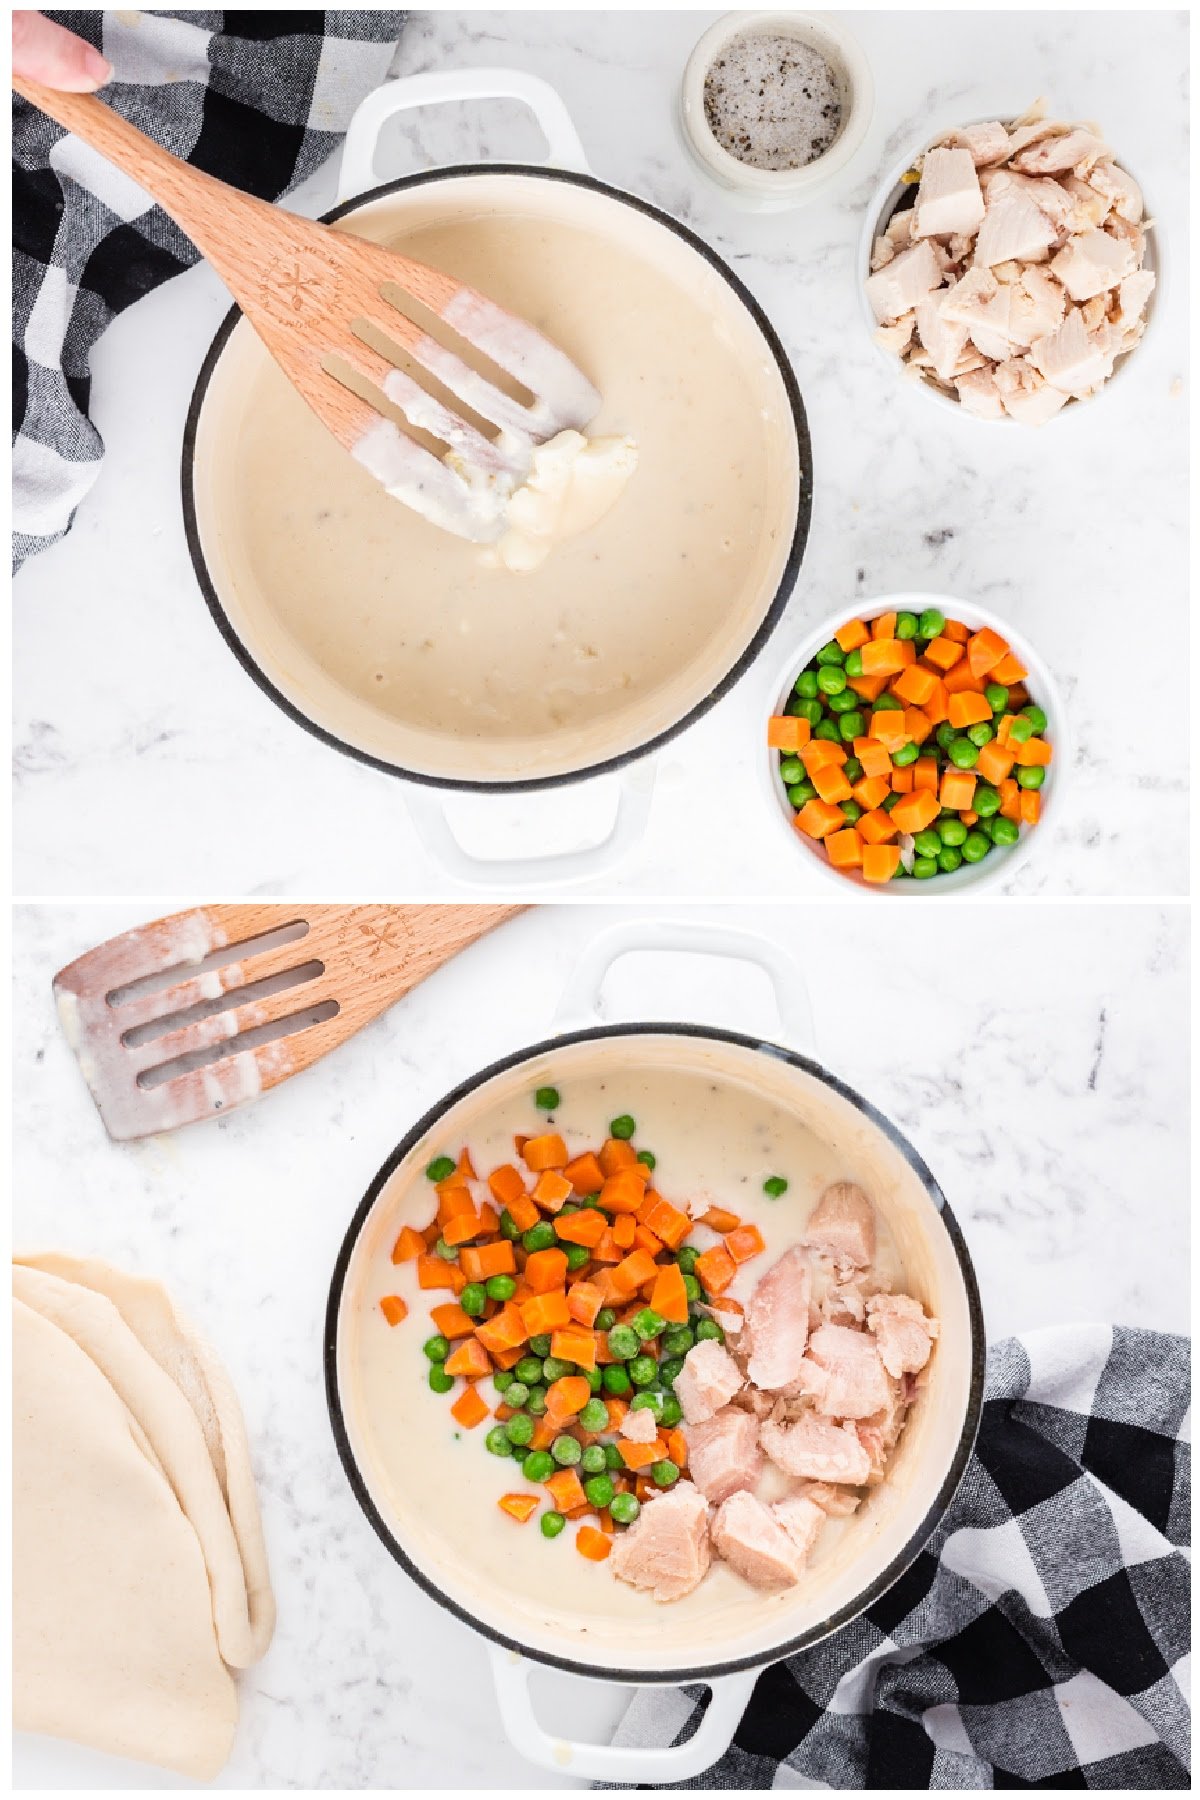
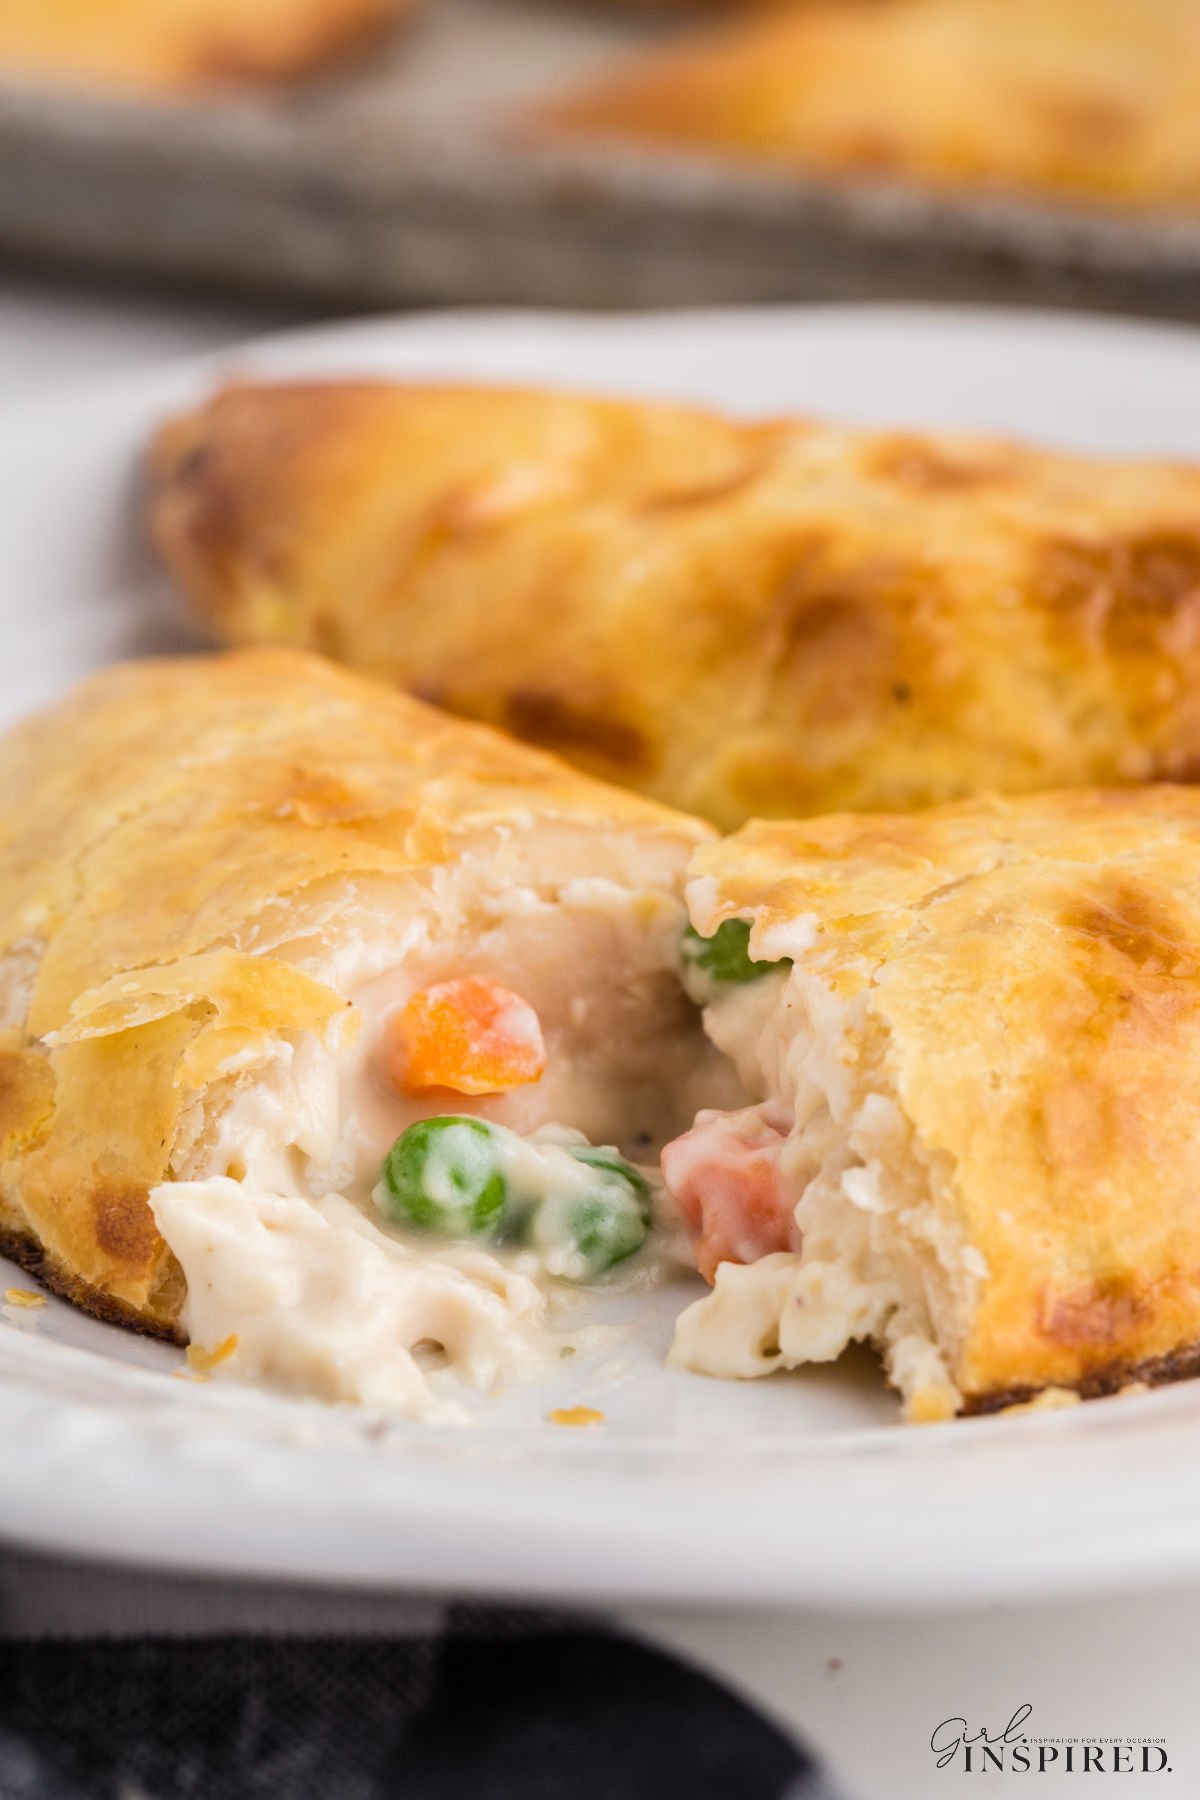
Step 5: Stir in cream cheese, frozen vegetables, and diced chicken. Stir to mix evenly.
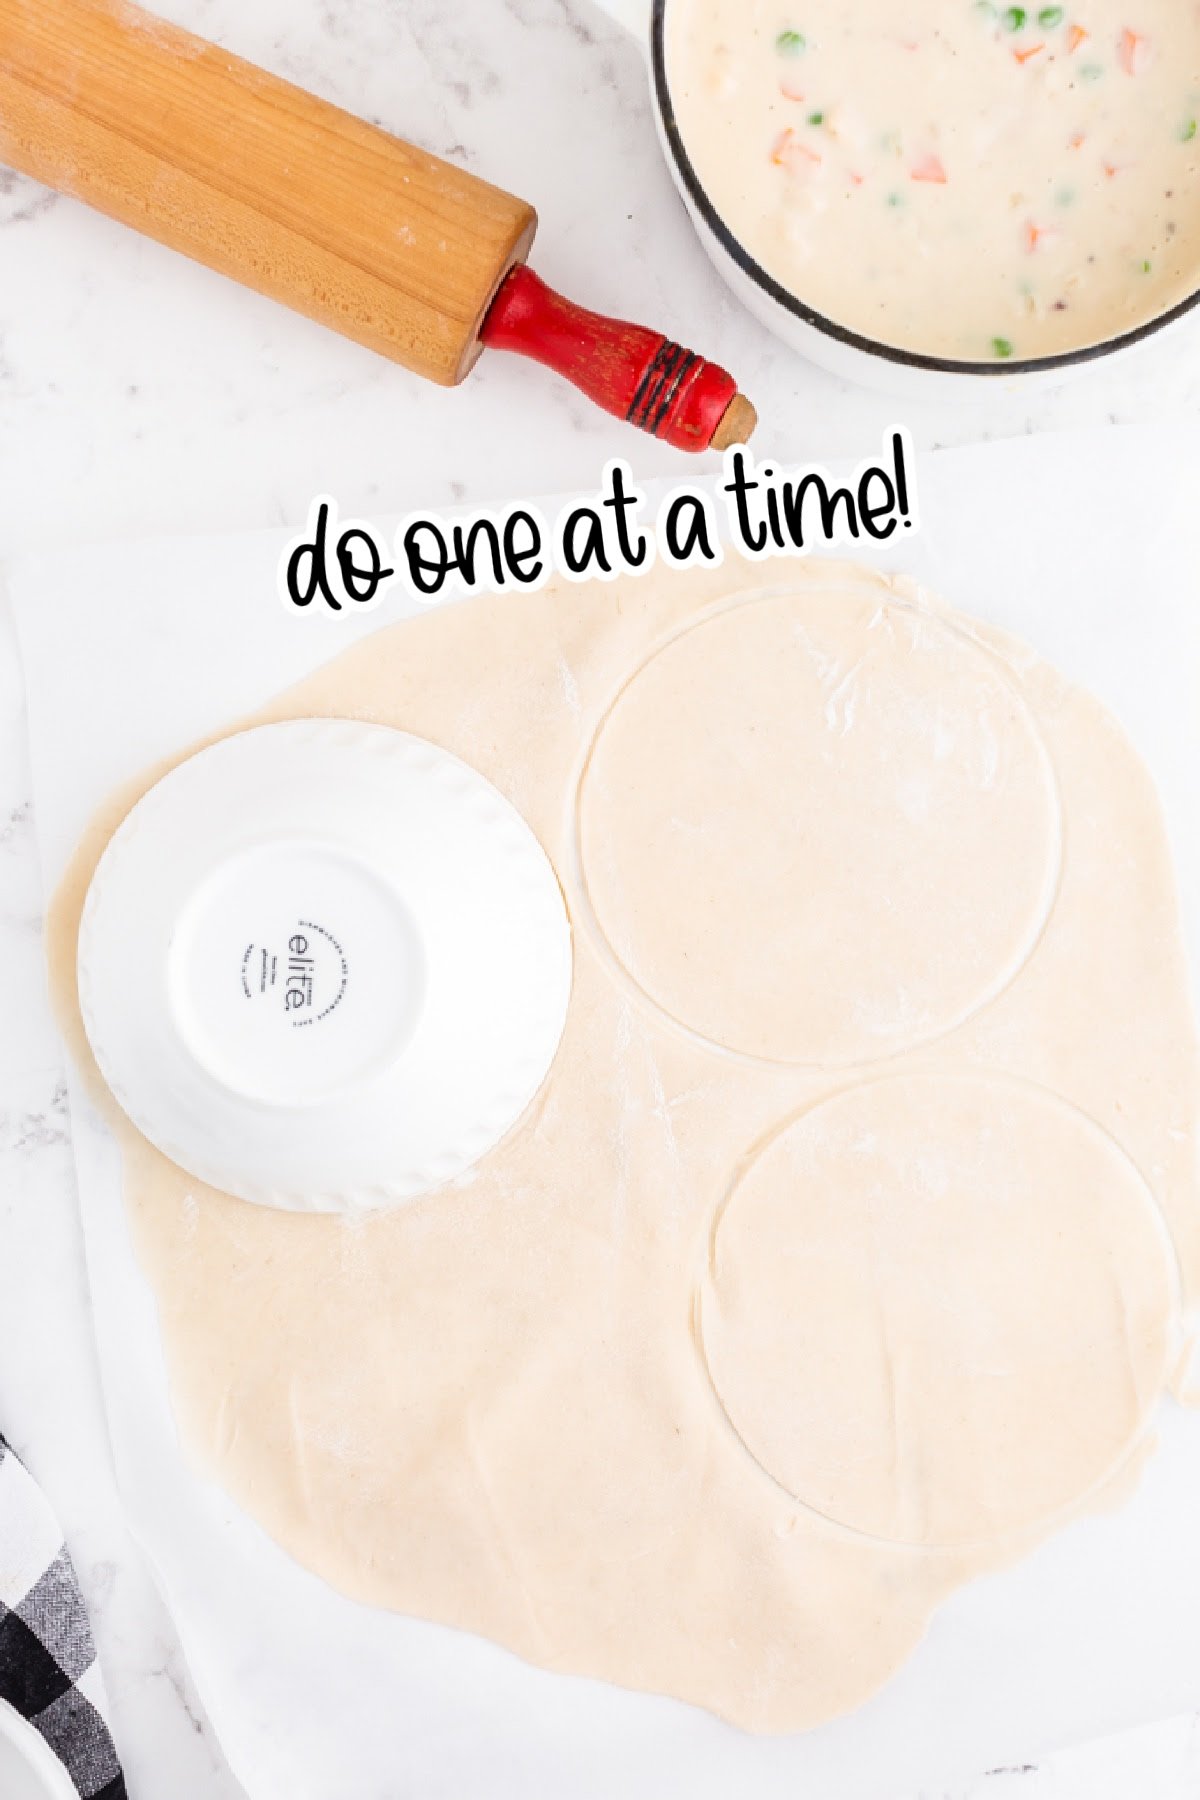
Step 6: Prepare pie crusts by removing pie crust from packaging. Unroll one crust on a lightly floured surface. It is important to keep the crusts thick enough to hold the pie filling, so I did not roll the crusts out any thinner than they came in the package (about ¼″ thick.) Use a bowl (6-8″) or a similar sized cookie cutter, placed upside down, to cut out two circles from the dough. Gently gather together the scraps, roll out the dough just enough to cut two additional circles (you may even need to do one at a time).
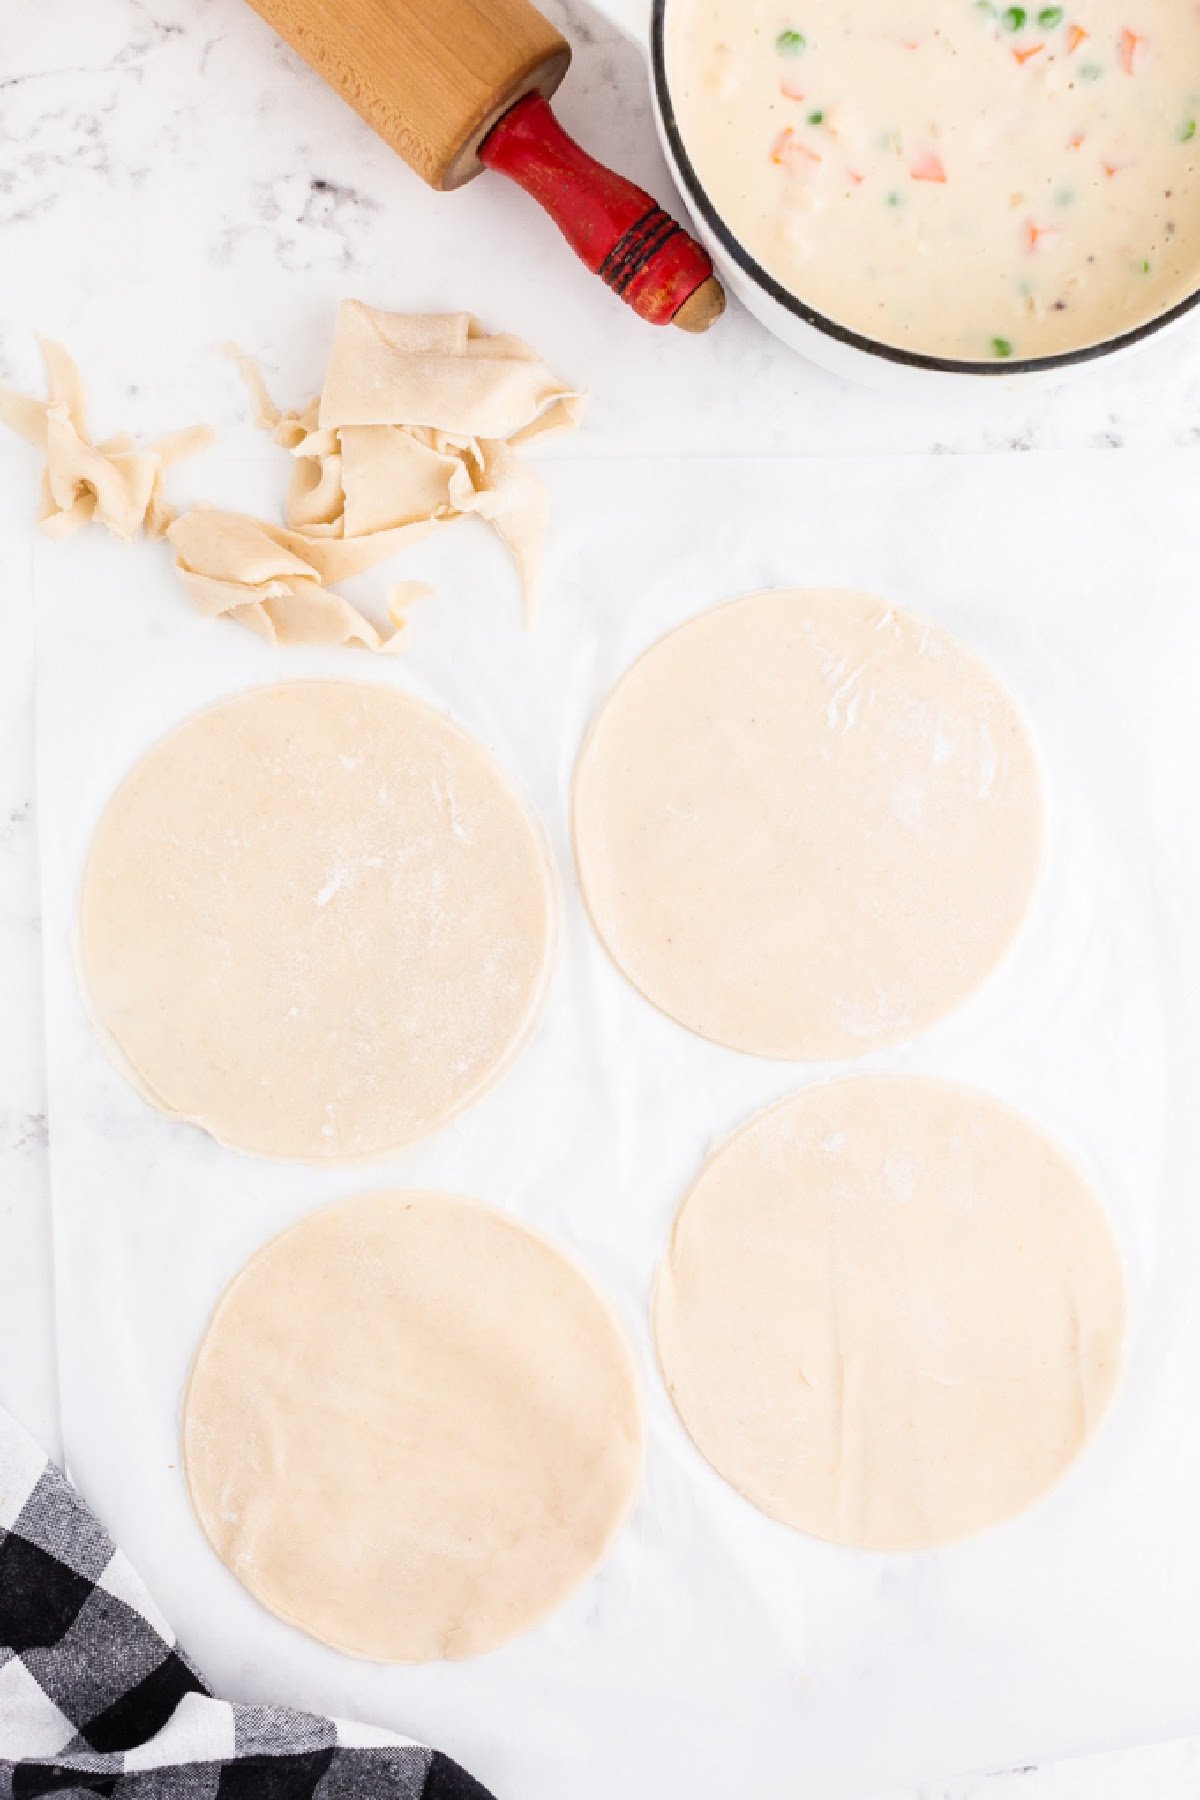
Step 7: You should be able to get four rounds from each pie crust. Of course, this will depend on the size of bowl. If you go much smaller than an 8″ circle, it will be hard to fill with very much pot pie filling.
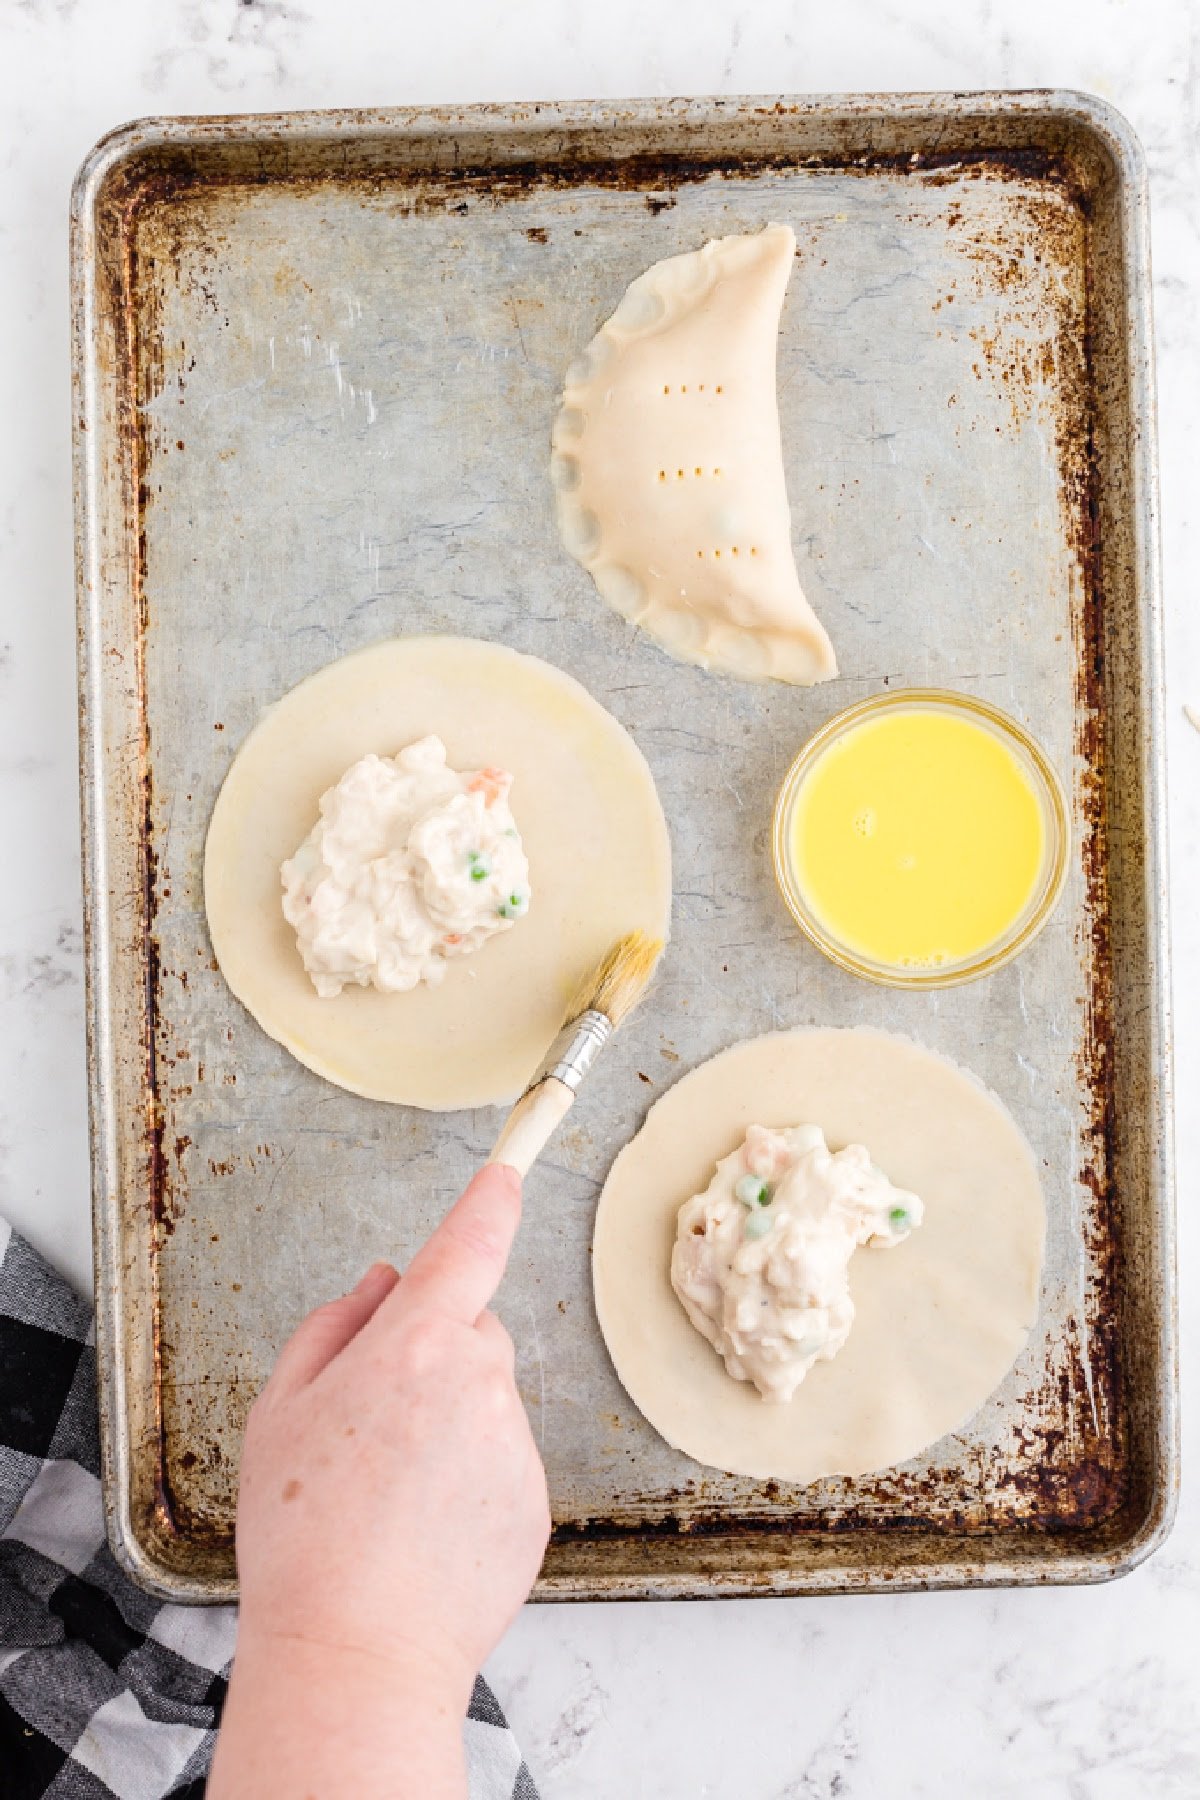
Step 8: Place three crust circles onto a prepared baking sheet sprayed with non-stick cooking spray. Place a scoop of filling into the center of the circle. Whisk together the egg and water to make an egg wash. Use a pastry brush to paint the egg wash around the edge of the hand pie crust.
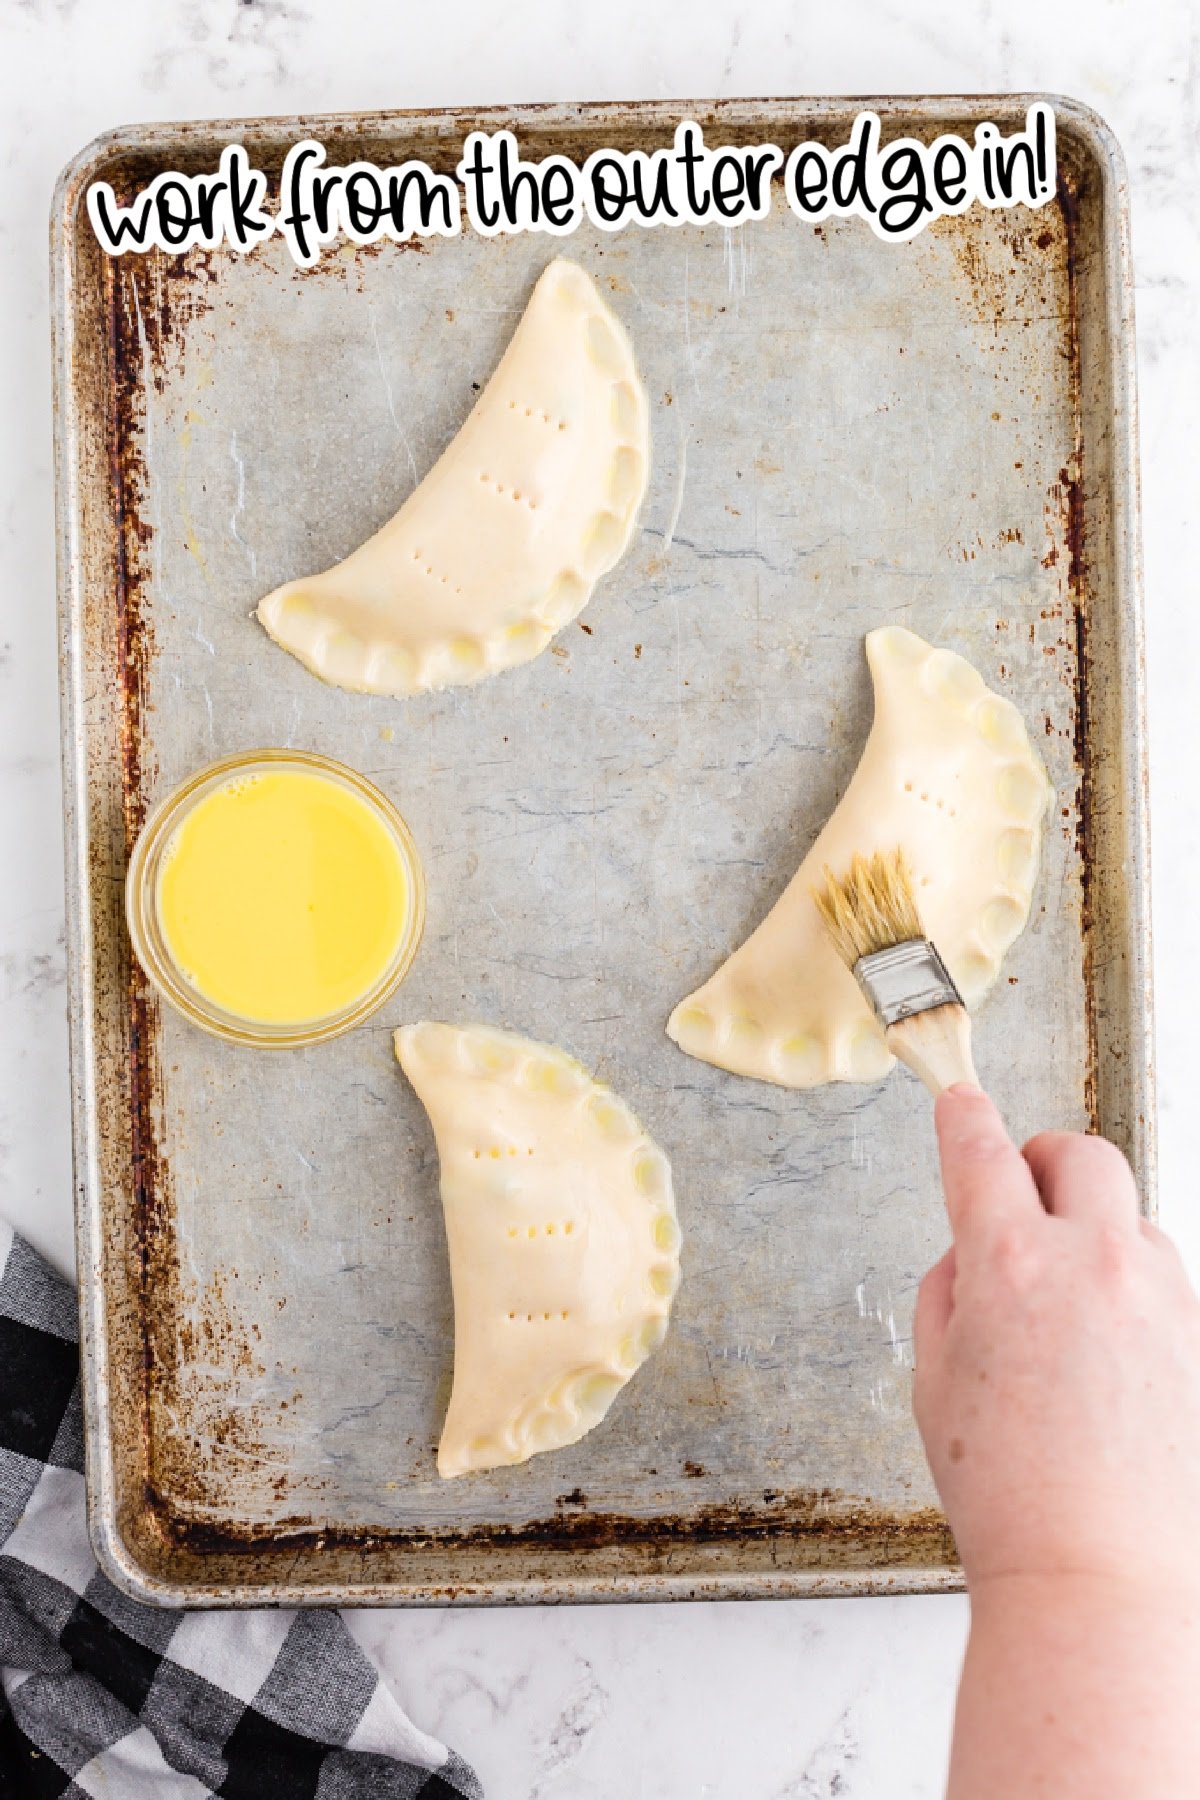
Step 9: Now, fold the pie crust in half to form a crescent shape. Press down (work from the outer edge in) and then crimp with your fingers or a fork to seal the edges. Brush the whole hand pie with the egg wash. Use a fork to poke a few holes in the top of the pies for venting.
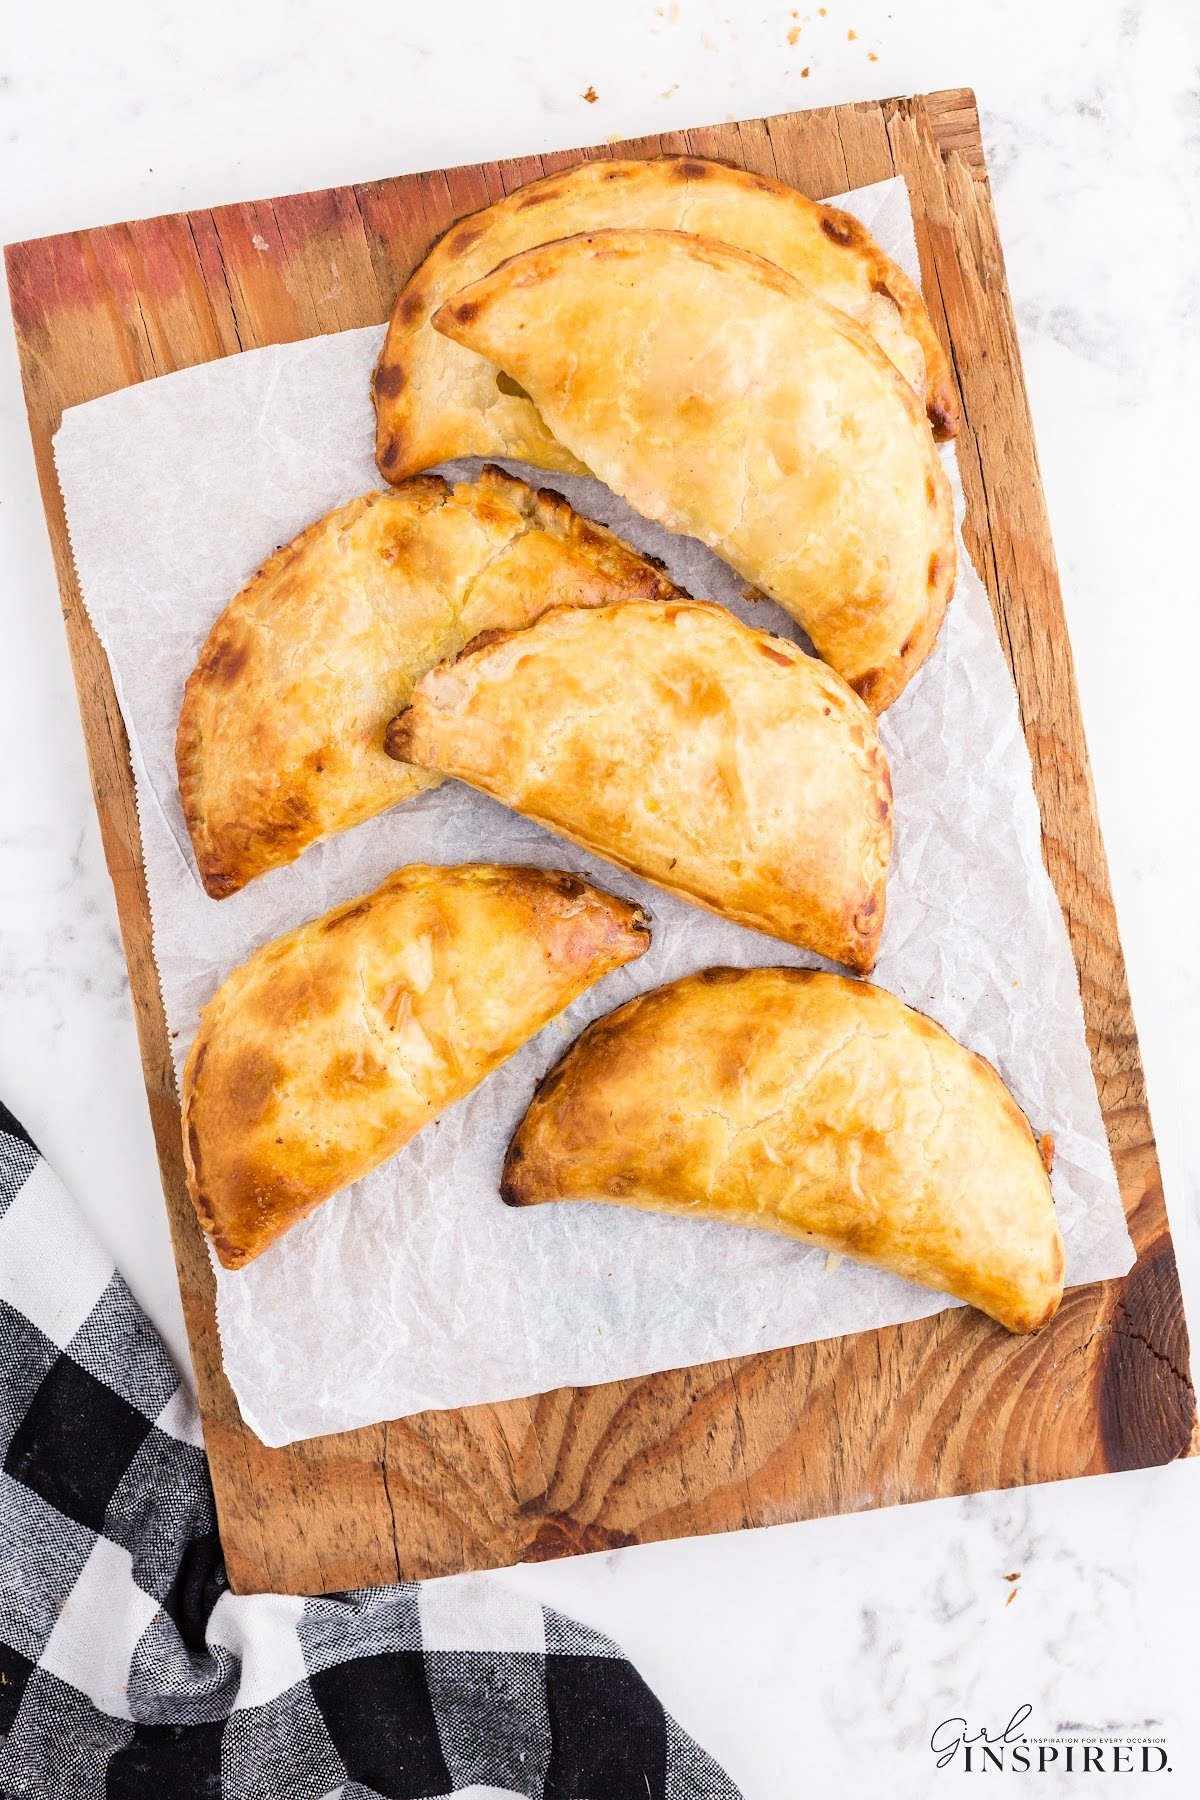
Step 10: Bake for 10-12 minutes or until pies are golden brown and crust is crispy. (The filling is already cooked so we’re really just cooking the crust here.)
SERVE: Allow pies to cool enough to handle. This will also allow the filling to set up just a bit.
Recipe Tips for Chicken Hand Pies
- Don’t skip the egg yolk wash step in this recipe. It gives the hand pies a lovely golden sheen and helps to seal the edges of the hand pie pastry.
- To ensure a good seal where the pastry joins, make sure that the edges of the pie dough are free from any excess pie filling or flour.
- Don’t overfill your handheld pies or the excess filling is likely to spill out of the pastry edges. A couple of tablespoons of the filling mixture will be sufficient.
- I didn’t thin out the rolled pastry but kept it at the thickness already provided by the refrigerated rolled pastry. If you roll out your pastry dough too thin, it’s likely that your pies will split during the baking process and you’ll have filling spilling out. Roll homemade pie crust no thinner than ¼″ thickness.
- Pinching the raw pie crust edges together with your fingers seems to provide a much better seal than just crimping with a fork but whatever method you choose, just ensure that the edges are joined together well for an optimal seal.
Recipe FAQs
Hand pies taste the best when eaten right after baking. With that said, you can store any cooked leftover hand pies in the refrigerator for 2-3 days in an airtight container or bag.
Best results to reheat, simply pop them back into the oven for about 10-15 minutes until heated throughout. I prefer reheating these mini chicken pot pies in the oven or air fryer instead of the microwave as the oven tends to create more even heating but of course, if you’ve taken these hand pies to the office for lunch then you can definitely use a microwave!
Yes, you can! Assemble chicken hand pies and then freeze them unbaked for up to 6 months.
Set your hand pies on a baking tray lined with parchment paper and place in the freezer, uncovered, until frozen solid. Remove the tray from the freezer and wrap the individual pies in plastic wrap or aluminum foil; store in an airtight container or a Ziploc bag.
When ready to bake your hand pies, thaw them in the refrigerator overnight or at room temperature on your counter and then bake them according to the recipe directions above.
No, you can make your own pot pie pastry for these hand pies if you prefer to make everything from scratch. I used refrigerated rolled pie crusts to save time.
If you do make your own pie crust for these hand pies, don’t forget to allow your pastry to chill for at least 30 minutes in the refrigerator prior to rolling out and assembling your pies. This will ensure that you end up with tender and flaky pie crust that will hold the filling well and melt in your mouth!
More Hand-Held Recipes To Try


If you try these Chicken Pot Pie Hand Pies or any other great recipe on my website, please please leave a 🌟 star rating and let me know how you liked it in the 📝 comments below.

Chicken Pot Pie Hand Pies
Ingredients
- 4 tablespoons salted butter melted
- ½ cup diced yellow onion
- ¼ cup all-purpose flour
- ½ teaspoon salt
- ½ teaspoon black pepper
- 1 ¼ cups whole milk
- 1 cup chicken broth or 1 cup water + 1 ½ teaspoons chicken bouillon
- 2 oz. cream cheese cut into pieces
- 1 cup peas and carrots
- 2 cups diced cooked chicken
- 2 refrigerated rolled pie crusts 1 standard 14. Oz. 2-pack
- 1 egg yolk + 1 teaspoon water beaten
Instructions
- Preheat the oven to 450°F.
- In a medium saucepan, melt butter over medium heat. Add diced onions and saute until onion is translucent (3-4 minutes).
- Add flour, salt, and pepper. Cook, stirring constantly, until flour mixture begins to brown (3-4 minutes).
- Slowly stir or whisk chicken broth and whole milk into the flour mixture. Stir constantly while pouring just a bit at a time to make a smooth mixture.
- Continue cooking over medium heat, stirring constantly to ensure milk does not burn on the bottom of the pan, Cook until mixture begins to bubble and thicken slightly (about 5 minutes). Remove from heat.
- Stir in cream cheese, frozen vegetables, and diced chicken. Stir to mix evenly.
- Prepare pie crusts by removing pie crust from packaging. Unroll one crust on a lightly floured surface. It is important to keep the crusts thick enough to hold the pie filling, so I did not roll the crusts out any thinner than they came in the package. Use a bowl, placed upside down, to cut out a two circles from the dough. Gently gather together the scraps, roll out just enough to cut two additional circles (you may even need to do one at a time).
- Place three crust circles onto a baking sheet sprayed with non-stick cooking spray.
- Place a scoop of filling into the center of the circle.
- Use a fork to beat the egg yolk with water.
- Brush a bit of the egg yolk wash around the edge of the circle to help the sides seal. Now, fold the pie crust in half to form a crescent shape. Press down (work from the outer edge in) and then crimp with your fingers or a fork to seal the edges. Brush the whole hand pie with the egg wash. Use a fork to poke a few holes in the top of the pies.
- Bake for 10-12 minutes or until pies are golden brown and crust is crispy. (The filling is already cooked so we’re really just cooking the crust here.)
- Storage:
- Best if eaten right away. Leftover hand pies can be stored in an airtight container in the refrigerator for 2-3 days. Reheat in the oven for best results.
Would you like to save this?
Notes
- The egg yolk wash will give the hand pies a nice golden sheen. It is also really helpful to seal the edges together. For the best seal, be sure that the filling and/or any excess flour is away from the edge of the dough.
- Only a couple of tablespoons of the filling mixture will fit in the pie. Do not overfill.
- If the crusts are too thin, the pie will split apart during baking. Keep the pie crust at least ¼″ thick.
- I found that pinching the crust edges provides a better seal than crimping with a fork; just make sure you smush the edges together well so that they seal.
Nutrition
Make this recipe?
Share it with me on Instagram @girlinspired1 and follow on Pinterest for more!


Leave A Reply!