girl. Inspired.

travel, food, design

  • TRAVEL
  • FOOD
    • Breakfast
    • Breads
    • Main Course
    • Desserts
    • Drinks
    • Soups|Salads|Side Dishes
    • Sauces|Dips|Salad Dressings
    • Cake Decorating
      • Inspiration and Ideas
      • Tips and Tutorials
  • Design
    • Craft/DIY
    • Sewing
      • Patterns and Tutorials
      • Pattern and Product Reviews
      • Sewing Ideas and Inspiration
    • Parties
  • Blog
  • About
    • Privacy Policy
  • Subscribe

his work shirt to her school dress

September 8, 2011 by girlinspired 90 Comments


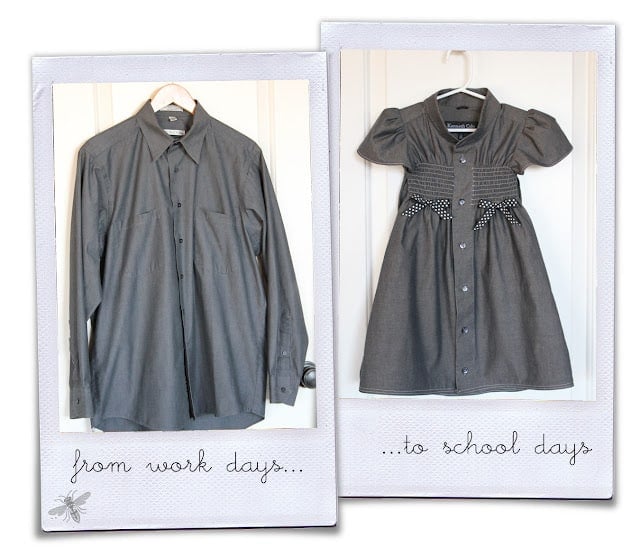
 Yes I did.  I chopped up one of my hardworking man’s old dress shirts and turned it into the cutest little dress for Grace.  My interest in such a project was piqued by others in blogland and by a darling little dress I saw in the kids Garnet Hill catalog.  I didn’t take pictures along the way because I did it at night and I honestly wasn’t sure it would turn out.  But if you want to give it a go, I scribbled some lines on a photo for you.  If you try it and get stuck, shoot me an email and I’ll tell you what I did.  Here’s the basic rundown:

 
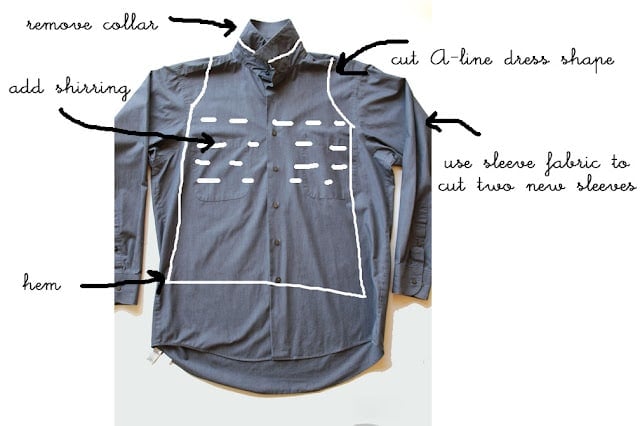
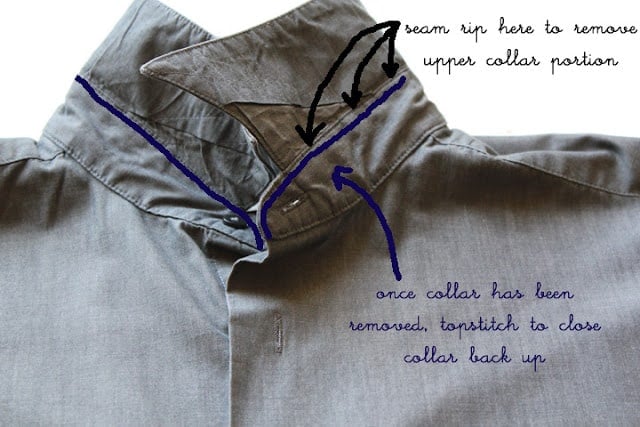
  • remove upper collar, topstitch lower collar closed again
  • remove pockets
  • chop up shirt into basic A-line dress, leaving collar and buttons intact (be sure to cut front and back together, they’ll be connected at the top)
  • use sleeve fabric to cut out two new sleeves – here is a great little tutorial on how to sew a puff sleeve and here is a standard sleeve pattern that you can download and use that tutorial to sew for this dress.
  • sew front to back along side seams 
  • hem bottom
  • attach new sleeves
  • sew rows of shirring across front; I sewed 9 rows about 1/4 inch apart each – be sure the two sides of shirring match up when the shirt is buttoned closed
  • sew on cute bows (or not!) 
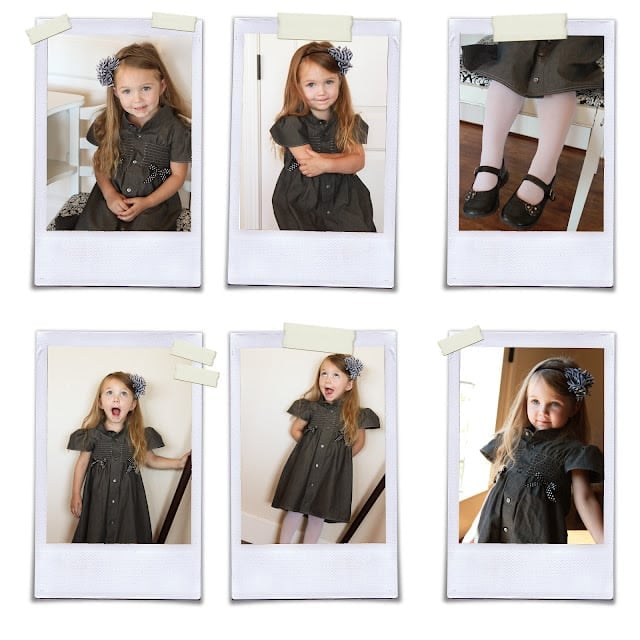
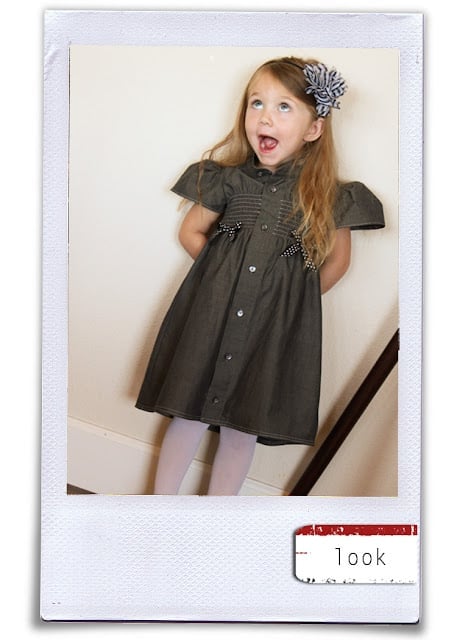
 If you’re lucky, your cute little model will have as much fun in her new dress as mine did!

Filed Under: Patterns and Tutorials, Popular Posts, Sewing Tagged With: shirring, upcycle

« Mission Reorganization: a Project Table…at long last
on ready-made frosting »

Comments

  1. notes of sincerity says

    September 8, 2011 at 1:18 pm

    Oh my sweet goodness!
    That is so precious.
    And just think, your daughter
    is wearing her daddy’s shirt.
    I wish I could sew like you do!!!

    Reply
  2. april says

    September 8, 2011 at 3:08 pm

    Absolutely darling!!!! You are so talented! Great job 🙂

    Reply
  3. Kerilyn says

    September 8, 2011 at 3:12 pm

    How sweet is that!? Daddy must be melting seeing his little girl all dressed up in his shirt. SERIOUSLY adorable!!

    Reply
  4. Stef says

    September 8, 2011 at 5:59 pm

    Thanks, everyone!

    Ms Moppet – yes, I just removed the pockets and steamed the lines a bit. Once the dress was sewn up and the shirring done, you can’t tell there was ever a pocket there!

    Reply
  5. Marianne says

    September 8, 2011 at 6:07 pm

    How adorable! Talk about recycling!

    Reply
  6. amanda says

    September 8, 2011 at 6:09 pm

    SERIOUSLY… How do you come up with this stuff??!! Lovely…as usual!

    Reply
  7. Sharon says

    September 8, 2011 at 1:14 pm

    too cute! I will have to give this a try, thanks for sharing!

    Reply
  8. Anne says

    September 8, 2011 at 1:43 pm

    Oh my! That is the cutest repurpose of a man’s business shirt I have ever seen. Who would’ve thought that something so plain and not really a little girl’s colour could look so beautiful! You certainly are very talented.

    Anne @ Domesblissity

    Reply
  9. Lynne says

    September 8, 2011 at 3:36 pm

    Fabulous! What a great refashion!

    Reply
  10. Kristie-Creating Chaos says

    September 8, 2011 at 3:41 pm

    That is fantastic! By far the cutest dress shirt to dress I’ve seen. I love the shirring and bows.

    Reply
  11. Michelle says

    September 8, 2011 at 3:48 pm

    This is adorable! I have seen lots of shirt conversions lately but this is my absolute favorite. I am going to have to copy this one, the bows and the shirring are the perfect touch.

    Reply
  12. Ms Moppet says

    September 8, 2011 at 4:42 pm

    So cute! I have been wanting to try this (with one of my shirts actually) I wasn’t quite sure how I wanted to go about it but you have inspired me. I can’t quite tell what you did with the pockets? did you just remove them? urbanmoppets.blogspot.com

    Reply
  13. The Homemaker says

    September 8, 2011 at 5:27 pm

    WOW!!! I LOVE IT!!! I repurpose shirts frequently for children’s craft smocks (Etsy store TheHomeMaker)but this is too cute for words!!! Thanks for sharing!

    Reply
  14. мамаДаника says

    September 8, 2011 at 5:39 pm

    Супер получилось!Вы молодцы!

    Reply
  15. Anonymous says

    September 9, 2011 at 1:29 am

    You didnt show me this one today!!! OK….now its on my ever growing list to do!! I REALLY love the grey!!!

    Reply
  16. rose1953 says

    September 9, 2011 at 1:42 am

    Really lovely! What a great idea!

    Reply
  17. projectdowhatyoulove says

    September 9, 2011 at 3:41 am

    Wow, you are so talented! How did you get that out of that! Awesome!

    Natalie
    http://www.projectdowhatyoulove.wordpress.com

    Reply
  18. Michele Alger says

    September 8, 2011 at 10:10 pm

    Oh my GOSH!!! DO YOU EVER STOP?! How in the world do you top each post with the next?! This is so incredibly beautiful!!! SO want to do this for my baby dolls. Wish me luck, cause I’m not Y-O-U! 😉

    Reply
  19. Rachel says

    September 9, 2011 at 12:21 pm

    That is an adorable makeover!

    Reply
  20. Tonia @ TheGunnySack.com says

    September 12, 2011 at 3:44 am

    I LOVE this and totally want to try it!

    Reply
  21. Amy @ Positively Splendid says

    September 13, 2011 at 1:34 pm

    Absolutely, positively AH-mazing, my friend!!

    Reply
  22. Lindsay says

    September 15, 2011 at 12:11 am

    This is so amazing! You have skills, that is for sure. I am just impressed that you transformed it as much as you did. I would love to have you share this at Show & Share–

    http://southernlovely.blogspot.com/2011/09/show-share-5.html

    Reply
  23. Shari @For the Little Doll In Your Life says

    September 15, 2011 at 2:08 am

    Stef – you never cease to amaze me. This is an incredible makeover, and your model is too darn cute.

    Reply
  24. Laura at Ms. Smartie Pants says

    September 17, 2011 at 3:13 pm

    This is just adorable! And what a memory. Imagine being clothed in your dad’s clothes on your first day of school! You could put the fabric stores out of business! I am suspecting your husband didn’t look nearly as cute in that shirt!!! 😉

    Reply
  25. Cook Clean Craft says

    September 17, 2011 at 10:09 pm

    I might raid my husband’s shirts now, getting ready for when my little girl is big enough to wear dresses (she’s just commando crawling at the moment). That is just gorgeous!

    Reply
  26. Brenbren says

    September 17, 2011 at 10:36 pm

    I LOVE LOVE LOVE LOVE LOVE IT! I have a shirt I have been saving to make over for my daughter and I think this is it:)

    Reply
  27. Wendy says

    September 18, 2011 at 4:54 am

    I so love this and I can’t wait to make one for every little girl in my life! Thanks for the great tute!

    Reply
  28. Anonymous says

    September 18, 2011 at 2:21 pm

    awesome transformation!!! I love this!!!
    http://saffiertje.blogspot.com

    Reply
  29. UnusuallyYours says

    September 18, 2011 at 7:49 pm

    That is one of the cutest thing I have seen!!!

    Reply
  30. Shelly @A Creative Space says

    September 18, 2011 at 8:33 pm

    You are UBER talented!! I loved reading your tutorial! Very clear. I have to Follow you, I do not want to miss a thing! 🙂 Gonna have to go peruse YouTube for Shirring tutorials…

    Reply
  31. Mammy Made says

    September 19, 2011 at 11:39 am

    Wow! I love that. You’re so talented! I’m pinning this.

    – Ellie @ Mammy Made

    Reply
  32. Anonymous says

    September 21, 2011 at 1:09 pm

    I Love this!!! I don’t have a little girl, but I have 2 adorable nieces! I am in the process of making a dress like this now! I only hope it turns out as cute as yours! Thanks so much for sharing!!

    Reply
  33. angelina says

    September 21, 2011 at 12:59 pm

    Wow, you are so talented! How did you get that out of that! Awesome!dress shirts

    Reply
  34. SO-MADZ-BETTER says

    September 22, 2011 at 4:38 pm

    wow! this is so genius!

    Reply
  35. Crafty Beth says

    September 22, 2011 at 10:39 pm

    One of the best men’s shirt refashions I have seen! I just bought some elastic thread and am ready to start my first shirring project–maybe this will be it! If I do it, I’ll be sure to link to you from my crafting blog http://www.bethbeingcrafty.blogspot.com 🙂

    Reply
  36. cajungal01 says

    September 25, 2011 at 11:55 pm

    I am so in love with this! I only know basic sewing though and certainly don’t know how to make those sleeves or sheer….I’d pay you to make some for me though! :0) Absolutely adorable! I have a TON of my husband’s shirts that don’t fit him and they are in great condition….
    :0)
    ~robin

    Reply
  37. Fifi says

    September 26, 2011 at 9:04 pm

    L.O.V.E IT!! Of all the men shirt re-dos I’ve seen this is the best one yet!! great job!

    newest follower!

    Reply
  38. Melissa says

    October 1, 2011 at 2:50 am

    Simply AMazing!!! This is the best repurposing ever! 🙂

    Reply
  39. Christina says

    October 13, 2011 at 5:10 am

    I absolutely love this dress!!!

    Reply
  40. carla says

    October 26, 2011 at 11:53 am

    This is so great. I must give it a try for my girls!

    Reply
  41. Kristie-Creating Chaos says

    November 3, 2011 at 5:00 am

    I made each of my girls a cute dress this morning using your mini tutorial. Thank you so much Stef. You should think about calling your site Girl. Inspiring. ^_^

    http://minasarah.blogspot.com/2011/11/my-turn-at-his-work-shirt-to-her-school.html

    Reply
  42. paula says

    November 3, 2011 at 2:58 pm

    i loooove your blog. i found you via pinterest! i have two little girls and you have inspired me in so many ways! ill keep on reading

    Reply
  43. Anonymous says

    December 9, 2011 at 1:32 pm

    Lovely! I am thinking it would be great for me with leggings as I have no girls to wear it 😉

    Reply
  44. Julie Fletcher says

    December 9, 2011 at 9:20 pm

    I am blown away. I wish you could make another one and post step by step how to do this.

    Reply
  45. Kim H. says

    December 19, 2011 at 8:10 pm

    I found this via pinterest, and it’s super super cute! Did you shirr the back too? And you did the shirring AFTER adding the sleeves and everything, right?

    Reply
    • Stef says

      January 14, 2012 at 8:55 pm

      Yes, Kim, I did the shirring last, but I did not do any shirring on the back!

      Reply
  46. Lori says

    December 31, 2011 at 3:38 pm

    Amazing job.

    Reply
  47. Jenn says

    December 31, 2011 at 4:21 pm

    This is the most ingenious idea I have EVER seen!! You inspire me to learn how to sew:) I have two children and could save so much money on clothing if i could just learn how to do this! BTW- I am your newest Follower. I would love for you to drop by and check out my blog. It doesn’t have anything crafty like this, just your average mommy blog, but I like to think it is destined for greatness:)

    Reply
  48. Gwen @ The Bold Abode says

    December 31, 2011 at 4:34 pm

    That is adorable! I love refashioning ideas! Fabulous…

    Reply
  49. Niki says

    January 3, 2012 at 8:12 pm

    I just had to tell you…I love, love, love this dress!! SOOOOOOO cute!! I wish I were a better sewer so I could try it for myself!!

    Reply
  50. Crystal says

    January 10, 2012 at 8:08 pm

    This is so cute I might have to pick up a pink clearance dress shirt next time I am out! LOL. This is absolutely adorable!

    Reply
  51. Gracy says

    February 3, 2012 at 5:31 am

    I wish there was a picture of the back of the dress. Did you carry the shirring around through the back as well, or attached a tie on the sides for adjusting? I have a daddy shirt that I knew I wanted to turn into a dress for my daughter, and then I found your cute example! Did you do elastic shirring, or just thread? I am definitively going to do this! Thanks for sharing!

    Reply
    • Stef says

      February 12, 2012 at 3:37 am

      I used elastic thread to do the shirring and stopped at each side – it doesn’t extend around the back.

      Have fun!!

      Reply
  52. Stef says

    February 13, 2012 at 9:16 pm

    The dress shirt is Large or 16″ collar, 34/35 arm – and my little cutie was about a 2T then. I originally thought I might have to resize the collar, but it turned out to look just fine! Good luck and have fun!

    Reply
  53. Christi says

    February 13, 2012 at 6:48 pm

    Love this idea!!! Can I ask what size shirt and what size was the little girl wearing it? Trying to figure it all out! Thank you!

    Reply
  54. Marci says

    February 26, 2012 at 9:23 pm

    I love this dress and have the perfect shirt to do this with that the hubby no longer wants (actually looks a lot like the one in your pictures!) I have one question though that I am hoping you can help me out with. Did you cut the front and back pieces to the same width? How much did the shirring pull it in? Did you account for the shirring in your measurements? Thanks so much for a great tutorial and your help! 🙂

    Reply
    • Stef says

      February 26, 2012 at 9:45 pm

      Hi Marci,

      I did cut the front and back the same width and I did not account for the shirring in the width – I totally just eyeballed it – a little wider than my kiddo. I’m sorry – I know I would want exact measurements if I was going to replicate something, but really, you should just go for it – it’s such a loose-fitting dress anyway that you don’t need to be exact. Use a dress or shirt from your daughter’s closet and lay it on top to give you a general idea for sizing.

      Reply
  55. Pam says

    March 6, 2012 at 10:44 am

    This is such a gorgeous refashion!!! Love the shirring and the bows!!!

    Reply
  56. Anonymous says

    March 8, 2012 at 2:27 pm

    that is awesome!!

    Reply
  57. Anonymous says

    March 9, 2012 at 12:14 am

    I just came across your blog, and I have to say, you are one of the most clever people I have ever seen! Your designs are absolutely darling (and so are your little models)!

    Reply
  58. GKJ says

    March 17, 2012 at 7:01 am

    I found this dress on Pinterest today when I was looking for some inspiration. LOVE it and LOVE your blog! I made a Princess Dress out of an old men’s shirt today. I have linked to this post and your blog as a source of inspiration. I hope that is OK 🙂 You can find the post here: http://prettybobbins.blogspot.com/2012/03/mens-shirt-into-princess-dress.html

    Reply
  59. Renae says

    April 11, 2012 at 2:22 pm

    Using your general instructions, I refashioned a women’s XL shirt into a dress for my daughter. It’s up on my blog, http://kyleandrenaehill.blogspot.com/2012/04/sew-vivor-week-2-easter-dress.html, if you’re interested.

    Reply
  60. Roberta MacDonald says

    April 16, 2012 at 3:53 pm

    Made one for my almost 8-year-old this weekend, and found that I’m going to need to go back and add snaps in-between the buttons on the shirred part. They pull apart just far enough that it doesn’t look right, but other than that she loves it and can’t wait to wear it!

    Reply
  61. feelincrafty says

    May 7, 2012 at 5:37 pm

    This is adorable! I think I’m going to gv it a try. The shirring scares me though!

    Reply
  62. Ces says

    May 23, 2012 at 5:01 am

    love!

    Reply
  63. Ravyk says

    May 23, 2012 at 3:37 pm

    Gorgeous! I have been hoarding away some of my partners old shirts, the fabric was too nice to throw away. Now I know what I’ll be doing with them!

    Reply
  64. April says

    May 26, 2012 at 2:43 am

    So cute! I love this dress!

    Reply
  65. OlaP says

    June 3, 2012 at 9:00 am

    hi! my english is`t perfect…
    can i show your blog and pictures this dress on my blog???
    i made this dress but i must show yours:D

    Reply
  66. Tara says

    June 7, 2012 at 6:50 pm

    I love this dress! I linked to it in a roundup of button-down refashions on my blog http://www.true-pure-lovely.blogspot.com. Thanks for the great tutorial!

    Reply
  67. Dorri says

    July 12, 2012 at 9:16 pm

    Aw so cute and such an adorable little girl.

    Reply
  68. Kat says

    August 5, 2012 at 7:39 pm

    I just made this for my daughter!
    I would love to share the photos, but I’m not sure how.
    http://www.facebook.com/media/set/?set=a.3889305706328.160959.1089537560&type=1#!/kat.newman.7
    This is the link to the pics on my facebook, but you might need to friend request to see them. (I am not very good at techie stuff)

    Reply
  69. Anonymous says

    September 14, 2012 at 3:16 am

    I’m making this for my granddaughter right now. Question: Did you do anything to the back of the shirt? or just leave it like the back of a man’s shirt? Once shirring is in place it seems very full at the sides behind the shirring. I haven’t tried it on my granddaughter since she lives hours away. Just checking!

    Reply
    • Stef says

      September 14, 2012 at 5:54 am

      HI! For this dress, I did not do anything to the back and the fit was fine. However, when I initially cut down the shirt, I cut it not much wider than a 2Tish dress. You could add shirring all the way around the back, too. Also, I found that I needed to go in and stitch down the button placket where the shirring was so that it didn’t gap when worn – does that make sense? I know your granddaughter will love it whether it’s a little wide or not!!

      Reply
  70. Nathalie Swiss says

    September 28, 2012 at 2:04 am

    Haha! I pissed my husband off. I sewed his polo shirt to remove some leftover threads and I got careless and it all ripped off! 😀
    Haha! Just learning my first sewing experience.

    Thanks for the tips.
    Regards,
    Nathalie
    I love my Brother xl2600i!

    Reply
  71. Anonymous says

    October 31, 2012 at 6:47 am

    This is a wonderful idea and the dress turned out gorgeous, best idea I’ve seen as far as repurposing clothing, too bad I don’t have a little girl to make this for, but if I did I certainly would apply this idea to an old shirt, got any ideas for grownups to apply these ideas too would love to see them

    Reply
  72. Anonymous says

    November 3, 2012 at 9:49 pm

    ohh so beautiful.. I just used this idea and made one for my princess from a pink satin shirt, LOVE IT. I just have no clue how to do the shirring. But i saw that you used a elastic thread, so now I just have to find one. (So glad i didn´t try to do the shirring without the elestic thread

    Reply
  73. Anonymous says

    January 19, 2013 at 5:44 am

    I JUST found your blog via Pinterest, and I love it… such neat ideas and fantastic decorating. One question, I can’t seem to Pin stuff. Wonder if I’m doing something wrong? I wanted to pin the dad’s dress shirts to girl dresses.. that is SUCH a cute idea!
    Kendra

    Reply
  74. AV says

    March 15, 2013 at 8:22 pm

    I LOVE this upcycle! I decided to give it a try! It turned out DARLING!!! My daughter is 6 years old and for the first one I used a ladies size large shirt so I had to do mine a little differently, also I didn’t have the elastic thread to do the shirring so I improvised a little but it still turned out so cute! I also decided to give it a little extra pop and changed out the buttons on mine! Would you mind if I sent a pic in an email to get your feedback? I have more shirts (men’s x-larges) and bought some elastic thread so I am ready to shirr and make another! Thank you so much for the idea!
    Ashley

    Reply
  75. Erika B says

    June 14, 2013 at 8:06 pm

    Such a cute idea! I am just getting back into sewing after *many* years away… My 8 year old is so happy with her new dress! I did change it up by using an oriental print with a mandarin collar. Also I left out the shirring and did gathers at either side with elastic, and added a sash. It turned out super cute. Now I’m recharged to sew everything I see!

    Reply
  76. shawn says

    June 15, 2013 at 1:22 am

    Loooooove this sooo much!! Great idea! Wish I’m good at sewing 🙁

    Reply
  77. Dewi Maria says

    July 17, 2013 at 7:32 pm

    this is super cute !!!
    I’ll give it a try today, even i’m not sure how to deal with the collar 😛

    Reply
  78. KChu says

    October 16, 2013 at 8:45 pm

    Of all the repurposing a man’s dress shirt, this is my favorite. Can’t wait to make one. Even though you don’t have step by step photos, the drawings and few steps explain it perfectly well. Thank you!

    Reply
  79. Melanie says

    March 8, 2014 at 7:53 am

    My sister has done this for her granddaughter with really pretty women’s shirts and they are adorable. Love this.

    Reply
  80. Kellie Fluegge says

    April 9, 2014 at 1:36 pm

    Would you mind emailing me a print/copy of the pattern you used for the sleeves? Thank you so much! kcfluegge@stx.rr.com

    Reply
    • girlinspired says

      April 16, 2014 at 10:03 am

      Hi Kellie, I’m sorry – I made the dress so many years ago, I have no idea which sleeve pattern I used, but any puff sleeve would do, I’m sure.

      Reply
  81. Trish says

    April 9, 2014 at 6:00 pm

    Hi! I’ve been scanning Men’s Shirt-to-Dress tutorials for awhile, and this is the one I have settled on to make first, it’s gorgeous!

    My question: It looks like you removed the pockets, is that correct? If so, were there obvious holes left after picking out all the threads, and if so, did the shirring camouflage them? I scanned the comments first and didn’t see an answer to this, sorry if you already answered it and I missed it!

    Thanks for putting this tutorial out on the web for us all!

    Reply
    • girlinspired says

      April 16, 2014 at 10:01 am

      Hi Trish, I did remove the pockets, and you could see some stitch lines, but once I pressed and steamed over the area, and then added shirring, you couldn’t see a thing. Have fun!

      Reply
  82. onel says

    July 4, 2014 at 3:24 am

    What a smart refashion!! The dress is so pretty!!

    Reply

Trackbacks

  1. tutulanki says:
    August 15, 2013 at 1:27 am

    […] Pomysł zaczerpnęłam ze strony The Girl Inspired, a tutaj możecie znaleźć DIY na sukieneczkę his work shirt to her school dress. […]

    Reply
  2. upcycle before: men’s shirts | kids clothes week blog says:
    January 13, 2015 at 7:02 am

    […] polka dot dress, me sew crazy 2. school dress, girl. inspired. 3. sailboat dress, life is […]

    Reply

Leave a Reply Cancel reply

Your email address will not be published. Required fields are marked *

Recipe Rating


About Stef
  • Email
  • Facebook
  • Instagram
  • Pinterest
  • RSS
  • Twitter

Sharing Policy

It is my hope that you will find inspiration on the Girl. Inspired. blog. All photos are copyright protected by Girl. Inspired. If you wish to share something that you have seen here, I am absolutely thrilled! Please use only one picture with a direct link back to the project you are referencing. Thank you so much for your understanding!

Privacy Policy

What are You Looking For?

Copyright © 2022 · Foodie Child Theme by Shay Bocks · Built on the Genesis Framework · Powered by WordPress

613 shares