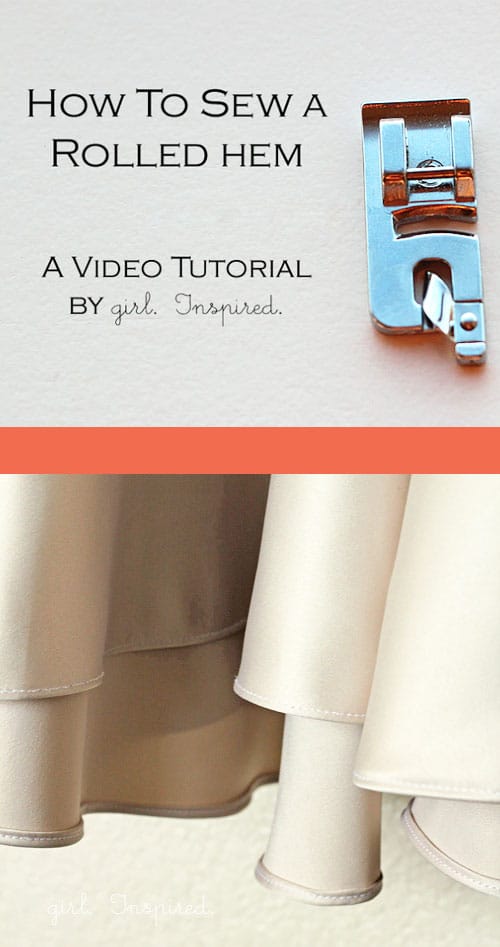
The rolled hem presser foot is just another amazing little device that makes my sewing life a million times easier. Using this sewing machine attachment makes hemming sheer and slippery fabrics an absolute breeze. The fabric takes very little preparation and the little foot does most of the work. Let’s dive in and learn how to sew a rolled hem.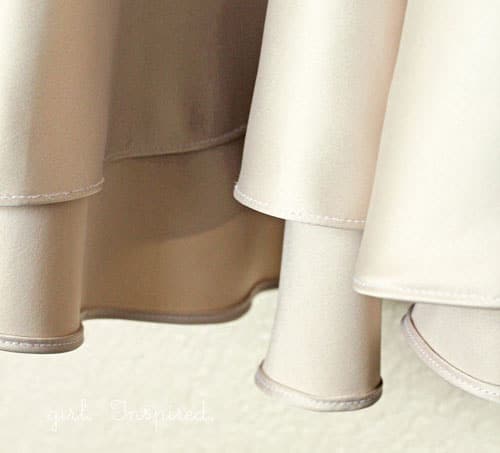
Today, I’m hoping to share my technique to easily use this tool. I thought it would be fun to see how I perform on-screen, so….I recorded a little video tutorial. I discovered that I say “um” a lot and throw in a bunch of unnecessary pauses between my overly detailed babbling. But, I think it will give you a quick picture of how I get my special presser foot to work its magic for me. And I hope it helps you with your next tricky hem!!
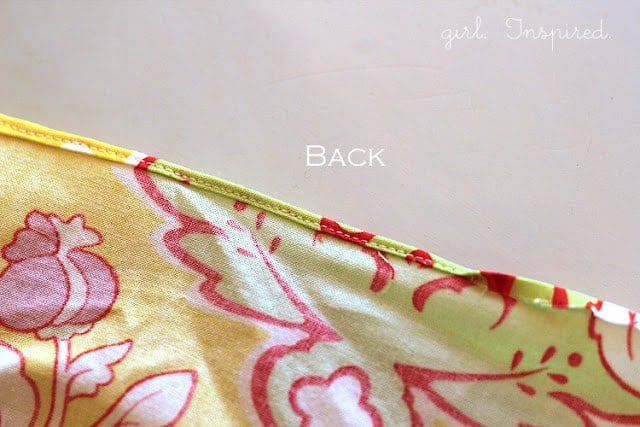
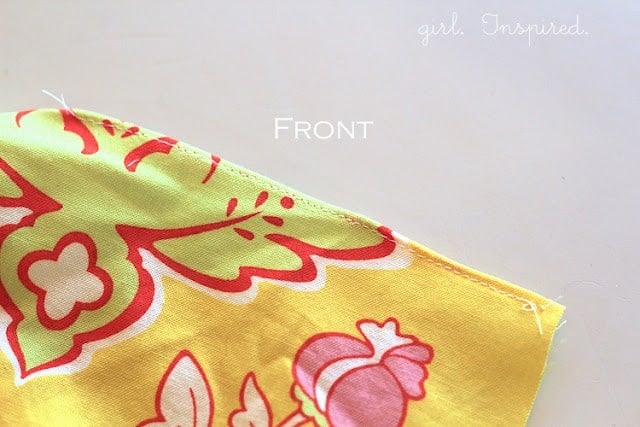
Did you find the video helpful? I have a couple close up pictures below of the finished rolled hem.


Comments & Reviews
Sara says
I was so frustrated with my rolled hem foot that I tossed it in the draw and gave up. But now I want to get it out and give it another go. I think the key I was missing was the first 2-3 stitches before threading the fabric through the coil. Thanks for taking the time to make this tutorial!
Catherine Stabler says
I have never been successful doing rolled hems but you do make it look so easy.
Helena A. says
Hi Stef! I have just found out your Blog and I am already a fan! You do such awesome things! Just to let you know that I have Pin several projects from your Blog to Pinterest!
Kisses from Portugal
RaeAnna says
Where should I buy the foot? I have a 1980’s White – my feet attach like the one in your picture
Stef says
RaeAnna- Mine came with my machine, but I’ve had great success searching Amazon for feet. If you have a local sewing machine shop, you could call and ask them, too, they might be able to order it.
Faye Hadfield says
a brilliant tutorial – I’ve never been able to get it started neatly…now I know how! Thank you xx
Delia says
This tute is awesome! Pinning it!
Glückskind says
Hi Stef,
I’m so much in love with this foot – I do rolled hems on EVERYTHING (OK. Except knits.;)), even on waved hems. Thats a little bit tricky, but if you carefully feed the fabric into the foot so that it’s always lying flat an straight directly in front of the “snake” it works.
For your information: I roll-hemmed a thick velveteen cotton just yesterday. That’s no problem.
By the way: I don’t iron before starting. I just fold the fabric twice, use a tiny little bit of wondertape to fix the seam an start it like that. As soon as I have done the first stiches I pull the fabric backwards to me and put it into the “snake” part of the foot. Then I start seaming.
If there are problems with the needle position you might check if you let the foot work by itself or if you move the fabric inconsciously to one side. I can change the needle-position but somtimes if I worry too much about my fabric entering correctly into the foot I pull a little bit too much – and the needle is out of the folded area.
You could also take a piece of cardboard as thick as your hem and let it move under the foot together with your fabric to contol the position of the hem but that is a very uncomfortable way to work, especially if seaming big amounts of fabric.
If it’s not that – go to let your machine check. It is possible that afer a few years the needle leaves the center position slightly. That may cause your problem. Give the mechanic your foot and tell him what you want to do! So he can carefully adjust the needle-position.
Much love from the other side of the ocean! If my English is not clear, let me know!
Thank you for your lovely and so inspiring blog, Stef!
Juliane
Saint2004 says
I’ve tried to use the hemmer foot on my machine and it does exactly what you describe as rolling the fabric evenly. However, my needle doesn’t seem to want to sew directly over the rolled edge but rather to the left, causing the hem to not be sewn properly. Any tips to correct this?
Charity says
I learned something very useful… sew a few stitches before trying to finagle the hem into the roll! That will help a LOT. I’m curious what you do when you are getting to the end of the hem on a tube. Would you just pull the fabric back out of the roll and stitch the last inch or so without it?
Thanks for the demonstration! =)
Stef says
Oh, yes!! Another great question, Charity! I do it just the way you suggested – when I get to the last inch or so (when the hem is already sewn in a tube), I stop stitching, make sure the needle is still down into the fabric, then I lift the presser foot and wiggle the fabric out of the coil. Then, I put the presser foot back down and finish stitching the hem. Since it is such a small part of the fabric, the hem seams to stay rolled up tight for a flawless finish!
Ellie-Mae says
I always thought the whole point of it is that you didn’t have to iron the tiny hem first. Couldn’t I just use an ordinary foot if it is already pressed?
Stef says
Good question! You really don’t have to iron the hem except for pressing twice under on the first couple inches – to get your needle and fabric lined up right under the needle. For me, it really works best if I either press or manually turn/guide the first folded edge into the foot with slippery fabrics – that’s just what works for me, but I still don’t have to turn twice and press a nice even hem. Also, I’m not able to press and stitch such a tiny hem on the machine with my regular foot.
Mariam says
I LOVE the hemmer foot. I really think it is the first tool that helped me take my sewing from looking “beginner” to polished and gave me the confidence to sew more. I especially love the foot when working with slippery fabrics like satin that don’t press well. I recommend it to people all the time, and now I will send them to your fantastic video to get a better how-to. Thanks for the great video.
Stef says
I love this foot, too! You’re right, it produces such a professional finish on the hem!
sweeter than cupcakes says
I totally need to get the sewing foot now!! I only thought they worked for very thin fabrics. Thanks for the demo
Stef says
Well, I really think it works best on thin/slippery fabrics, but you could use it to hem cotton, too. Anything thicker than a quilting weight cotton probably wouldn’t feed through very well, but I haven’t tried it.
Cookie says
maybe it’s because i’m a newbie to sewing, but it would have helped me to have a closer view in the video. i could hardly tell what you were doing. the photographs are great for the closeups, i just wish the video had been shot closer! but thanks for the introduction!
Stef says
That’s great feedback, Cookie! I will definitely be working on future video tutorials and I’ll keep that in mind! I hope you’ll give it a try! Thanks again for taking the time to comment!!
IRedS says
Love the video — I think it’s always helpful to “see” how to turn under, manipulate it through the coil thing, etc. Thanks!
Stef says
Thank you! I’m a visual learner, too. Pictures and video are the best next thing to someone sitting next to me. Plus, I can stare as long as I need for the concept to click!
Joanna says
It’s really helpful, and it’s also really nice to hear your voice! 🙂
Stef says
Cool! Thanks, Joanna!
Janet Mende says
This was the ONLY tutorial that really worked! Thank you for taking the time to post!
Jennie says
THanks for your clear instructions tips and video. I am returning to sewing after many years and working on improving my skills. Thanks so much for your ruffle tutorial.
JB