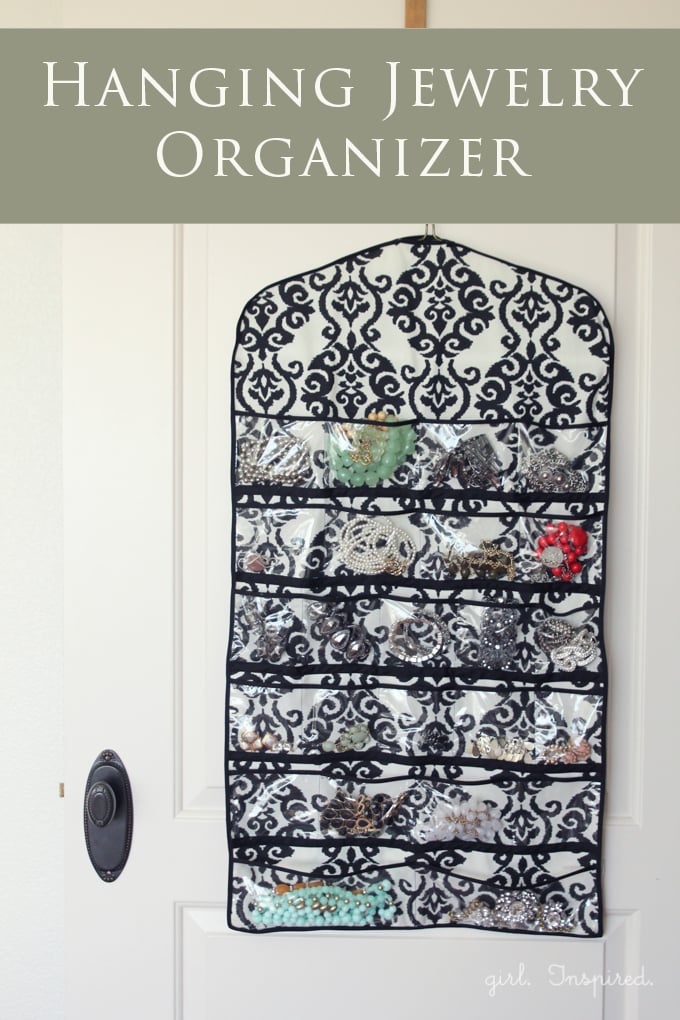
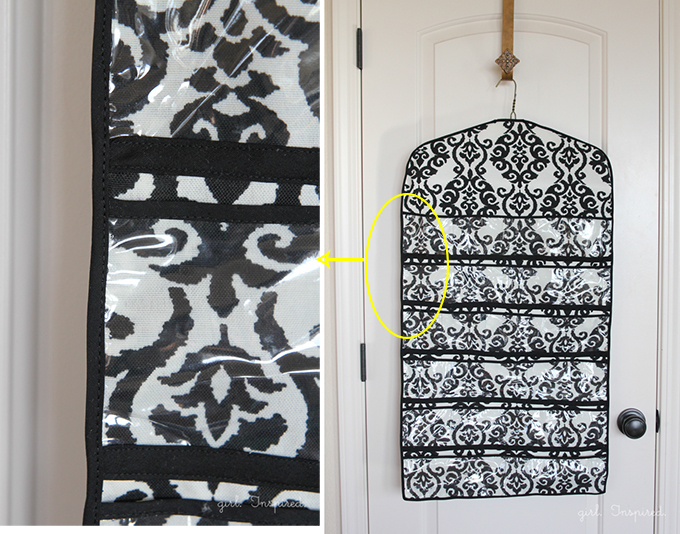
We are doing some MAJOR cleaning and de-cluttering in our home. We’ve been here a good number of years and the stuff has really piled up. It feels SO great to get rid of all the stuff that is just taking up space and sucking up my energy. I keep finding that each cleaning task leads me down a rabbit hole – before I can sort through that, I have to sort through this, and clear out that, and have a place for this. One such rabbit hole in my master bathroom led me to the realization that I desperately needed a better system of storing and organizing my jewelry. I love the fun trends in accessories, but I can’t even fit one of those chunky necklaces into my jewelry box, much less my whole collection. I sewed a hanging jewelry organizer to keep many of my earrings, bracelets, and necklaces safe and visible. The clear vinyl pockets make it easy to quickly find what I’m looking for and the built in hanger makes it simple to keep the whole thing right in my closet. Today, I’ll show you how to make your own!
 You will need:
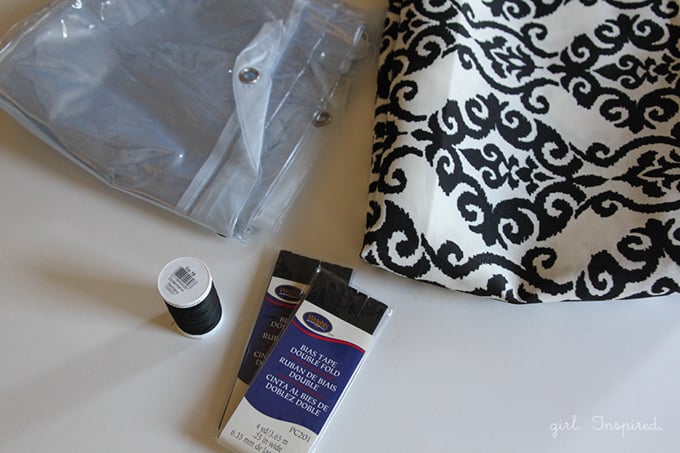
1 yard of home decor or upholstery fabric (the heavier fabric will help the organizer hold its shape)
2 packages (4 yards each) of double fold bias tape
1-2 packages (3 yards each) of extra wide double fold bias tape
clear vinyl shower curtain liner
ruler and disappearing ink fabric marker
large heavy-duty wire hanger (18″ wide)
matching thread
heavy duty sewing machine needle

Step 1: Begin by cutting two vertical pieces of fabric 20″ wide by 35″ long.

Step 2: Place your hanger on top of the fabric pieces and draw a line approximately 1″ above the shape of the hanger. Trim away the excess fabric to approximately follow the curve of the hanger. You will want at least an inch around every side of the hanger so that there is enough room to maneuver while you’re stitching the hanger into the organizer later. To ensure that both sides of the organizer are symmetrical, fold the fabric (both pieces) in half vertically, and cut your drawn curve this way – when you open the pieces up, everything will be nice and symmetrical.
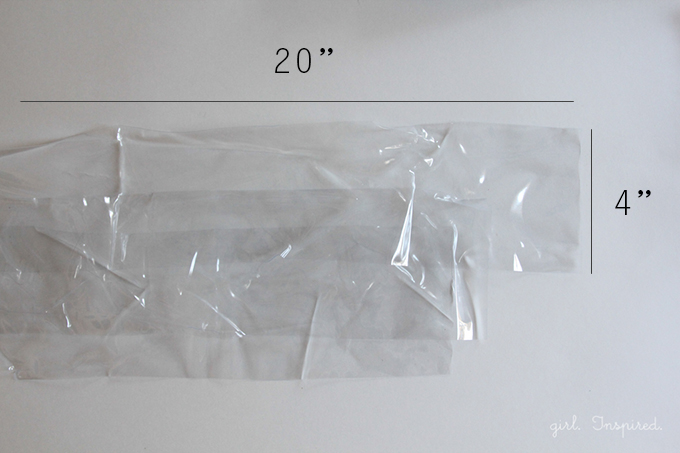
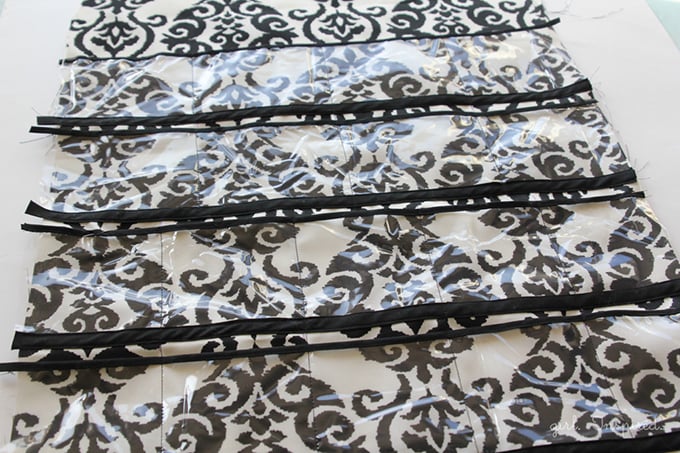
Step 3: Cut six sections of clear vinyl from the shower curtain liner. Each sections should be 4″ tall by 20″ wide. These will become the pocket pieces.
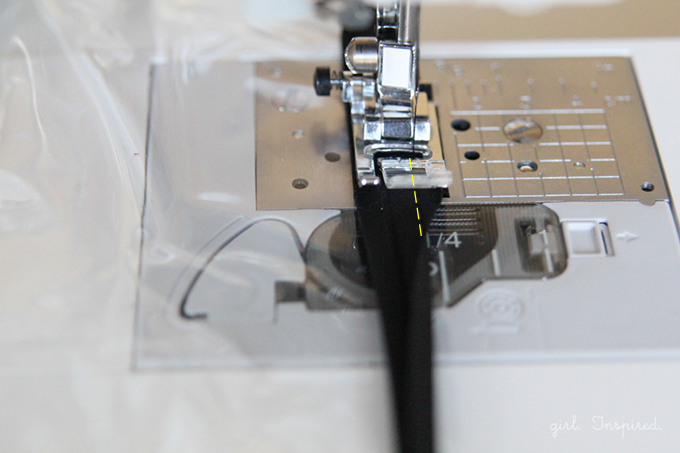
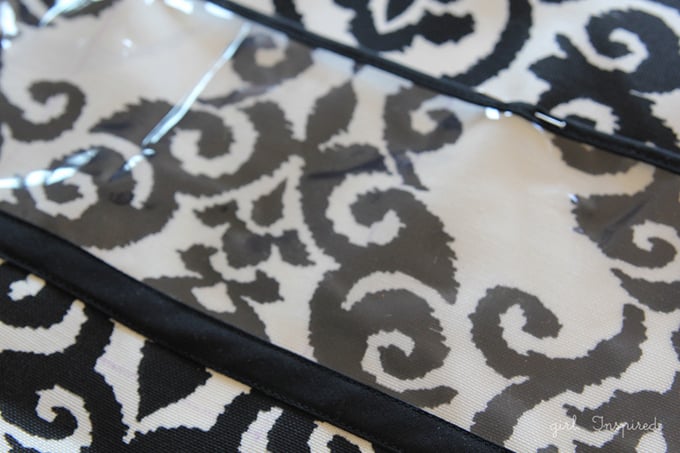
Step 4: Using the double fold bias tape (the more narrow bias tape), cut pieces approximately 21″ long. Open up each piece completely. Place the opened bias tape right side down on top of one vinyl pocket piece. Match up the edges along the length. Holding the bias tape in place with your fingers (pins will leave holes in the vinyl so avoid their use or be sure to only place them right along the very edge), stitch the bias tape along the top edge of the pocket piece. Be sure you are stitching about ⅛″ from the edge – right in the first fold of the bias tape.
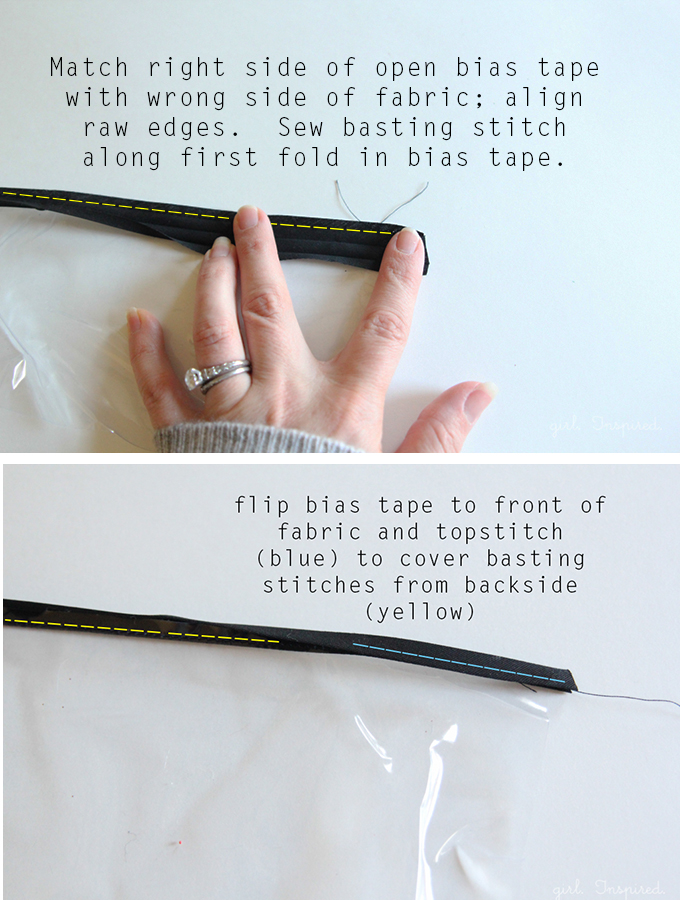
Step 5: Once you have basted the bias tape in place, fold it up again along its original folds and flip it up and over the edge of the vinyl to the “right side.” Now, topstitch along the edge to conceal the basting stitches and create a fully encased top edge to the pocket. Repeat for all six pocket pieces.

Step 6: With the extra wide double fold bias tape, wrap the bottom edge of each pocket piece and pin the bias tape (keeping the pins only on the bias tape) into place. You’re simple opening the bias tape partway and inserting the vinyl into the fold. Repeat for five of the pocket pieces and set them aside.
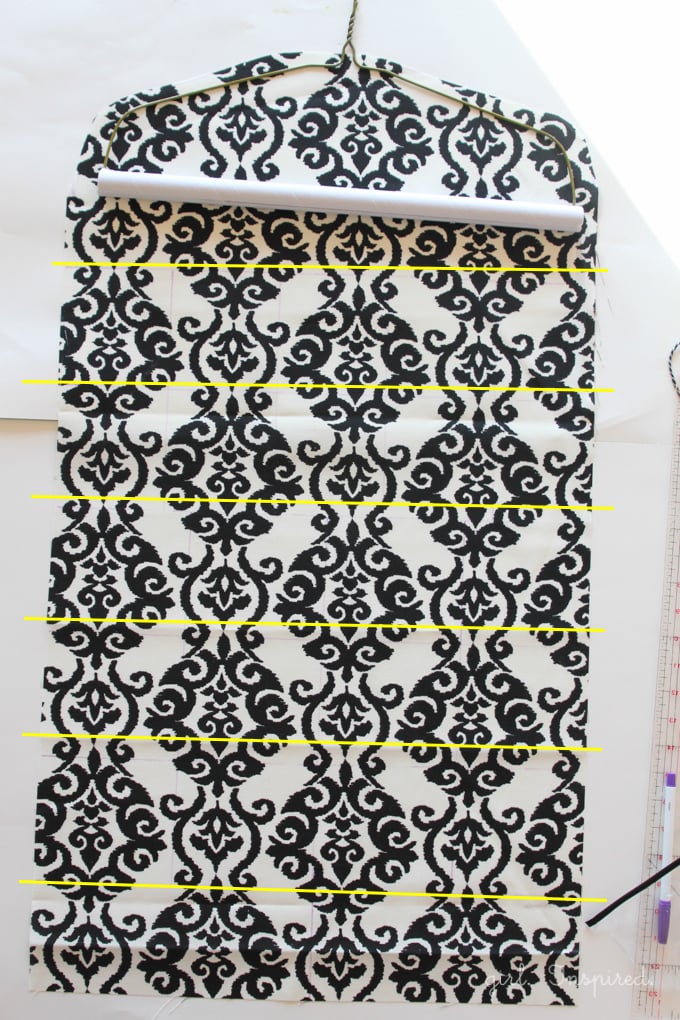
Step 7: Now we will prepare the fabric for attaching the pockets. Beginning at the bottom of the fabric (just the front side of the organizer), draw a horizontal line with your disappearing ink fabric marker 4″ from the bottom edge. Draw five additional lines, each 4.5″ from the line below it. You should have six lines all together.
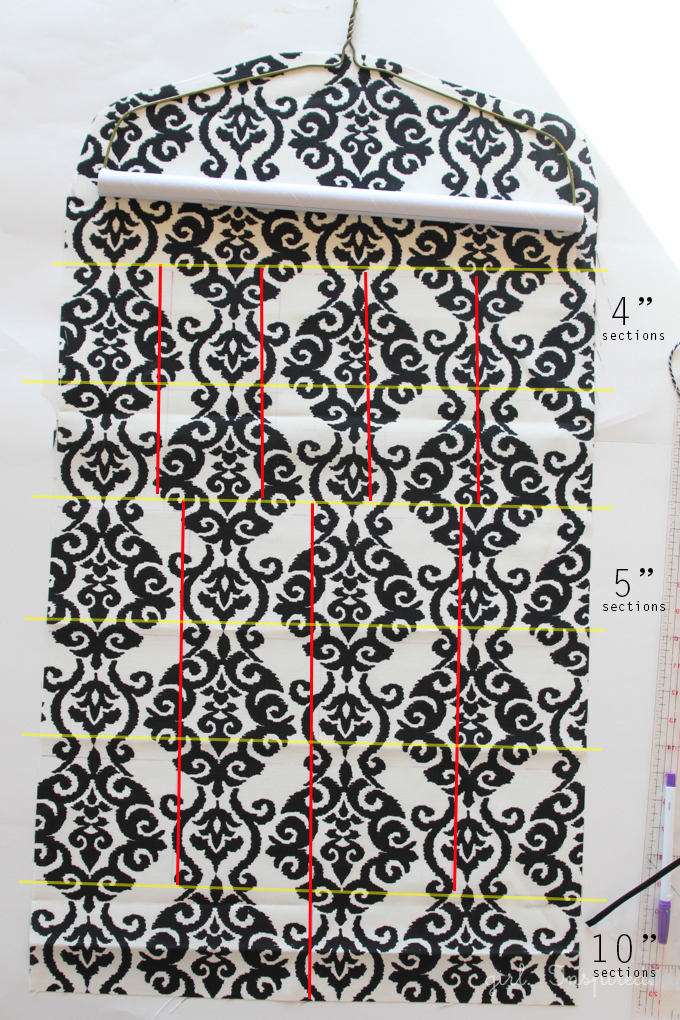
Step 8: Mark where you would like your vertical lines to be on the finished organizer. Each horizontal pocket can be divided into sections of varying widths. For ease, I divided two pockets into 5 – 4″ sections (smaller for earrings and bracelets), three pockets into 4 – 5″ sections (larger for chunky necklaces), and the bottom pocket into 2 – 10″ sections (extra large). Mark these vertical lines now so that you can easily follow them when your pockets are sewn on.
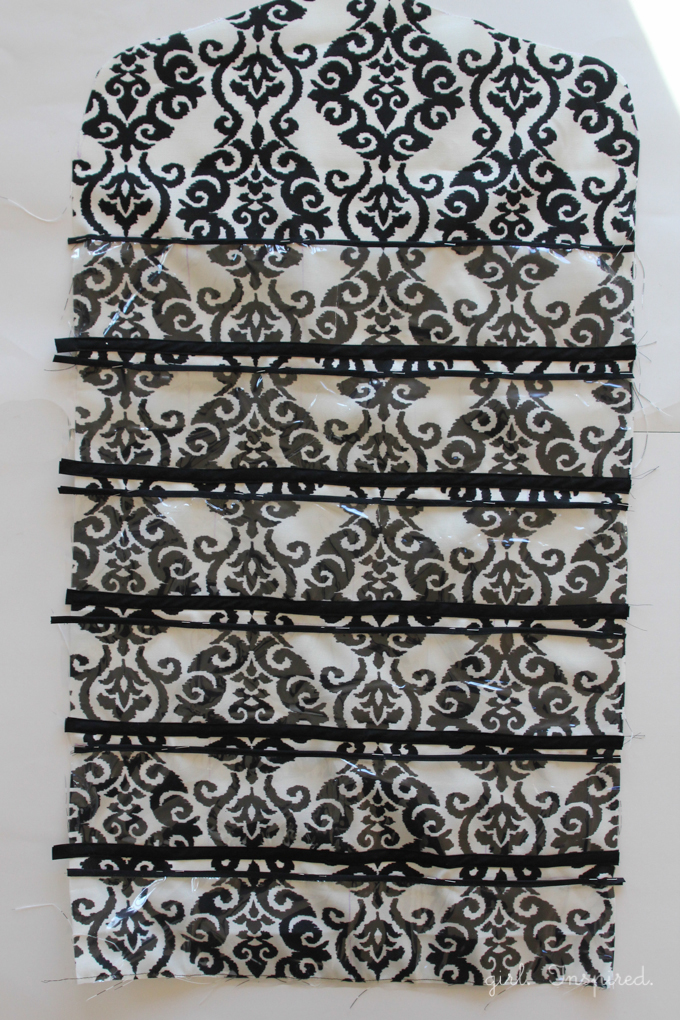
Step 9: Pin the pockets onto the fabric. The top edge of each pocket should align with each horizontal line that you marked. The pocket that does not have extra wide bias tape on its bottom edge will align with the very bottom edge of the organizer. You will need to pin the pockets into place along their top edges AND repin the bottom edge of each pocket, making sure to keep the extra wide bias tape fully encasing the bottom edge of each vinyl piece. It is probably easiest to pin and sew one pocket at a time, beginning with the top and working your way down.
Step 10: To attach the pockets, you will sew two rows of stitching on each pocket. These two rows of stitching should be along the two edges of the extra wide bias tape running the length of the bottom of each pocket. DO NOT SEW horizontally along the top edge of each pocket – simply leave the pins in place for now. The top edge needs to stay open so that you can tuck your jewelry in!
Step 11: Once all of the pockets have been attached along their bottoms, it’s time to sew the vertical lines in to make the pocket dividers. Because you’re sewing on top of the vinyl, it may get a little tricky to keep your presser foot from sticking. Hold your fabric firmly so that you can help to keep the fabric moving. If you have a teflon foot for your machine, it may come in handy. You can also place strips of tissue paper between the presser foot and the vinyl (you can find more information on sewing with vinyl or oilcloth where I show you how to sew a raincoat).
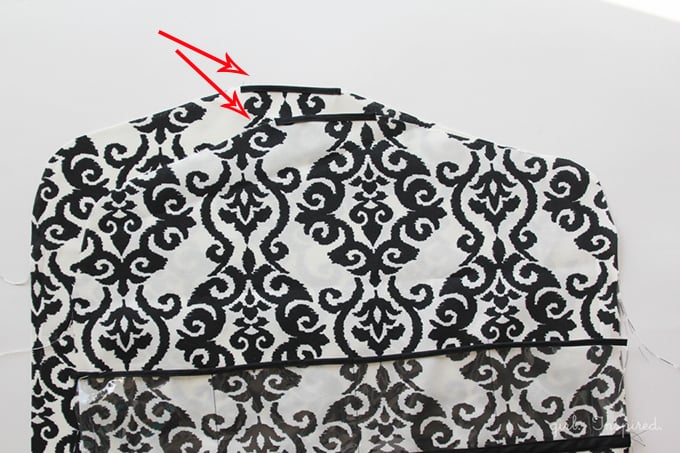
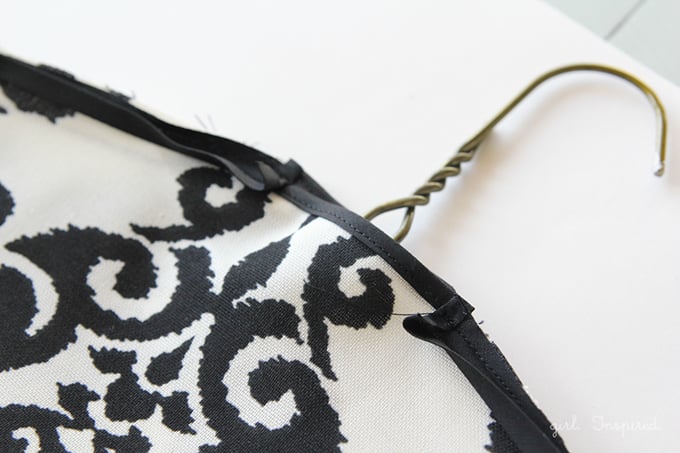
Step 12: Now it’s time to attach the back of the organizer to the front and finish the edges. (Please note that you can add pockets of any size in a similar manner to the back of the organizer for even more storage space. Simply follow the same techniques outlined above before continuing with Step 12.) We will need to first finish the edges at the top center where the hanger will poke through. Cut two 3″ pieces of double fold bias tape and attach them to the top center of each fabric panel as shown (use the same techniques as Steps 4-5.)
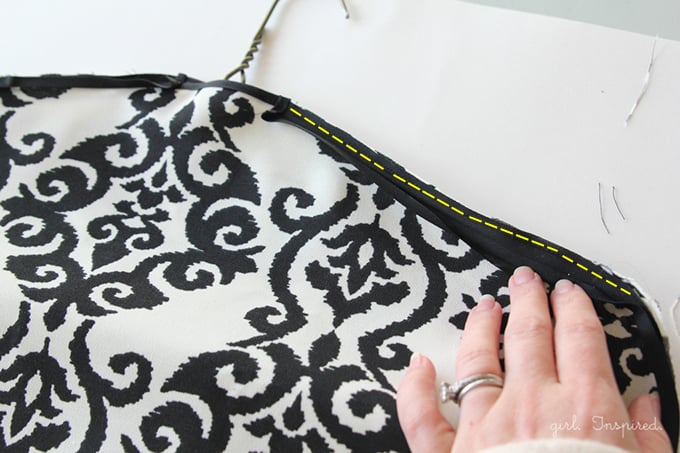
Step 13: Place the two fabric panels wrong sides together, matching all the sides evenly and pinning here and there to keep them aligned. Now we’re going to add bias tape all the way around the edges of the organizer. I used the narrower double fold bias tape and I think the finish looks nice and neat. You can also use the extra wide bias tape and it would be even easier to finish off the project, but you would lose a bit of storage space in the pockets. It’s up to you! Either way, open up the bias tape like you did before and match the right side of the bias tape to the BACK SIDE of the fabric organizer. Baste it into place all the way around the perimeter, sewing along that first fold (about ⅛″ away from the raw edges). Be sure you are catching all three layers (front panel, back panel, vinyl pocket edges) in the stitches. I found that I needed to keep the pocket edges pinned so that they wouldn’t stick on the machine as I was sewing and get nudged out of place. Work slowly and carefully – use a heavy duty machine needle to easily sew through the bulky layers, particularly where you are sewing over the top and bottom edges of each pocket. BEFORE you completely stitch on the bias tape, tuck the hanger up into the organizer so that it can be sewn in. We left that extra 1″ of wiggle room around the hanger when we designed the organizer so you should be able to maneuver it to the side as you sew on the bias tape with the hanger in place.
One more note about attaching the bias tape edging: Start and stop the edging about an inch to each side of the top center. Overlap the edging that you added in Step 12 by about a half inch on each side. Also, fold the bias tape back over on itself as shown in the picture above so that when you flip the whole thing to the front side, those top sides of the bias tape will have a neat finish instead of a raw edge.
Step 14: Almost done! You just need to flip that bias tape around to the front side of the organizer and topstitch it down. Because you have some bulk tucked in there, I highly recommend trimming down any uneven edges or excess fabric/vinyl. This way, you will be able to wrap the bias tape all the way over the edge and stitch it down to cover the layers and basting stitches underneath.
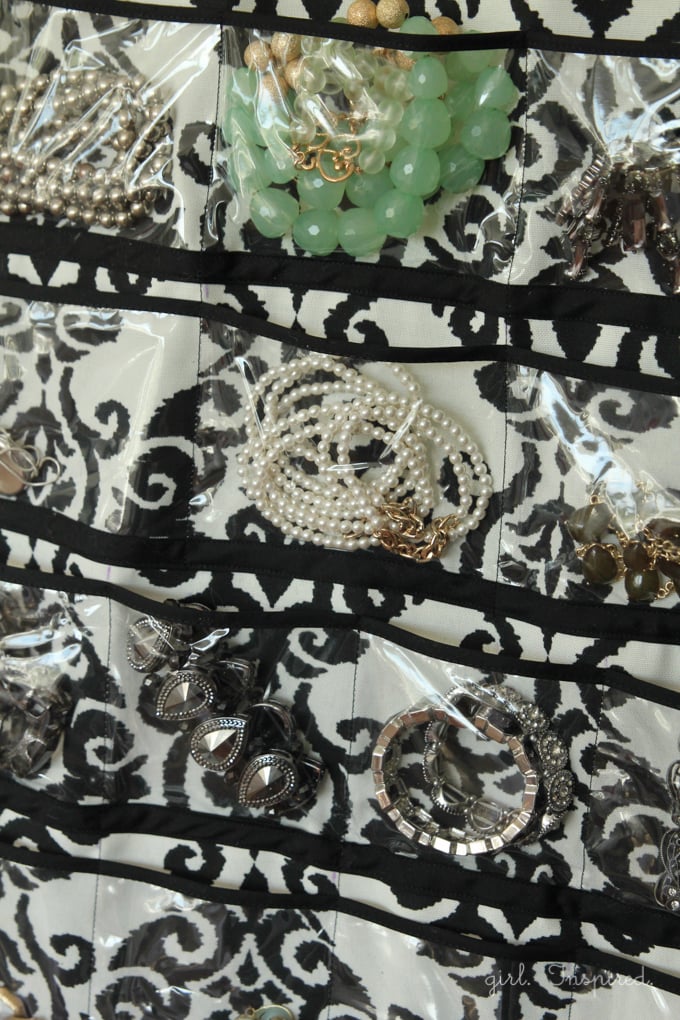
Fill her up with all your pretty jewelry, hang her up and out of the way, and give yourself a pat on the back for getting another piece of your home organized and more functional!


Comments & Reviews
Sewing Shop says
Hi, this is a really clever idea! Great tutorial 🙂
I have linked to it on my blog, you can see it here.
Harriet says
Thank you for this inspiring idea. I had already wanted to make one of these, though not for my jewelry, but for my presser feet! I will probably use one of my old (stronger) poly/plastic/whatever the heck that stuff is hangers and up at the top create a way to reinsert a replacement should it ever be necessary. I use my mother’s “Armageddon” table (you know, the kitchen tables from the early 50’s that have 2 leaves and are sturdy enough to hid under in the event of an earthquake or major crisis!) so I do have lots of room, but the compartmented box I have been using for the feet has been outgrown. I figured having the feet in a caddy such as this, hanging at my right hand on the wall, would be a much better choice that having to sort through the box!
Having recently worked with plastic when constructing my husband’s shaving kit, I would suggest using a longer stitch length when topstitching the binding to the plastic/vinyl. Stitches too short will create a “tear-off” effect like the top of a legal pad. Not what you want when you’ve worked so hard to create a master piece!
Thank you again for a great tutorial!
Marilyn says
I have several of these I bought a garage sales. I use one to store my flash drives which have my embroidery designs on them for my embroidery machine.
Anne says
We need to do some major decluttering at our house! Stuff is everywhere! Your jewelry organizer is so pretty, and a great way to keep those smaller items within easy reach. I’ve got a Craft Gossip post scheduled for tomorrow afternoon that links to your tutorial:
http://sewing.craftgossip.com/80890/2015/02/14/
–Anne
anndei says
Love it!! I can see so many other uses for it (kids’ toys, trinkets, legos…. the possibilities are endless!!!) But I was wondering, you sew through the vinyl just as if it were fabric? What size needle and what kind of thread?
Thanks for sharing a great idea!!!