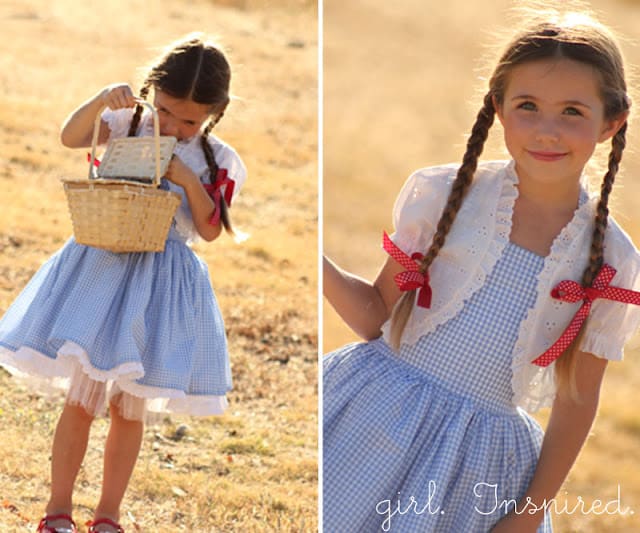
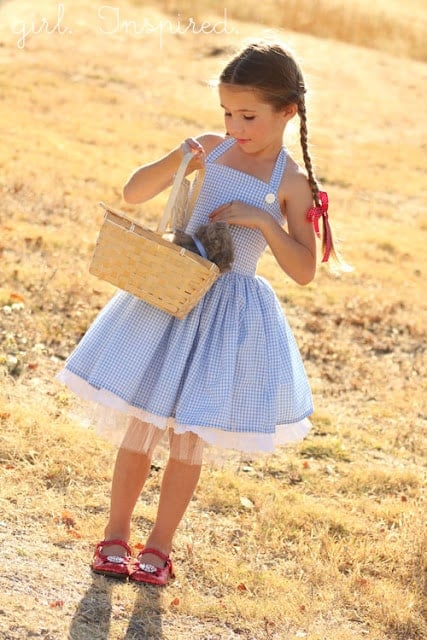
If you need a last minute costume for your little girl, this quick Dorothy dress tutorial might come in handy. I shared the tutorial for making Olivia her Dorothy costume at the Train to Crazy a few weeks ago. Hope you like it!I absolutely love making my three girls their Halloween costumes, but this year, I’ve succumbed to time pressures and ended up purchasing two of my girls’ costumes. When my seven-year-old told me she wanted to be Dorothy, though, it pulled at my DIY heartstrings a little too much.
I just couldn’t buy a polyester Dorothy dress from the costume aisle. I was pretty sure I could whip something up quick. And it would have been super fast if I didn’t find myself staring at a million different trims trying to decide what to put where. That really slowed me down. In the end, I went with my initial instincts and today I’m going to share with you a tutorial for a dress that you could probably finish in less than an hour. Ready?
You will need the main material and a lining material – I used a really lightweight gingham for the top layer and muslin for the lining. You will also need three measurements: chest, underarm to waist, and waist to hemline. Using my daughter’s chest measurement, I cut the bodice pieces. The front bodice piece width should be half the width of the chest measurement + ½″ (¼″ seam allowance on each side). To find the height of the bodice piece, measure from the underarm to the waist, factor in ¼″ seam allowance on the top and ½″ seam allowance at the waist; then cut your piece at this length on the sides with a smooth curve up to the center. I hope that’s clear. For the back of the bodice and lining, you will cut a simple rectangle that is the same width as the bodice front + 2 inches if you are going to add shirring as I did AND the length should be just the length from underarm to waist plus a total of ¾″ seam allowance.
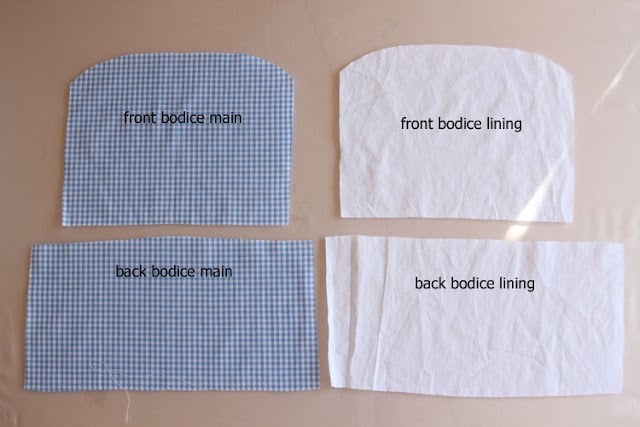
Stitch your bodice front to the bodice back along each side seam; repeat for lining. Now, cut your skirt pieces. I wanted a really full skirt so I cut two pieces selvage to selvage for the main skirt and two pieces selvage to selvage for the lining. The length for the pieces was determined by measuring from my daughter’s waist to just above her knee, with added length for seam allowances. Join the short ends of the skirt pieces to form two tubes (one main, one lining). Now, you’re going to attach each skirt to its corresponding bodice piece.
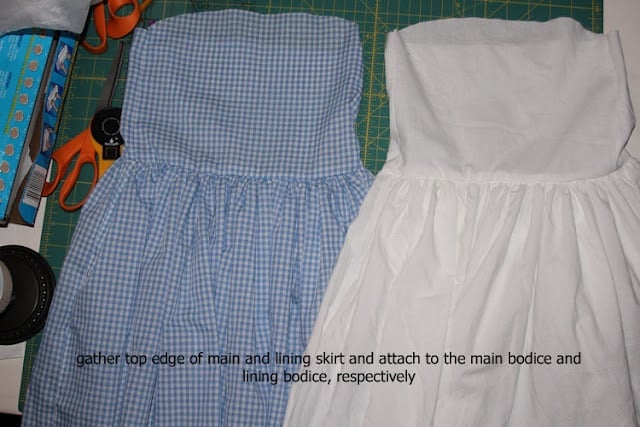
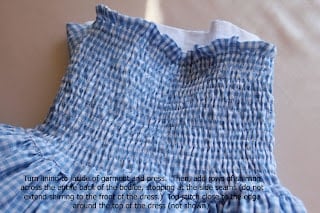
Now, we’re going to join together the dress and lining and finish the top edge of the bodice all in one easy step.

If you are making a stretchy little dress that is easy to get on and off, you can use this shirring method. If you’re not familiar with shirring, it really is a cinch! You can read more about it in my shirring tutorial.
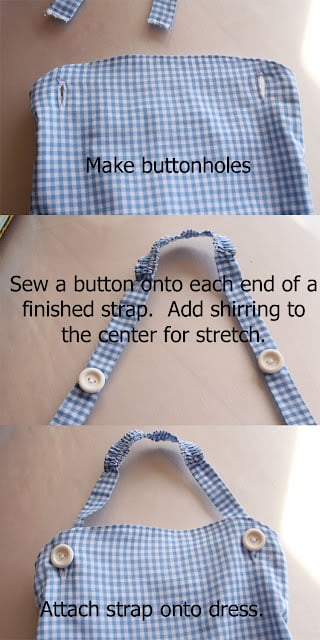
Now, to add the classic Dorothy buttons, but with an easy halter strap:
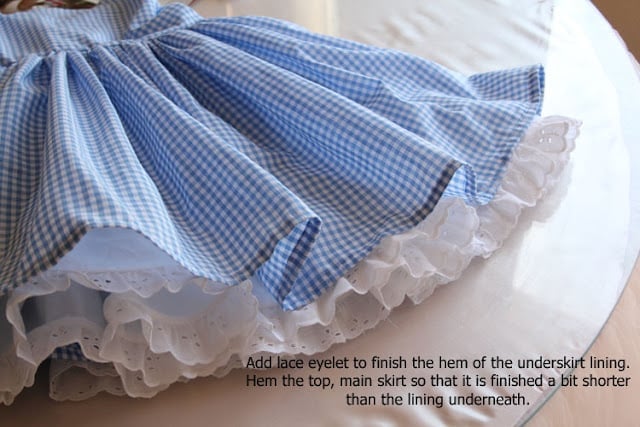
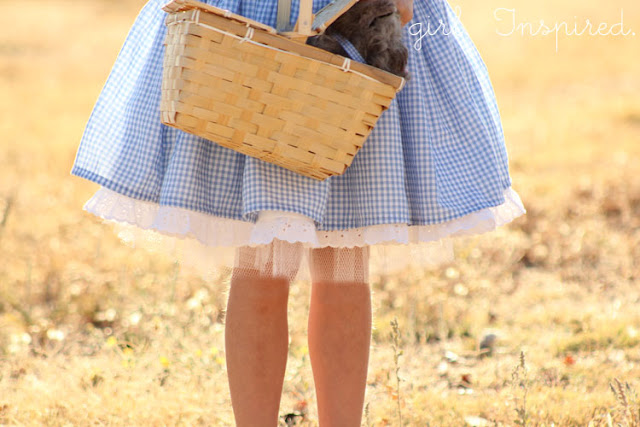
Finally, you’re going to finish your hems. I loved the idea of having the fluffy petticoat look underneath the main dress. I had a hard time deciding whether or not to add ric rac around the main dress hem or to add stripes with red trim toward the bottom of the skirt; in the end, I just did a plain hem and then added some nice old-fashioned eyelet trim to the hem of the underskirt.
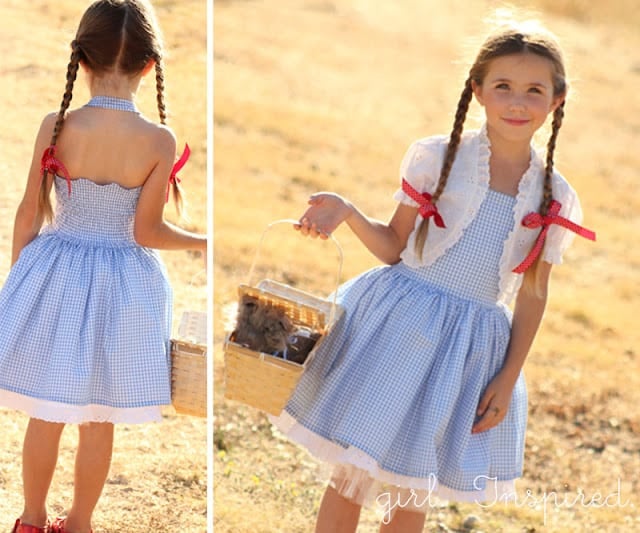
And that’s it! I put the dress over a tulle pettiskirt for extra fluff and added a little white eyelet bolero that was mine when I was a little girl. Target stocked the glittery shoes and Toto in basket, thank goodness. I have to say, I’m so glad I took the time to make this costume and my Olivia is, too!
Happy Halloween!


Comments & Reviews
Tash says
Thank you for this pattern. I made this dress for my daughter for bookweek and it turned out beautiful.
Susan says
So cute. I’m going to make this for my granddaughter. Did you make the tulle pettiskirt using the same instructions as your tutorial, https://thegirlinspired.com/2012/07/pettiskirt-please-tutorial/?
Jenny says
Thanks for this awesome tutorial! I was able to create my daughter a Little Miss Muffet costume using your pattern:) check out my blog to see the pics! and thanks again for sharing!
http://wrightbyme.blogspot.com/2014/02/little-miss-muffet.html
Melanie says
How wide and how long did you make the straps for the halter? Do I have to do the shirring on the strap or can I just leave it as is?
girlinspired says
Hi Melanie, The best way to figure out the length for the halter is to have your daughter try the dress on and then measure from one side of the bodice, up around the neck, and down to the other side of the bodice. I think I made mine about 1″ wide when finished (so I probably cut the strip 2 1/2″ wide). You don’t have to add the shirring, but adding shirring or some elastic into the strap will make it more comfortable to wear. When you’re figuring out the length for the strap, be sure to calculate extra length that will be gathered up with the elastic/shirring. Hope that helps! xo, Stef
Aimee Prets says
I love this dress! We live in Washington State so we would definatley need the little sweater to go over the dress. Did you make that as well or is it something you already had?
girlinspired says
Hi Aimee, The little bolero was mine when I was a little girl…but I’m sure you could use any white or red sweater!
michelle mills says
wow love this so much, its going in my list of “too dos”
girlinspired says
Thanks Michelle! I’m looking at this dress again thinking it would be so cute for just a summer dress!
Andrea from The Train To Crazy says
Thank you so much for being a guest!
tatiana says
es hermossa
{jen} iCandyhandmade says
I can’t stand how adorable this is! What a perfect Dorothy!
Simple Simon & Co says
SO worth the work…LOVE IT!
(How the heck did I miss this over at Andrea’s???)
-liZ
Simple Simon & Co says
SO worth the work…LOVE IT!
(How the heck did I miss this over at Andrea’s???)
-liZ
Simple Simon & Co says
SO worth the work…LOVE IT!
(How the heck did I miss this over at Andrea’s???)
-liZ
Julia C. says
What a sweet girl…she is looking so grown up:). I LOVE, LOVE the dress Stef…it is just gorgeous! Your daughter makes a darling Dorothy!
~Julia
Anemistyle says
Gorgeous girl and dress, you make it look so EASY X
Jessica at Me Sew Crazy says
So so so cute Stef!! Your little girl is just gorgeous, makes the perfect Dorothy 🙂