
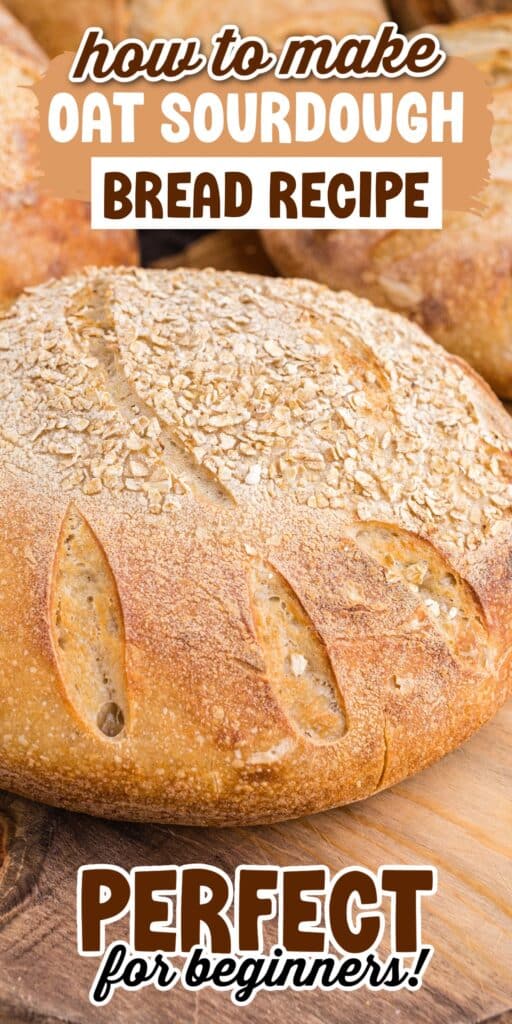

Follow this straightforward guide to create the perfect rustic oat sourdough bread – crisp golden crust on the outside, soft and chewy inside, using a combination of whole grain flour and bread flour.
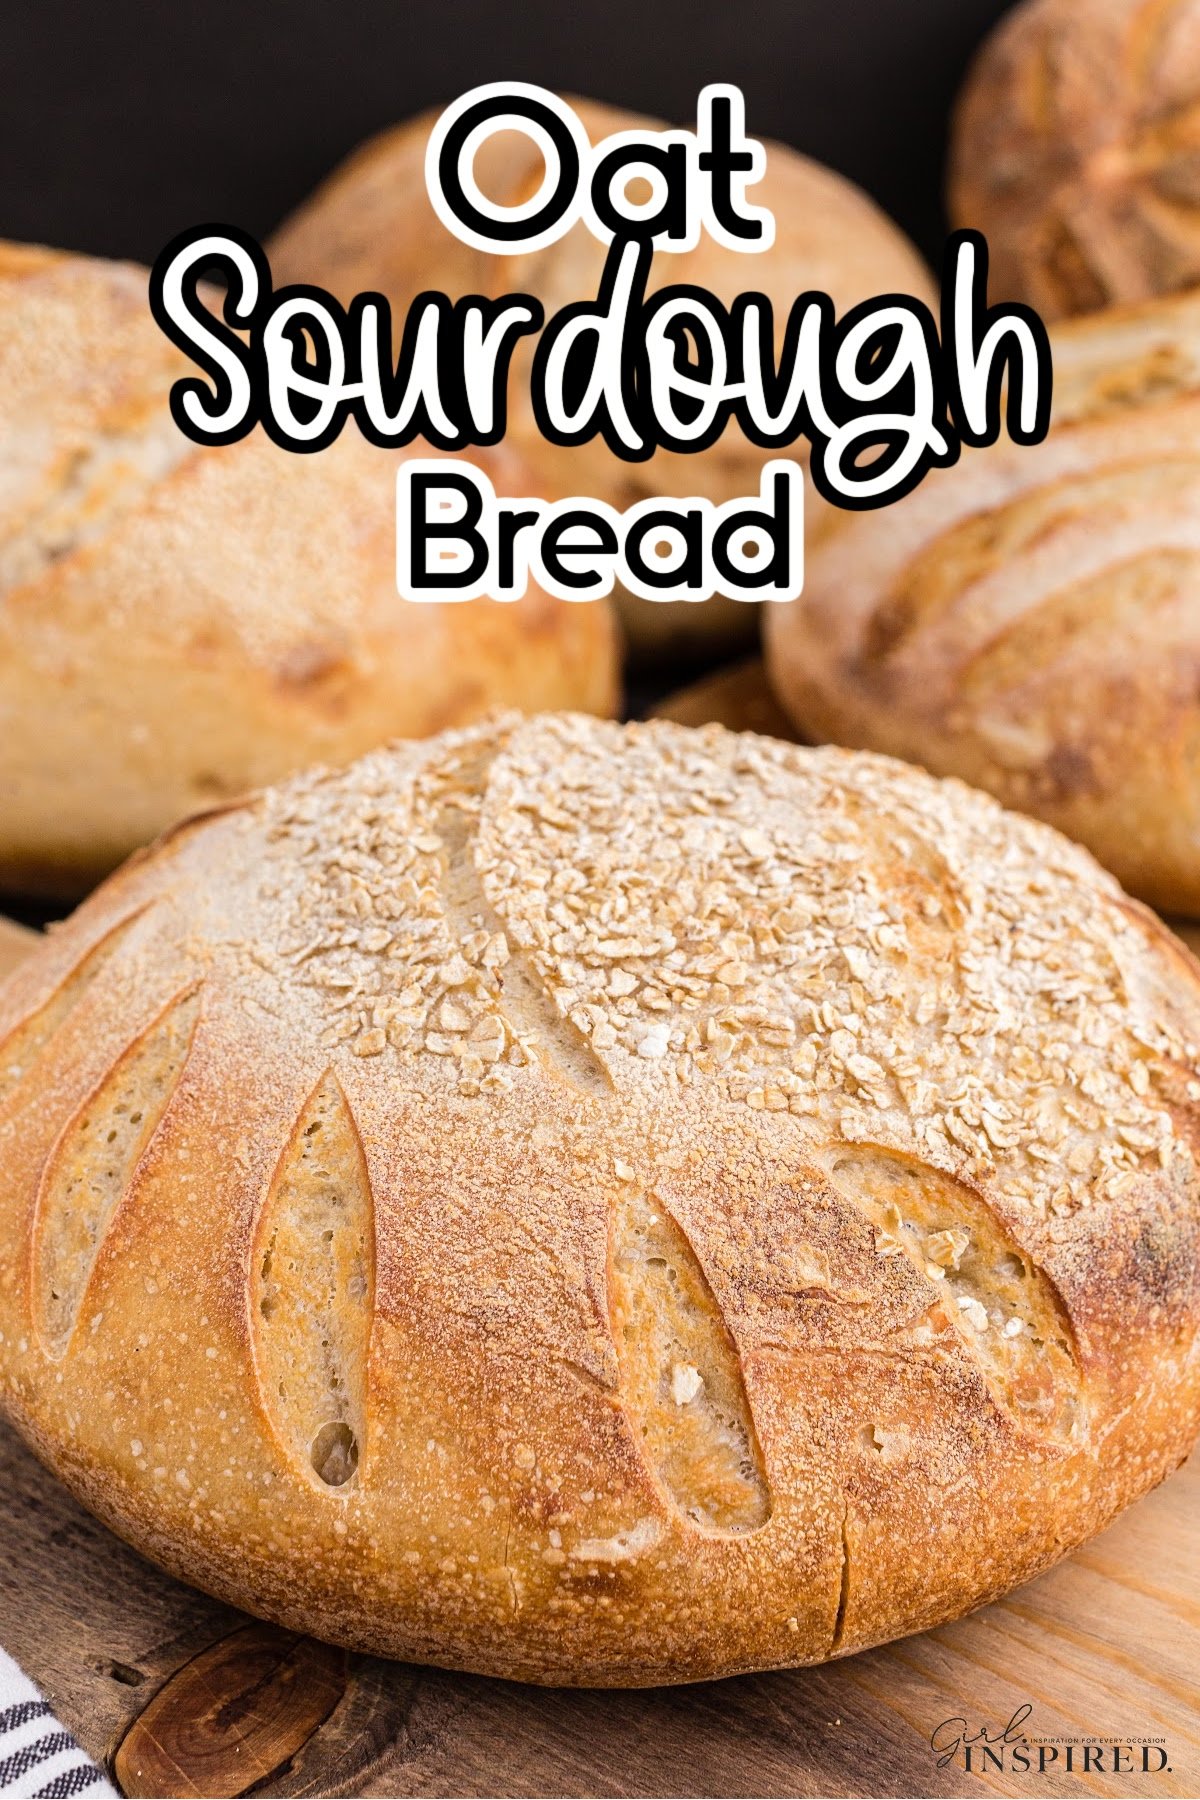
After baking countless loaves of sourdough bread, I’ve discovered that oat sourdough bread holds a special place in my kitchen. In fact, I started with this basic sourdough bread recipe and never looked back! Incorporating the right ratio of whole grain flours into a perfect loaf of sourdough produces a loaf with added nutrition while still maintaining that perfect texture.
While I consider myself a capable home baker now, I remember how overwhelming sourdough was at first. This oat sourdough recipe is my gift to you: a perfect starting point that’s slightly different from the basic sourdough, with the wholesome addition of oat flour for a subtly sweet, nutty richness that mellows sourdough’s tang for a more balanced taste.
In my home, baking sourdough from scratch with my own sourdough starter means nourishing my family with heartier, nutrient-packed loaves, including experimenting with some variations from time to time. For you, it might spark a passion for artisan baking, or get you hooked on trying other sourdough -inspired recipes, like Sourdough Blueberry Muffins or Sourdough Stuffing with Sausage.
But first, let’s master this satisfying oat sourdough loaf together. You’ll need this sourdough bread starter and a little planning ahead!
Jump to:
🥖 Ingredients:
This oat sourdough bread recipe contains a number of basic ingredients, and all of them are easy to find at your local grocery store. Let’s talk about the most important ingredients.
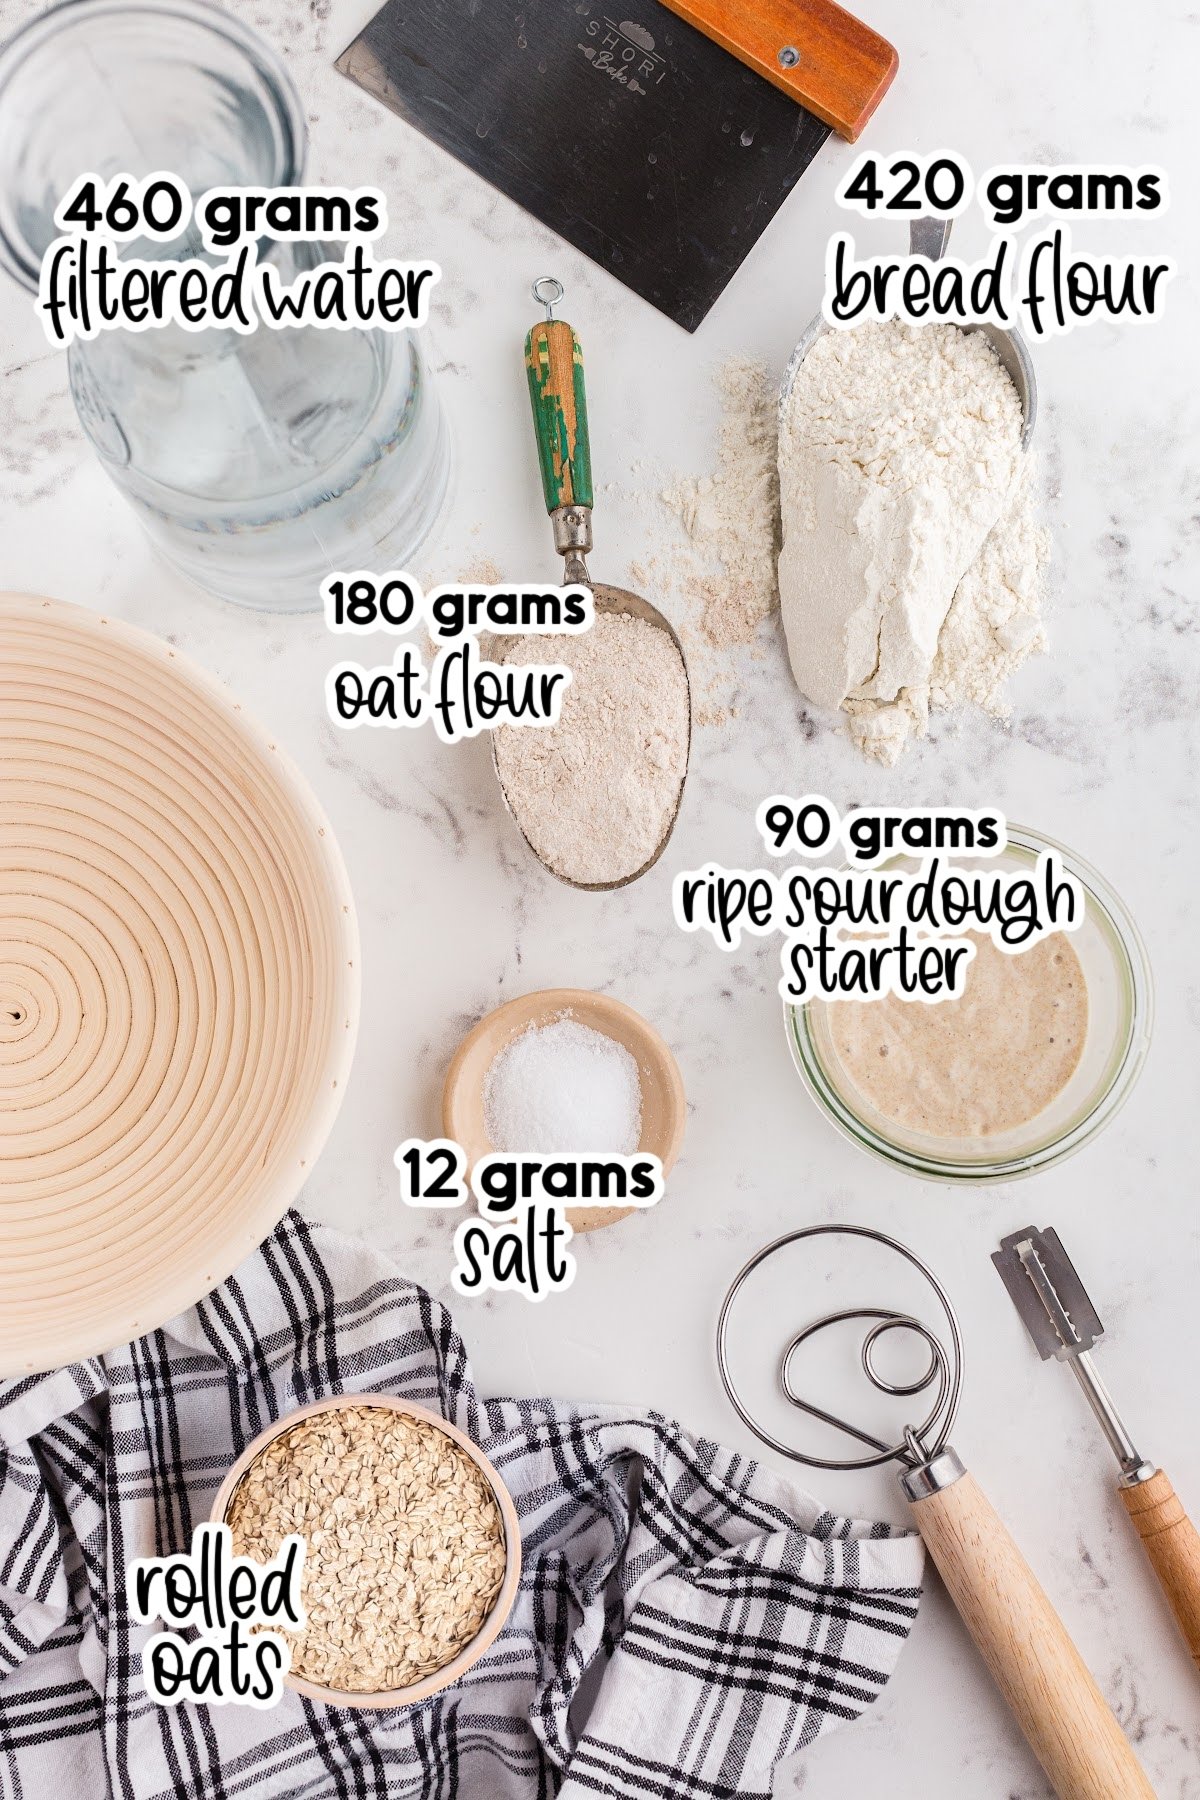
- Flour – This oat flour sourdough bread recipe calls for a combination of oat flour and bread flour. Oat flour is naturally gluten-free, which is why only a small percentage of it is used to make this sourdough bread. The majority of the flour in this recipe is from bread flour, which has a higher protein content (12–14%), helping to develop a strong gluten density for a better rise and a chewier, airier crumb!
- Filtered water – Always use filtered, distilled, or well water (without additives) to avoid unwanted chlorine and chemicals that are typically found in tap water. These chemicals can disrupt the yeast and bacterial activity, which are essential for proper fermentation in the making of this oat sourdough bread.
- Sourdough starter – For optimal fermentation, use your starter 8–10 hours after feeding, when it’s at its most active (bubbly and slightly domed). The perfect moment is when the dome just begins to flatten, indicating peak yeast and bacterial activity.
- Salt – Salt does more than just season your bread – it regulates fermentation and reinforces gluten development for better rise. While most types of salt work, fine sea salt or kosher salt yields the most consistent results in sourdough recipes. Always weigh your salt (grams) for precise accuracy, as crystal sizes vary dramatically between types.
- Rice flour – For mess-free proofing, dust your banneton and dough with rice flour. Being gluten-free, it prevents sticking to both the basket and plastic wrap – a perfect non-stick surface for your dough to rest prior to baking.
For a full list of ingredients and their measurements, 📋 please view my printable recipe card at the bottom of the post.
Optional Garnish:
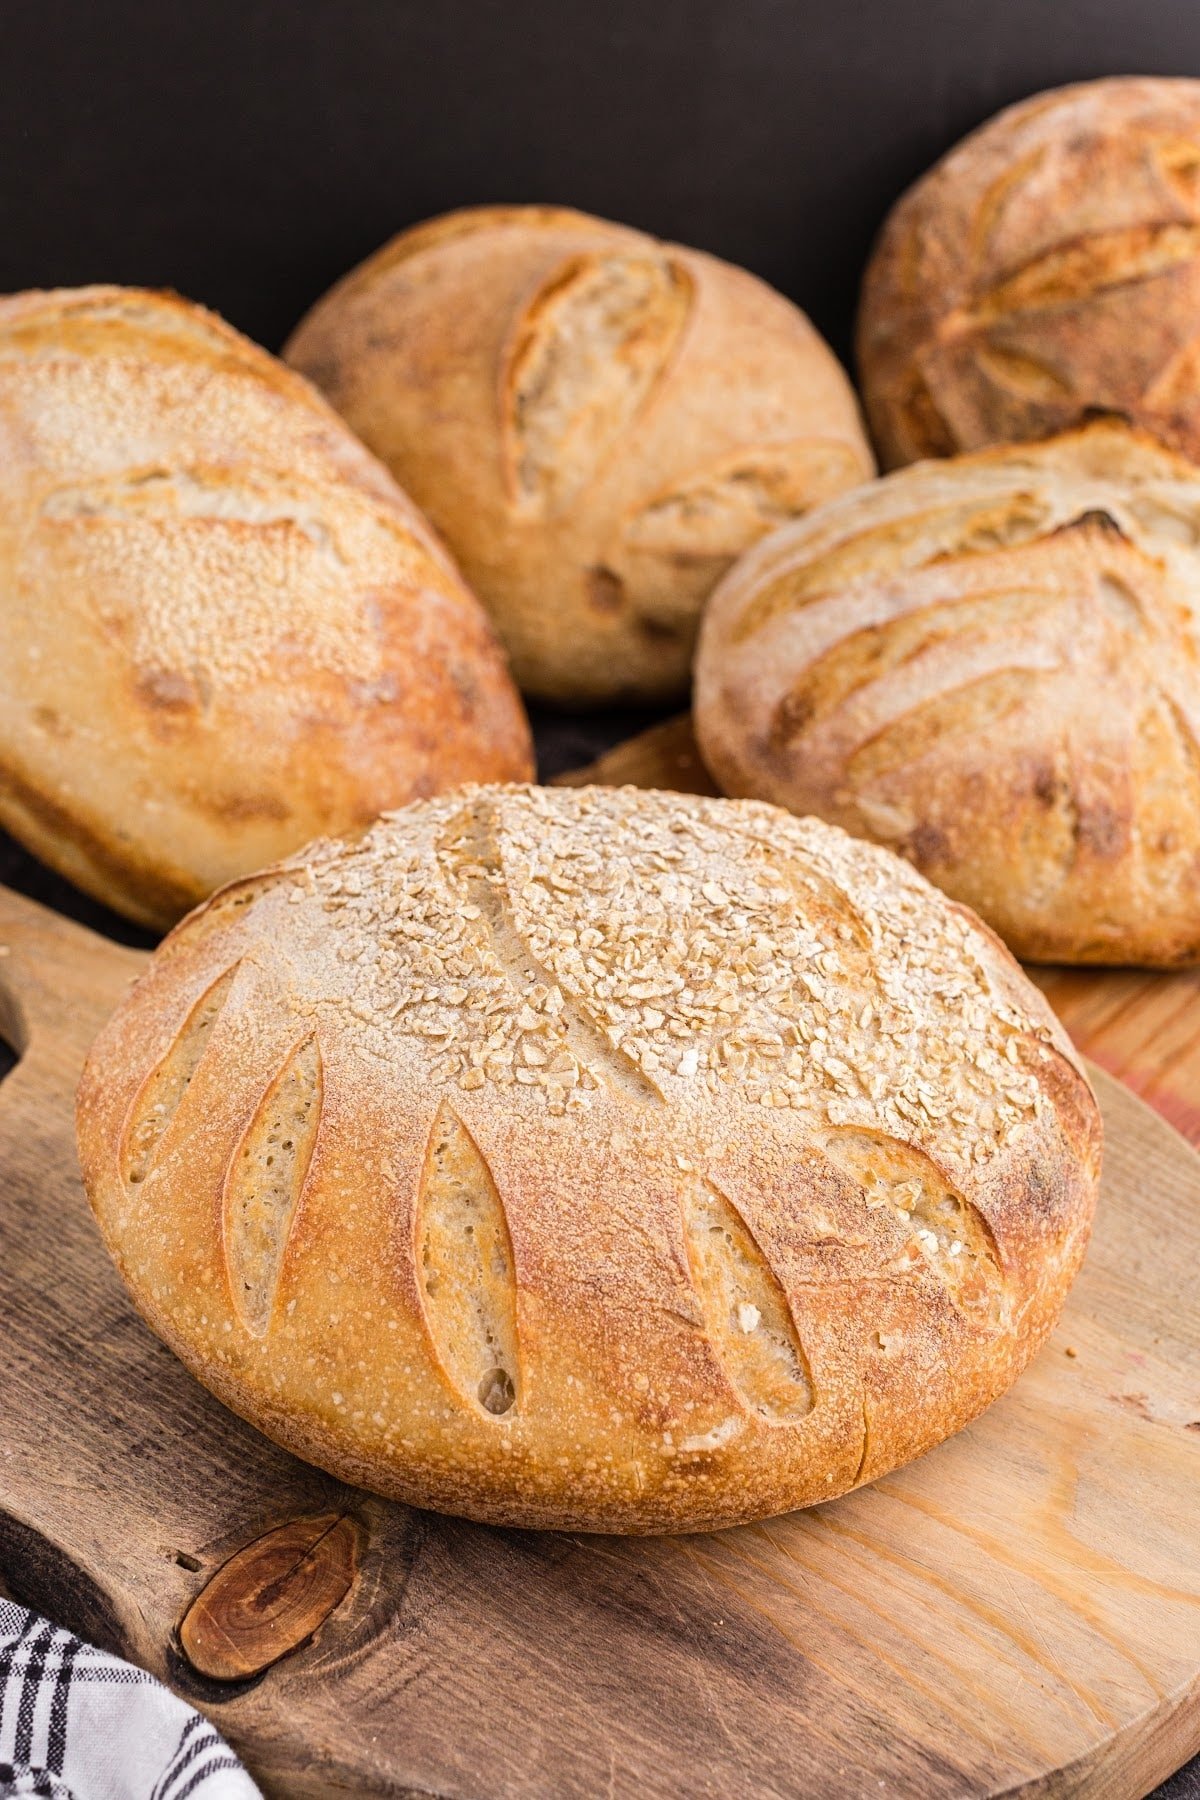
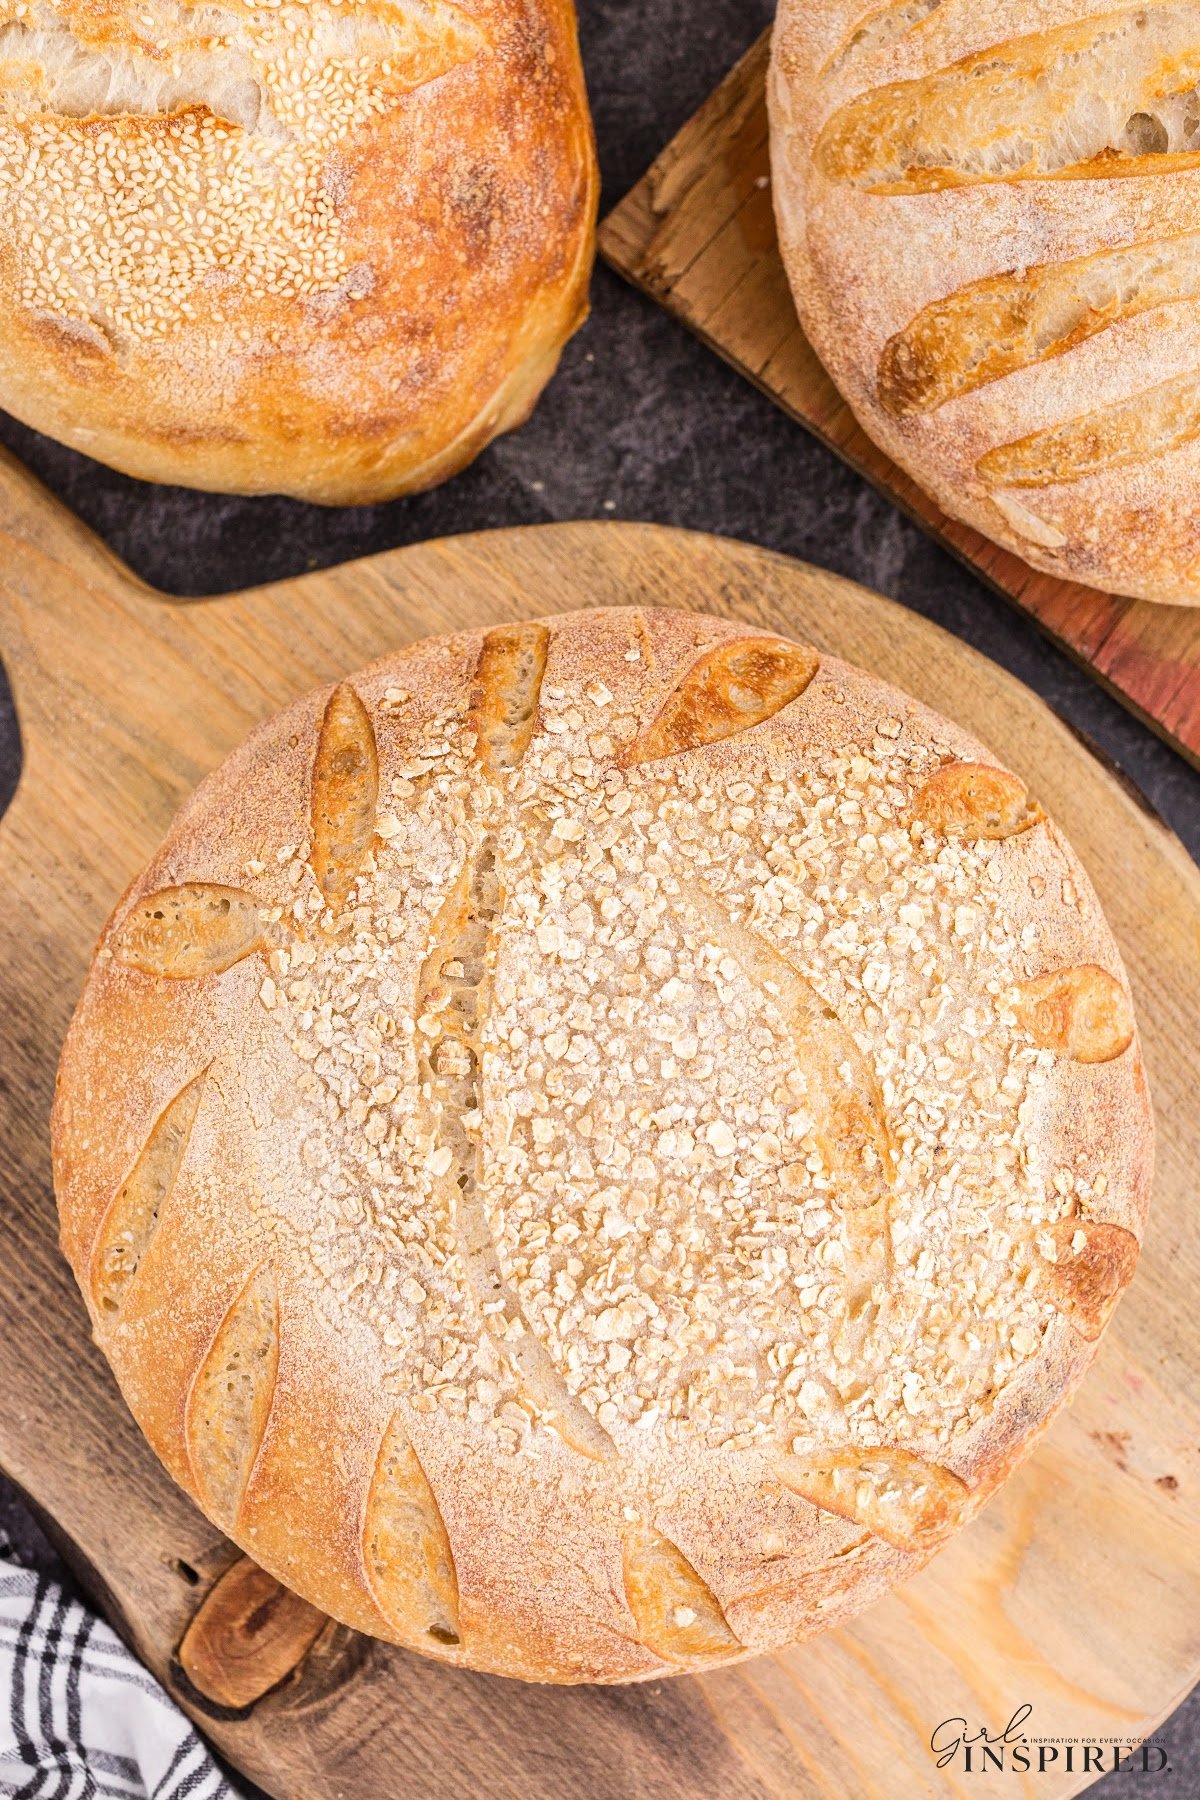
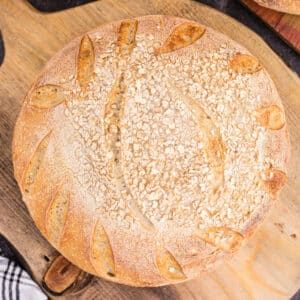
For a rustic oat-crusted loaf, sprinkle some whole oats in your banneton before adding the dough (see step 7 below) . The oats will adhere to the surface during proofing, creating a beautiful textured finish when baked.
Equipment Needed:
While the following tools are not all essential, I’ve found them to be an absolute game-changer, especially when you start to level-up your sourdough bread-making skills. When you’re already dedicating hours to perfect bread, these little investments will streamline your process for fail-proof results every time! Here’s what I recommend:
Digital Food Scale: Measuring ingredients in grams is crucial for sourdough bread success. If you don’t already own one, prioritize a scale with a tare function (to zero out container weights) and a 10–11 pound capacity to handle large mixing bowls and dough.
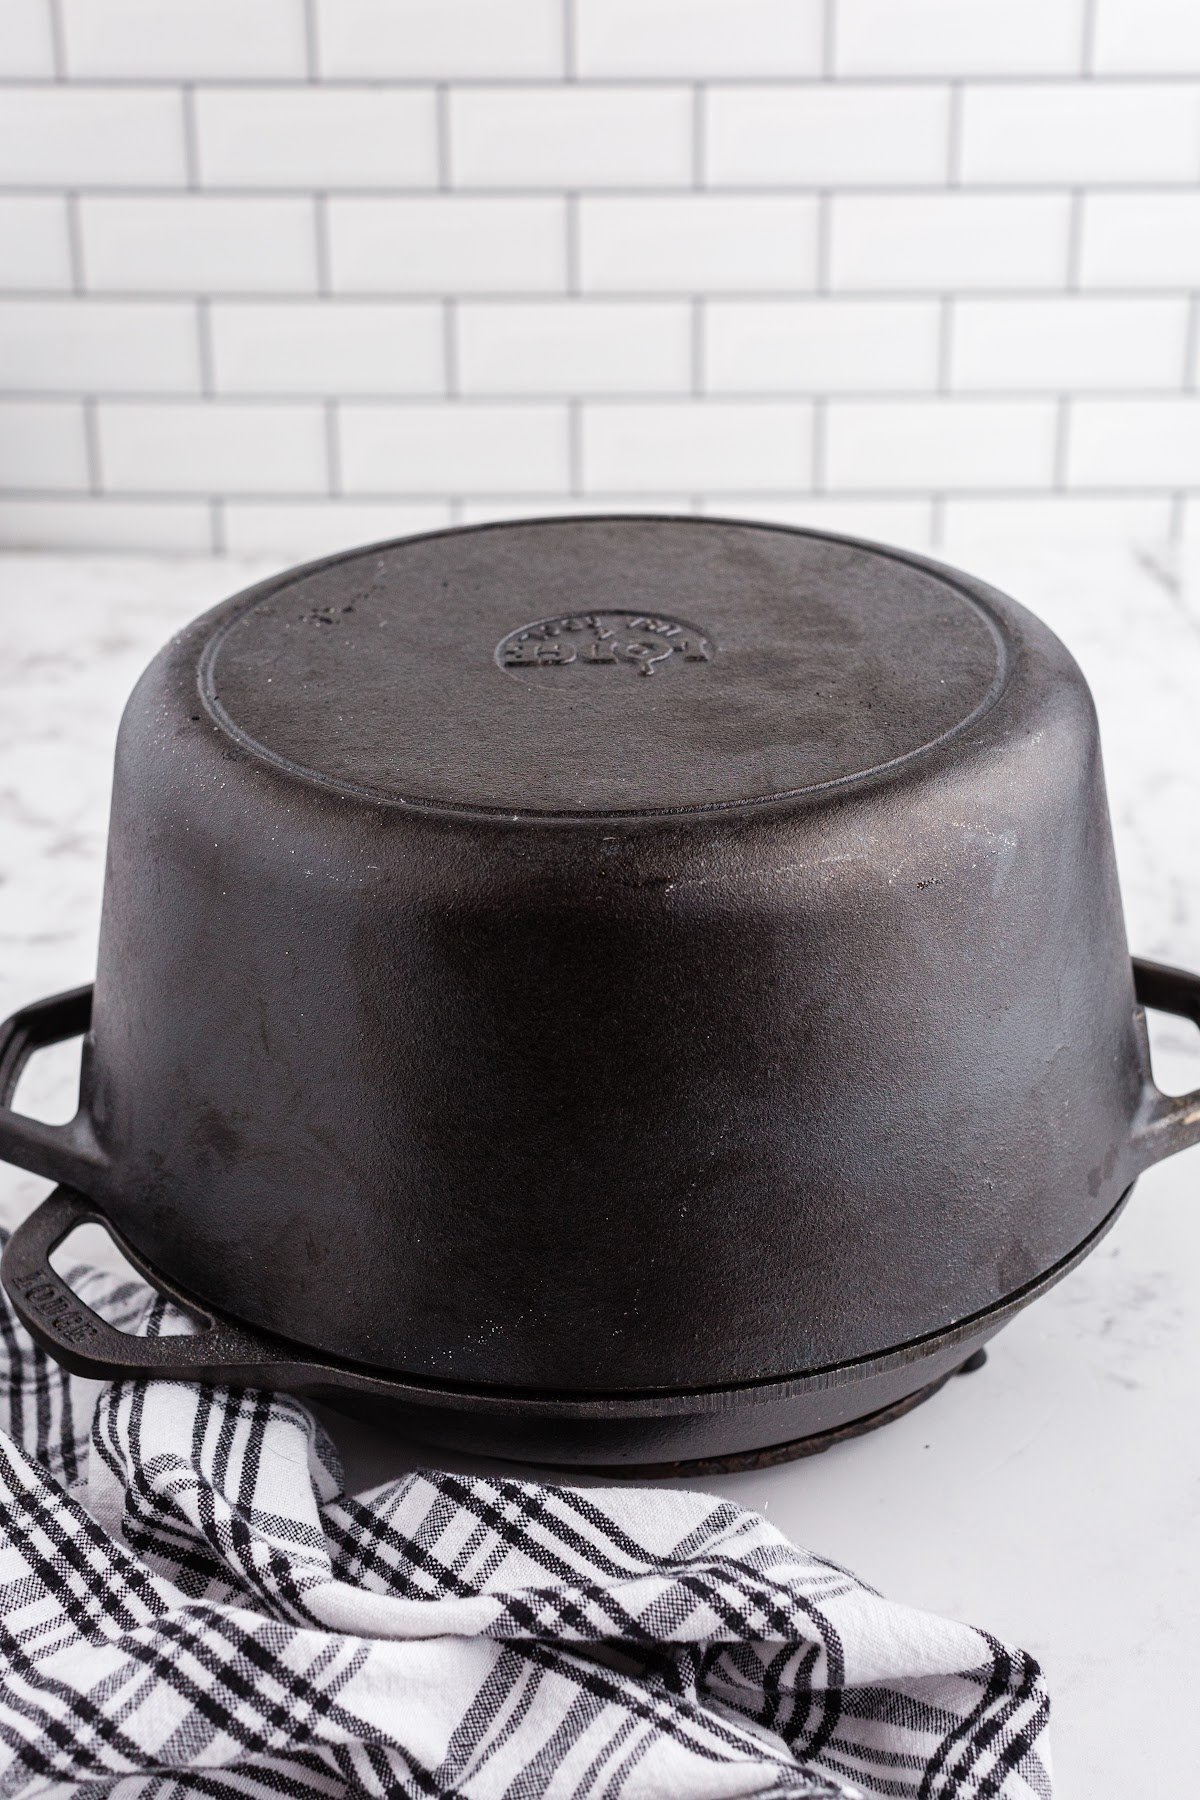
Dutch Oven: This heavy and robust pot functions like a mini oven, locking in steam for a crisp crust and tender crumb. It’s seriously a worthwhile investment, lasts a lifetime, and can also be used for soups, stews, and so much more!
Lame: This is a specialized tool for scoring clean, artistic patterns on bread. While a sharp knife works, a lame’s razor blade delivers neater cuts, especially on soft, sticky dough.
Banneton: A proofing basket that helps the dough maintain its shape during final fermentation. You can improvise with a lined baking sheet, but a banneton noticeably improves structure and texture.
Danish Dough Whisk: With its looped wire design, this whisk effortlessly blends thick, sticky doughs (like sourdough) without overmixing. It’s perfect for high-hydration recipes that struggle with traditional kneading tools.
Plastic Wrap or Reusable Covers: Essential for keeping the dough moist during proofing. Eco-friendly alternatives include beeswax-coated fabric bags, non-breathable fabric or silicone covers. All of these options prevent the dough from drying out..
Substitutions and Variations
- Flour types – The oat flour accounts for 30% of the flour in this sourdough recipe. If you want to add another whole grain variety, such as whole wheat flour or rye flour, I suggest that you reduce the oat flour or swap it out entirely. Using a higher ratio of whole grain flour will make your sourdough quite dense, so I don’t recommend going above the 20-30% threshold.
- Delicious mix-ins – When you are feeling more confident with your bread-making skills, including mix-ins offers a great way to create new flavors – think of roasted garlic, herbs, cheese, dried fruit, or nuts. For best results, add mix-ins during the last round of stretch and folds so they’re evenly distributed without tearing the dough.
🔪 Instructions:
PREP: Before starting, review all the recipe steps carefully -this process stretches over 36 hours! You’ll need to feed your sourdough starter 8-10 hours before making the dough (keeping it at room temperature), then mix the dough about 24 hours before your planned bake time. Make sure to mark these milestones to stay on track.
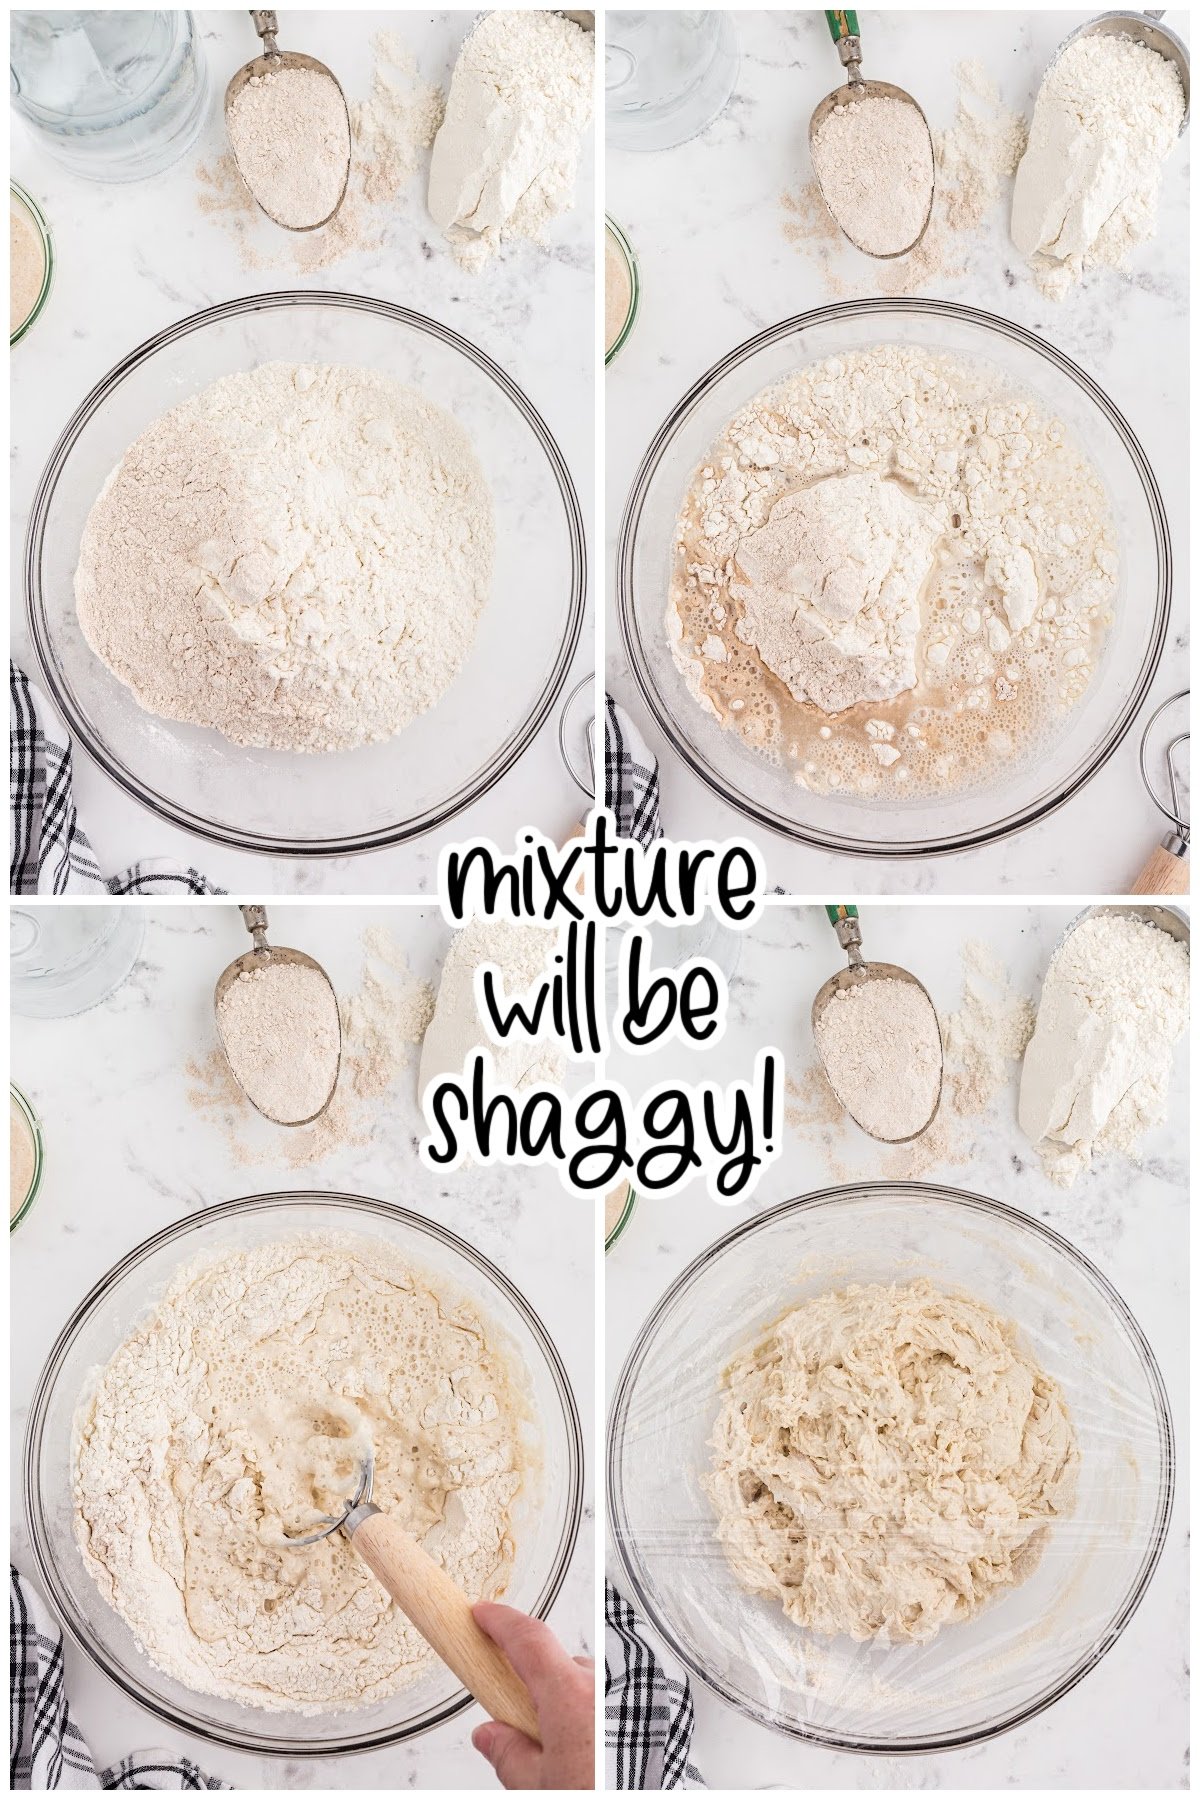
Step 1: In a large mixing bowl, combine the bread flour and oat flour (a total of 600 grams of flour) and 460 grams of distilled water and stir to combine as best as possible (mixture will be “shaggy”). Cover with plastic wrap and set in a warm, room temperature location for 45 minutes.
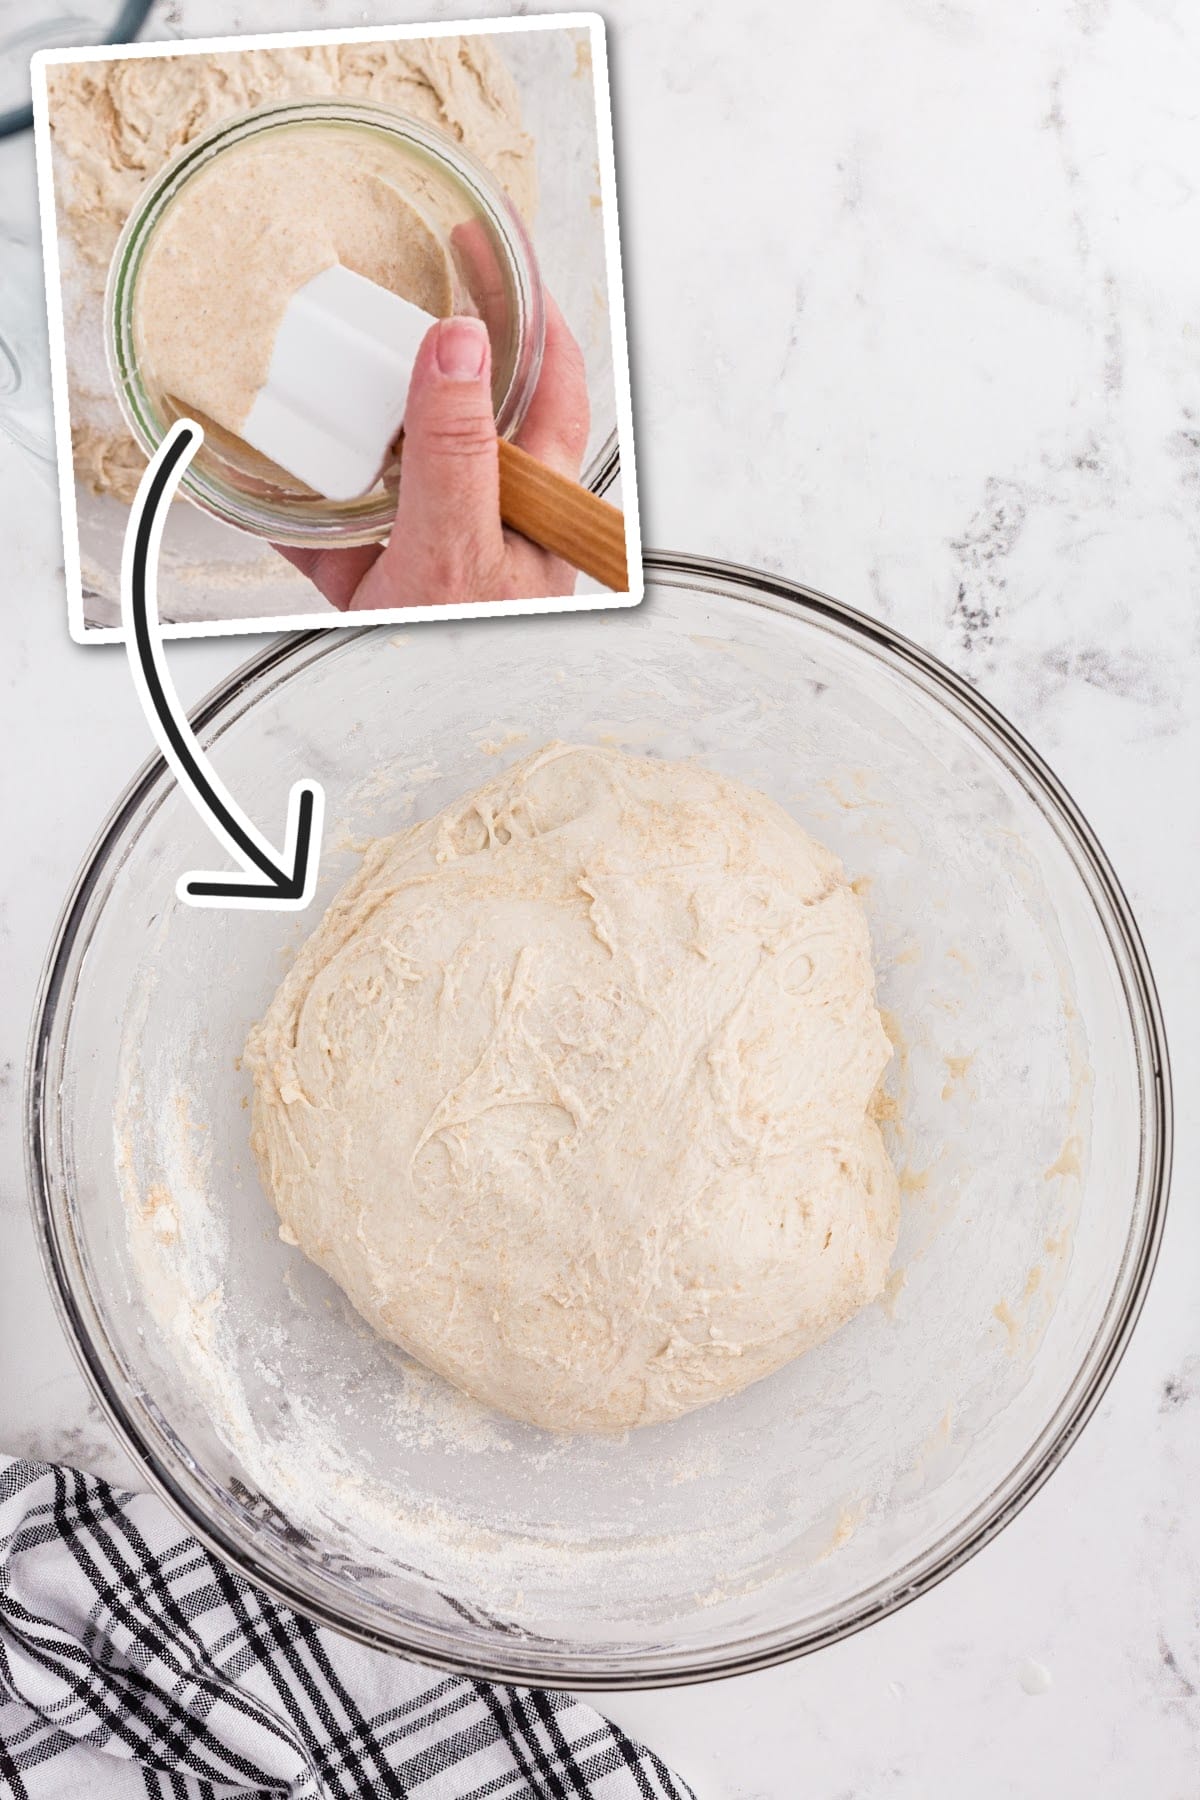
Step 2: After 45 minutes (this gives the mixture time to autolyze), add 90 grams of starter and 12 grams of salt to the flour/water mixture and stir well.
Cover the bowl with plastic wrap and set aside for 4-6 hours (see next step for steps to strengthen dough during the 6 hours)
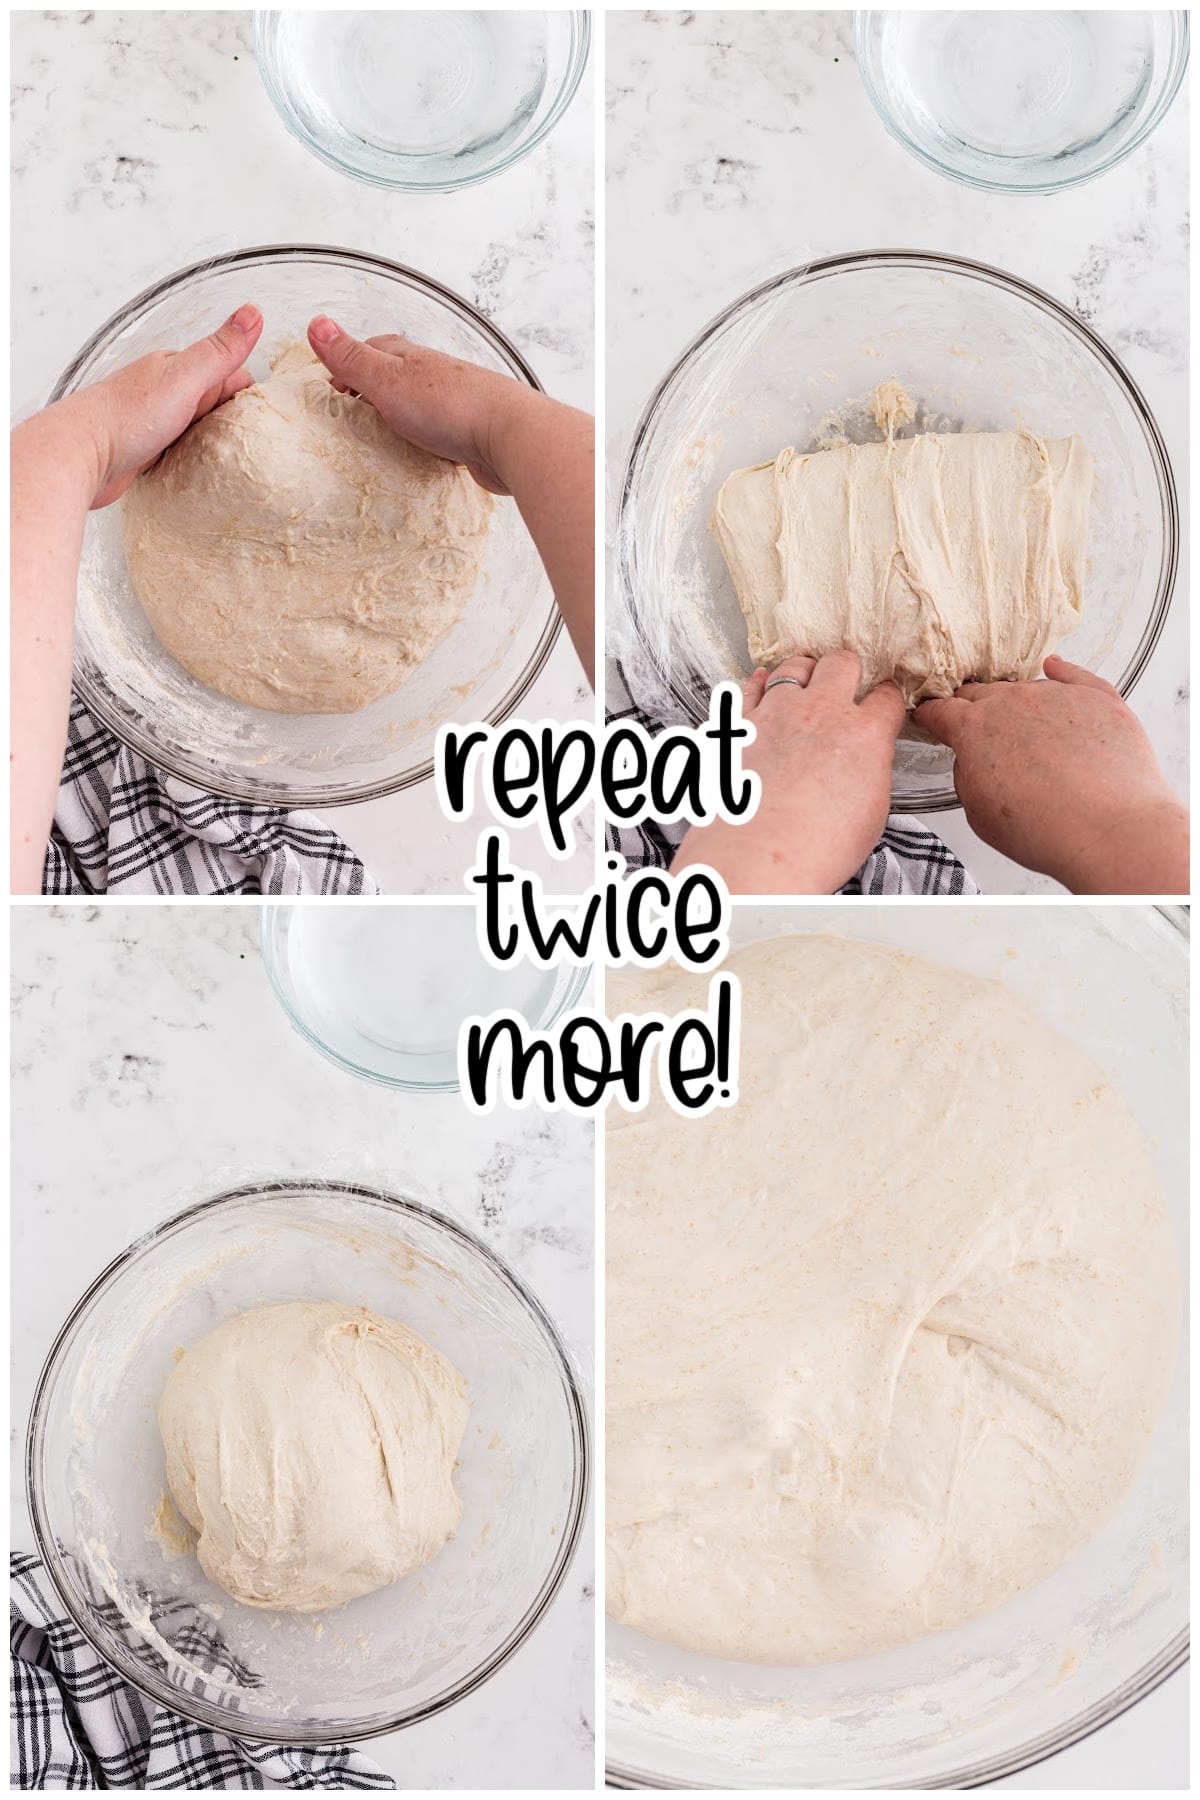
Step 3: We will perform a set of folds to strengthen the dough during the first two hours of this “bulk fermentation” time. Begin the first set 30 minutes after mixing the starter/salt into the autolyzed dough.
Every 30 minutes, uncover the bowl of dough. Dip your hands into warm water (this keeps the dough from sticking to your hands). Slide your hands down around the top of the dough. Lift this side of the dough up and fold it down over the side opposite. Turn the bowl 90 degrees and repeat lifting and folding until you have lifted and folded each of the four sides of the dough. Replace the plastic wrap and leave the dough to set for another 30 minutes. Do this TWO more times for a total of three stretches like this.
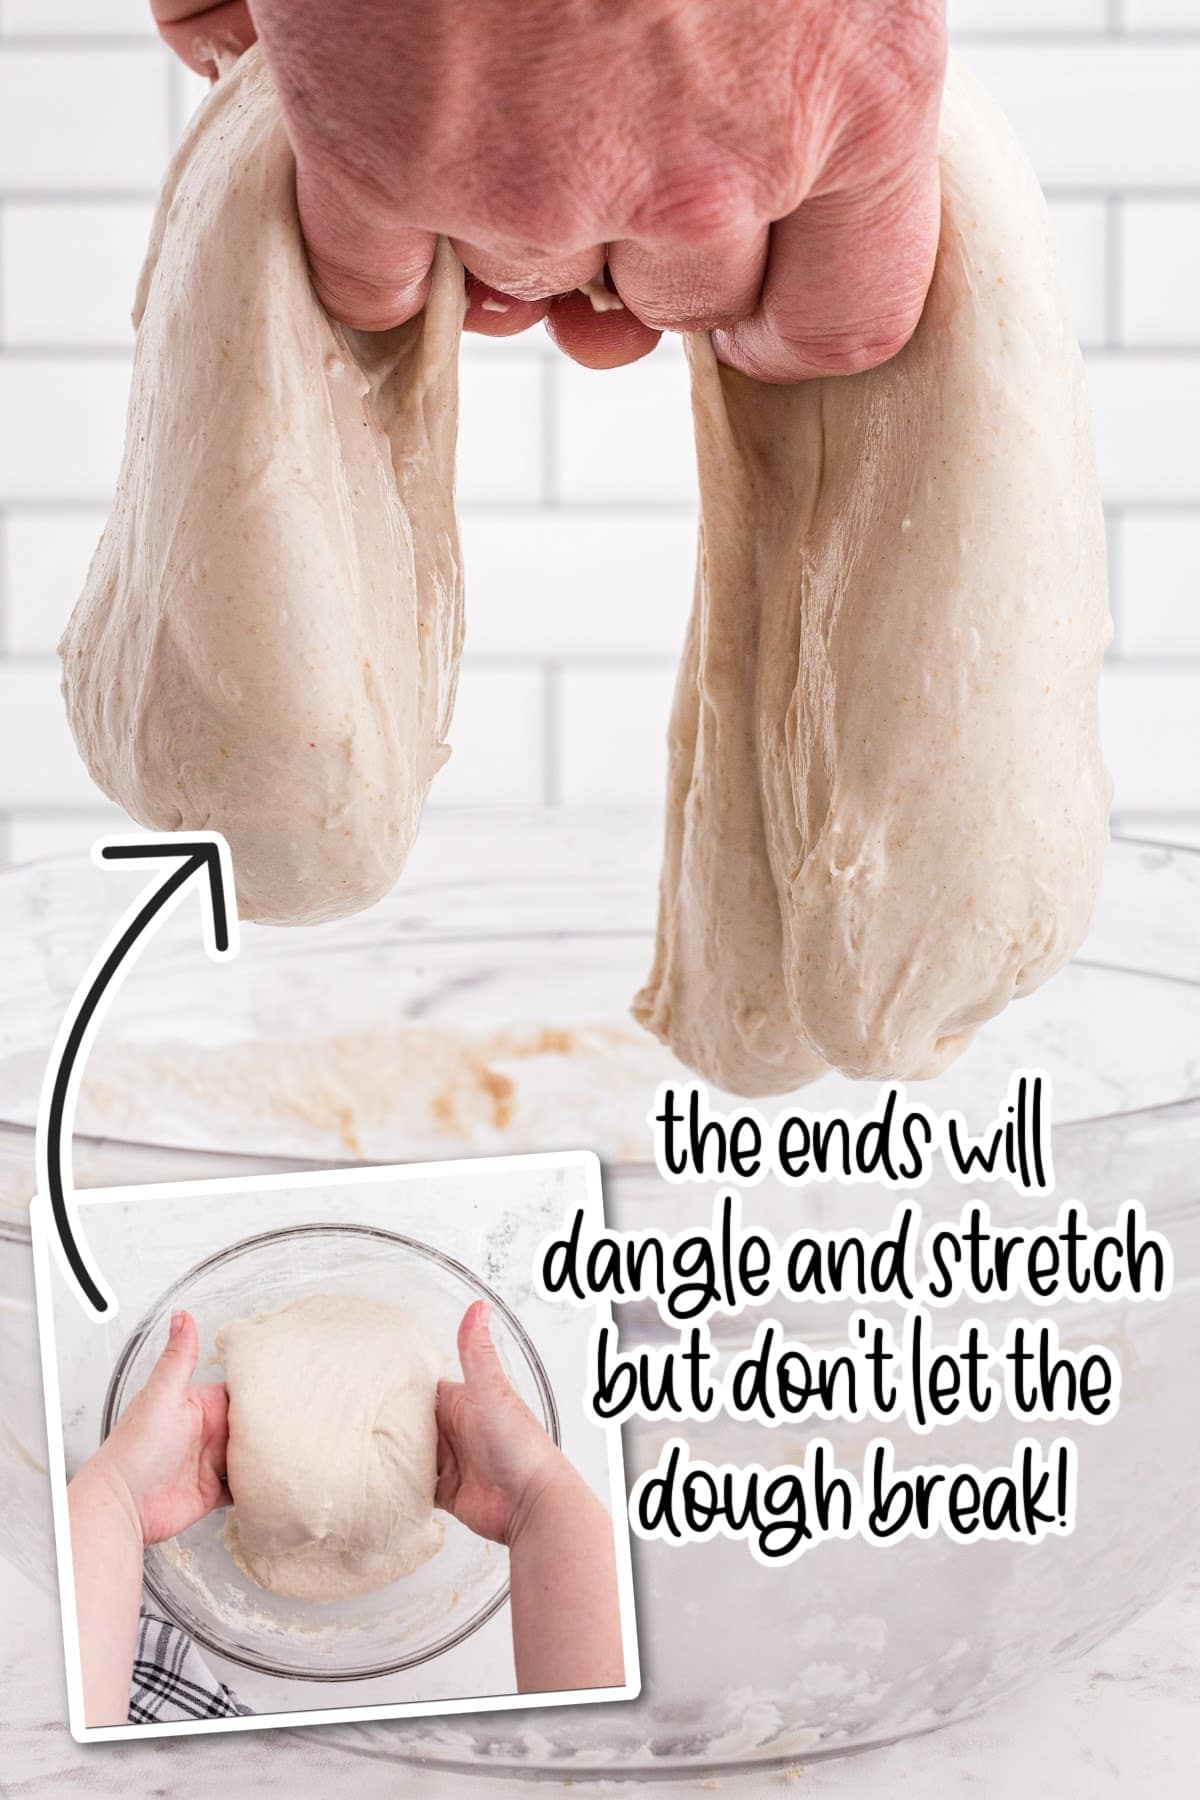
Step 4: After you’ve completed three sets of lifting and folding the dough, do a final set of dough strengthening folds. Slide your dampened hands around the dough sides (right and left). Lift the dough straight up from the bowl. The ends will dangle down and stretch. Do not let the dough break. Set the dough straight back down on itself. Rotate the bowl 90 degrees and repeat, completing four lift and stretch sets.
For optimal results, perform your stretch and folds during the early stages of bulk fermentation, spacing them roughly 30 minutes apart. This technique develops gluten while the dough remains pliable, promoting improved rise, structure, and an open crumb – all without the need for intensive kneading!

Step 5: Let the dough sit, covered, for about four more hours undisturbed to complete bulk fermentation. The exact time will vary based on temperature. Warmer environments will speed up fermentation, while cooler temperatures may extend the process.

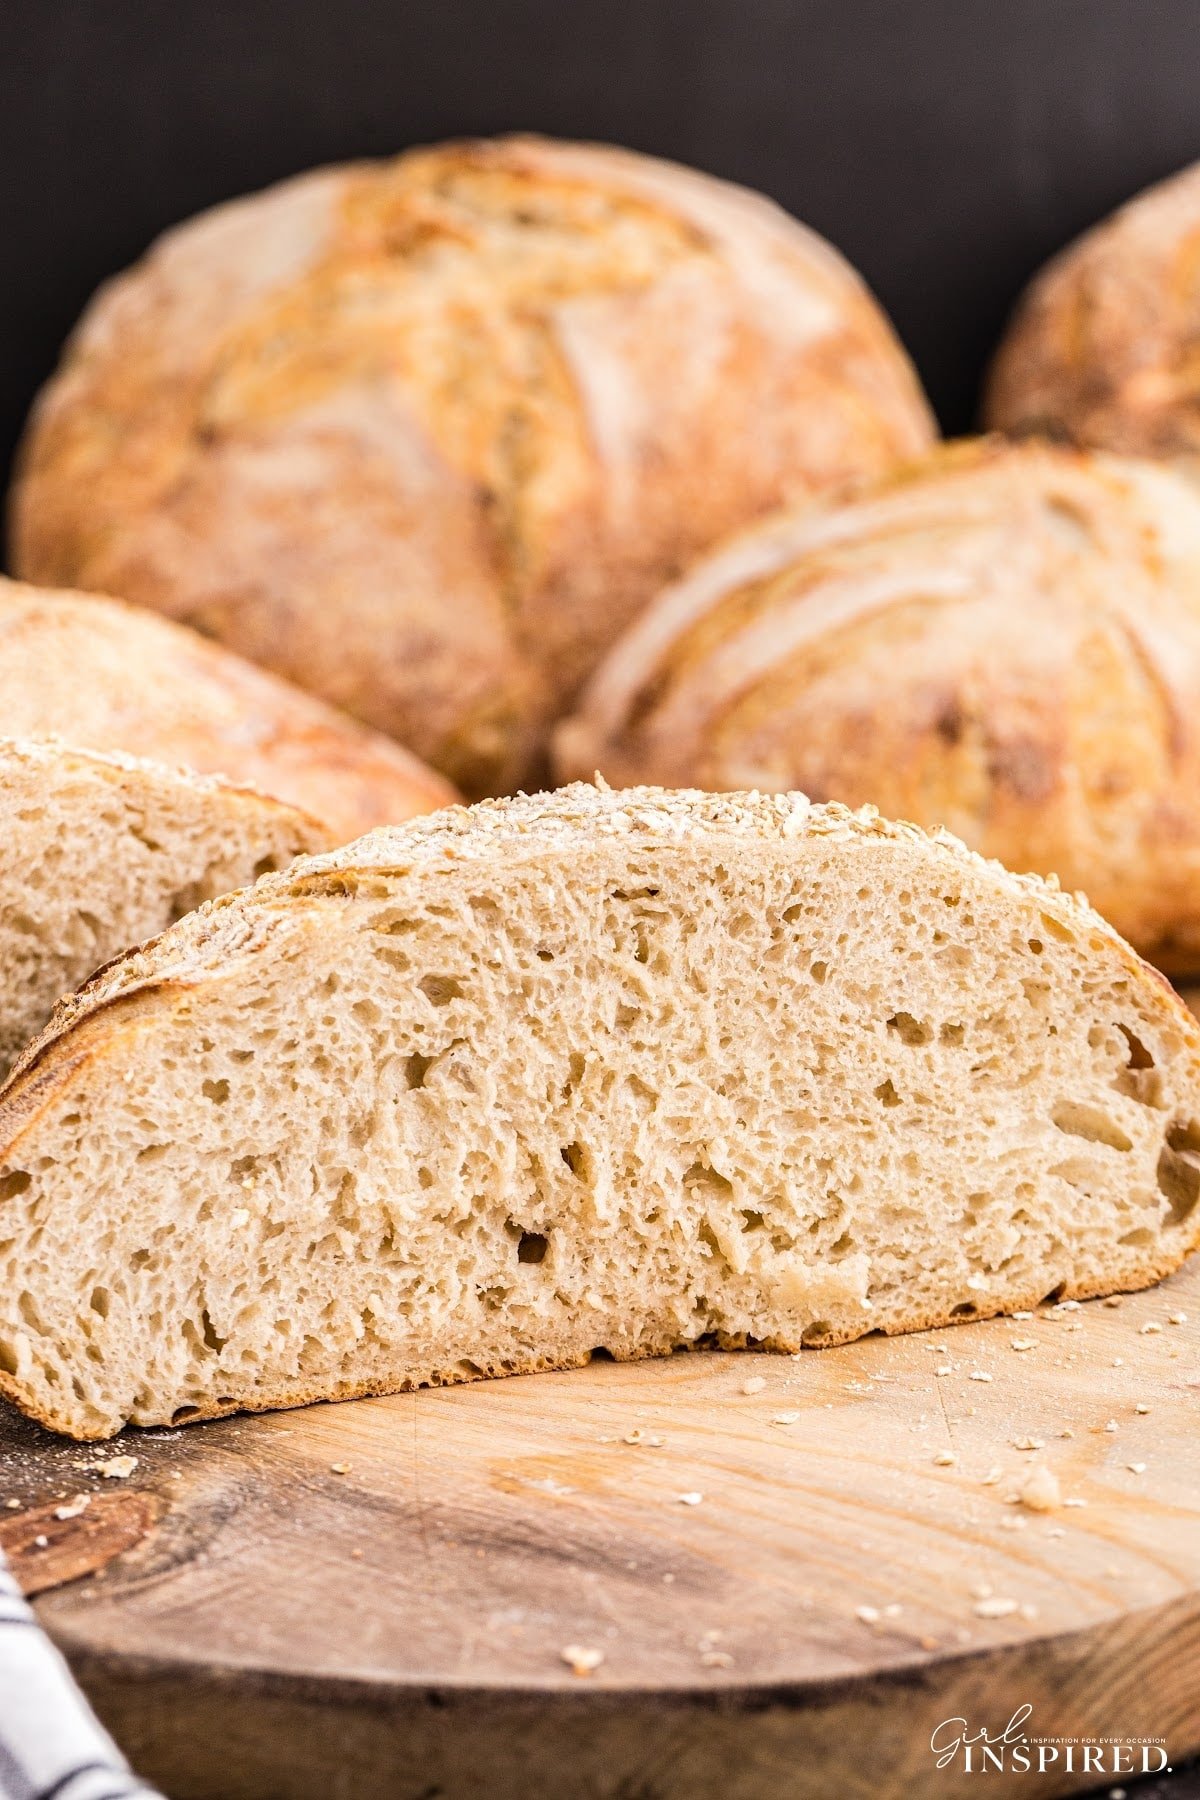
Step 6: When bulk fermentation is complete, the dough should be smooth and slightly rounded, holding its shape with somewhat of a dome toward the edges of the bowl. Large bubbles may appear under the surface of the bread. It should have increased in size, and jiggle when you shake the bowl. When you remove the dough from the bowl, you will be able to feel that is light with lots of air pockets throughout.

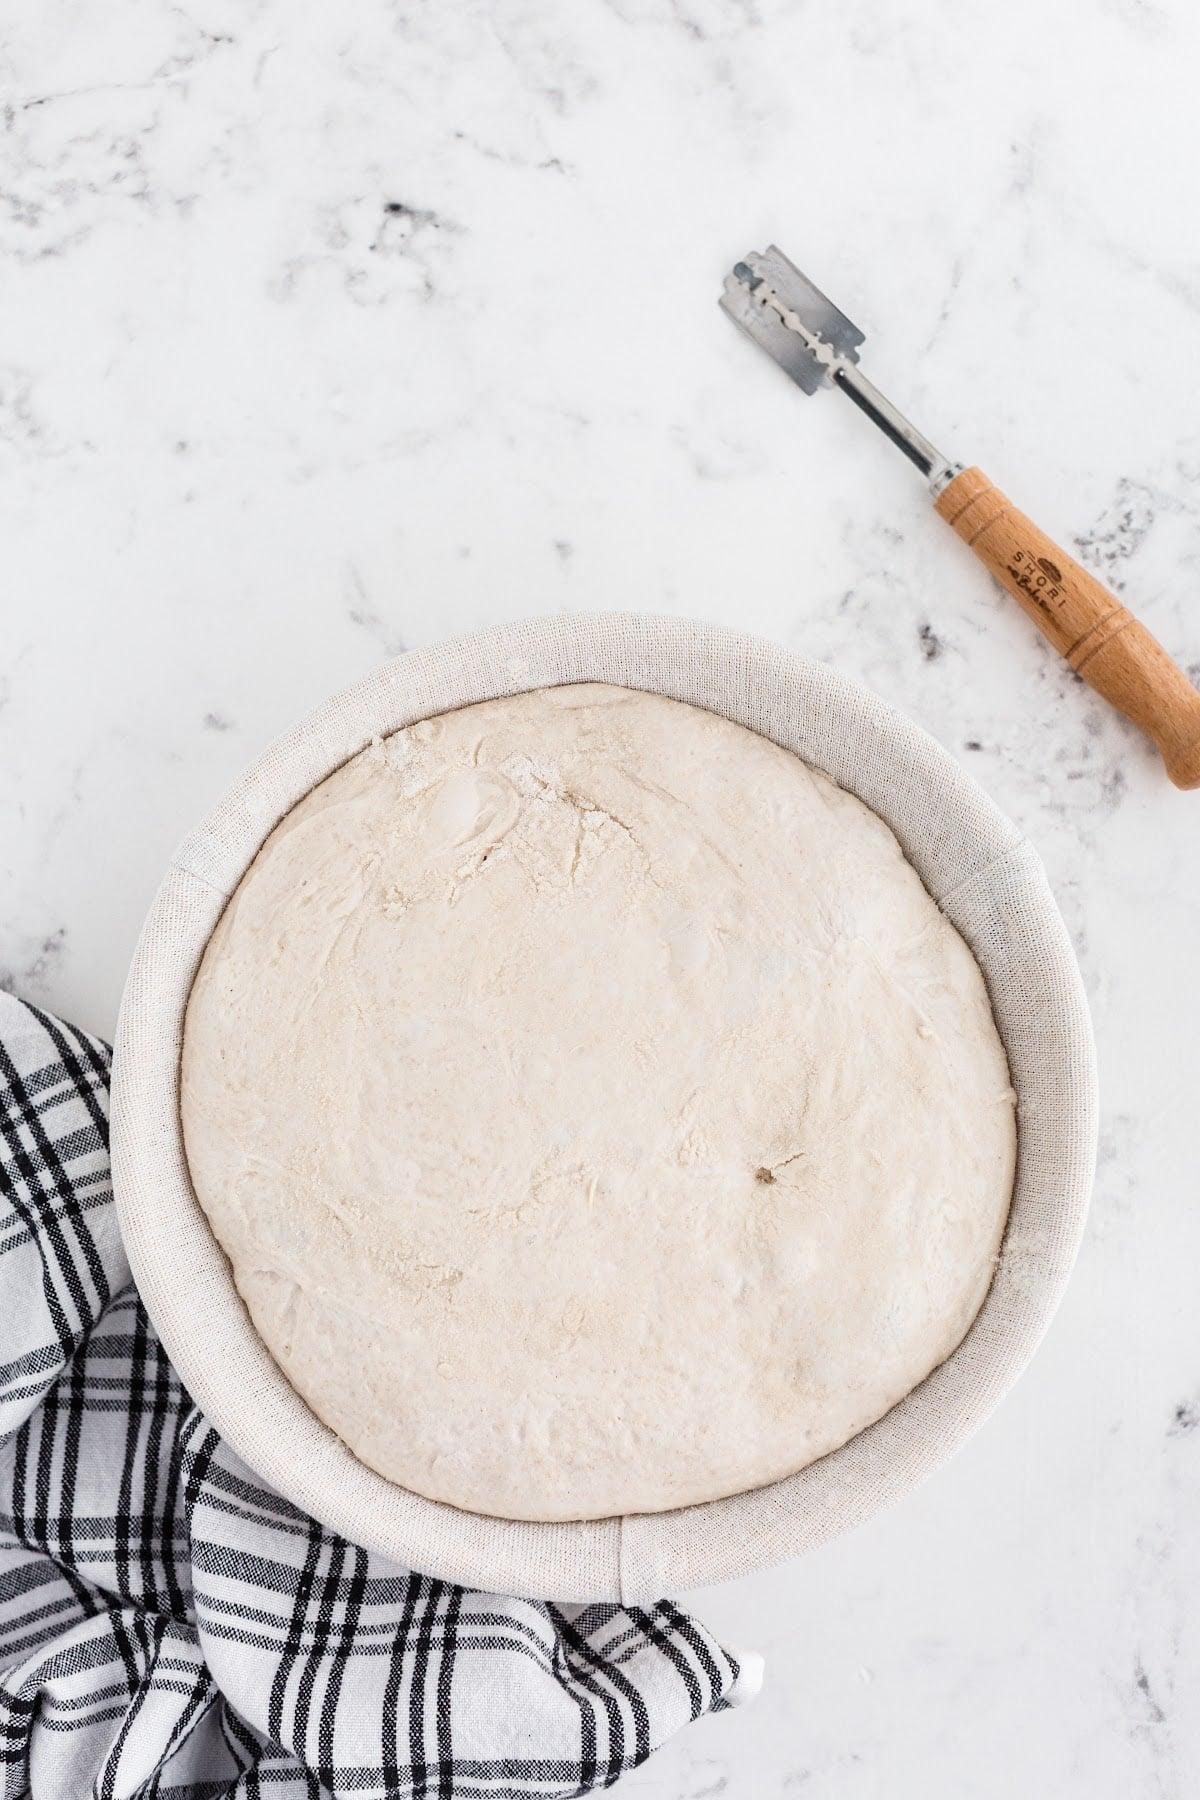
Step 7: Now it’s time to shape the bread into a loaf. You can divide the dough at this point and make two smaller loaves or shape into ovals or baguettes or whatever you desire. We will simply shape one round loaf.
Place the liner in the banneton and sprinkle with rice flour (the rice flour doesn’t have gluten so it won’t stick to the bread dough). If you would like to bake your loaf with some whole oats on top, sprinkle a couple tablespoons into the basket at this time.
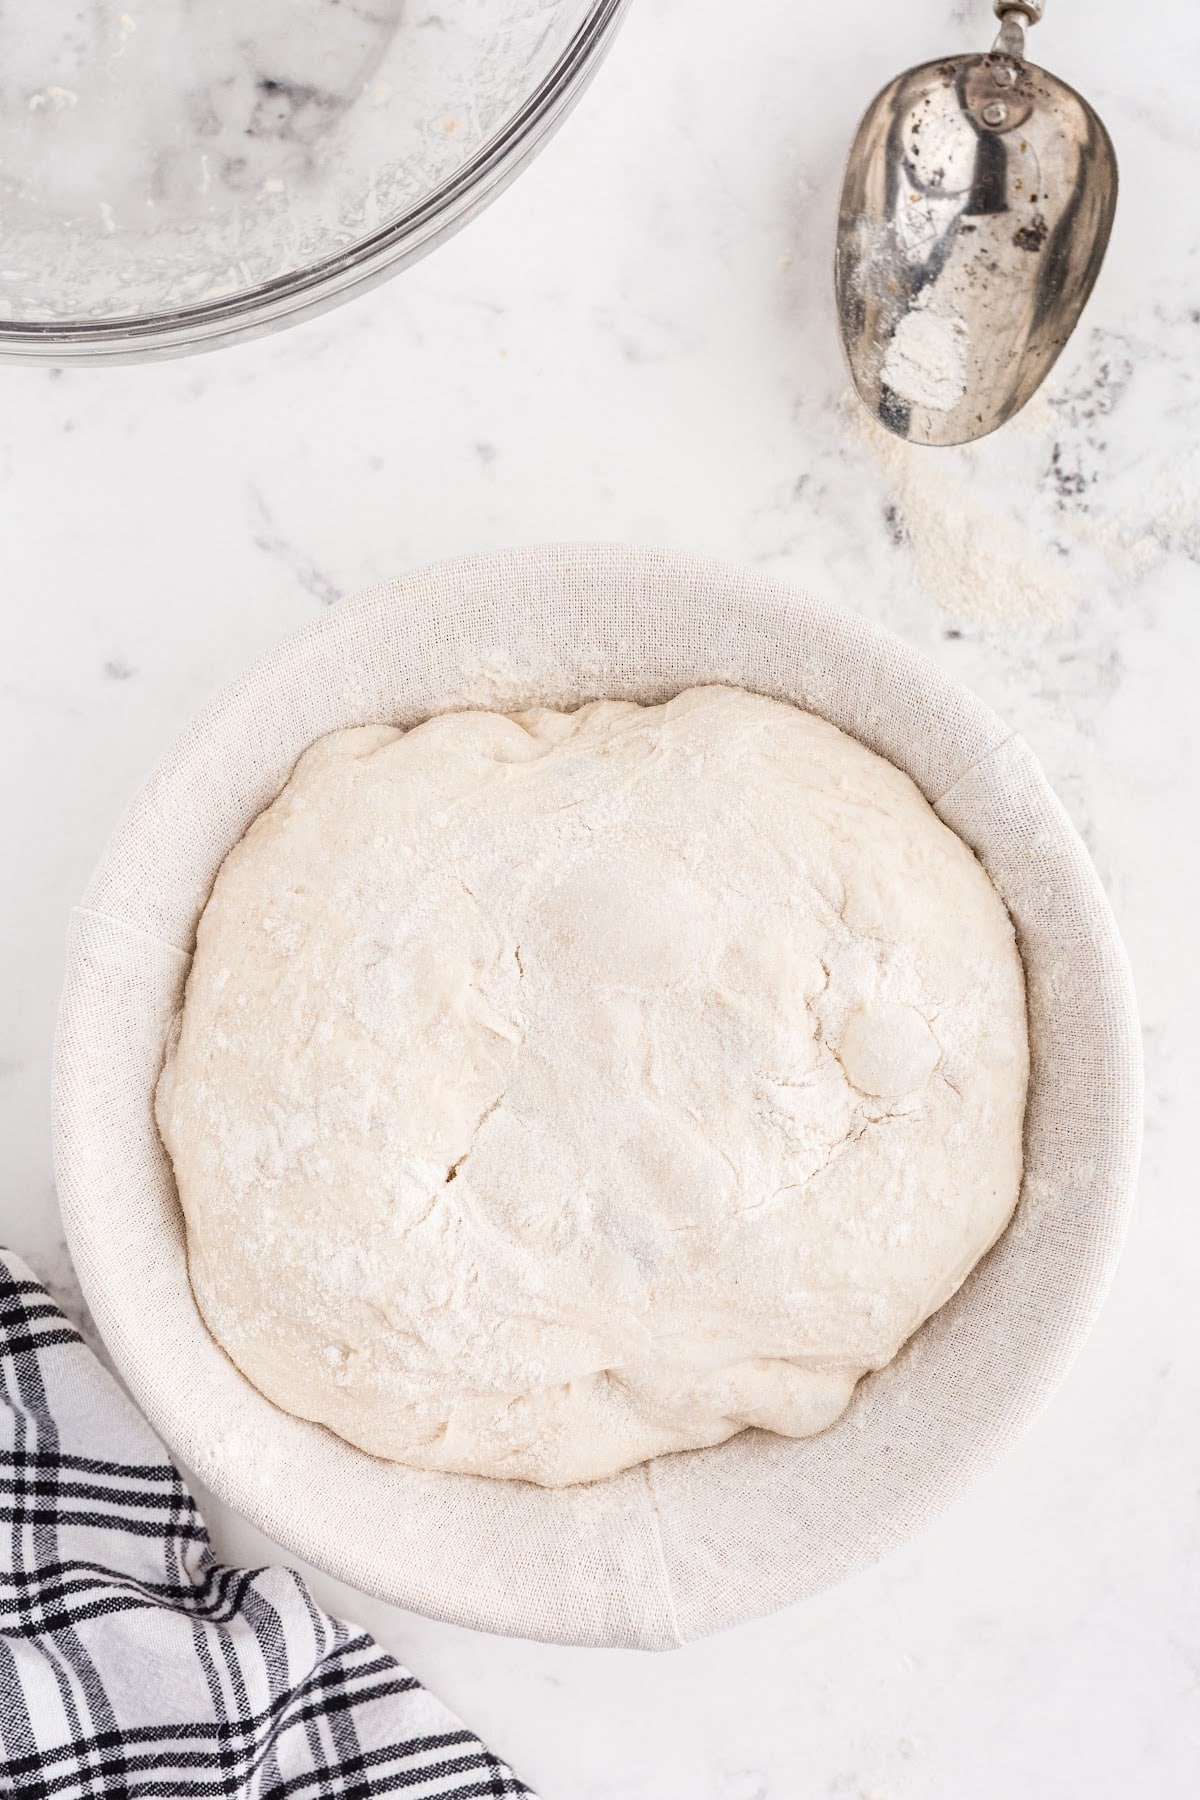
Step 8: Lift the dough from the bowl and place it into the basket, flipping it upside down so that the smooth “top” of the dough is now face down in the basket on top of the oats. Tuck the excess dough onto itself to form a neat upside down loaf.
Sprinkle rice flour on top of the dough to prevent it from sticking to the plastic wrap and also to dust the baking dish when it flips over into the pan at baking time.
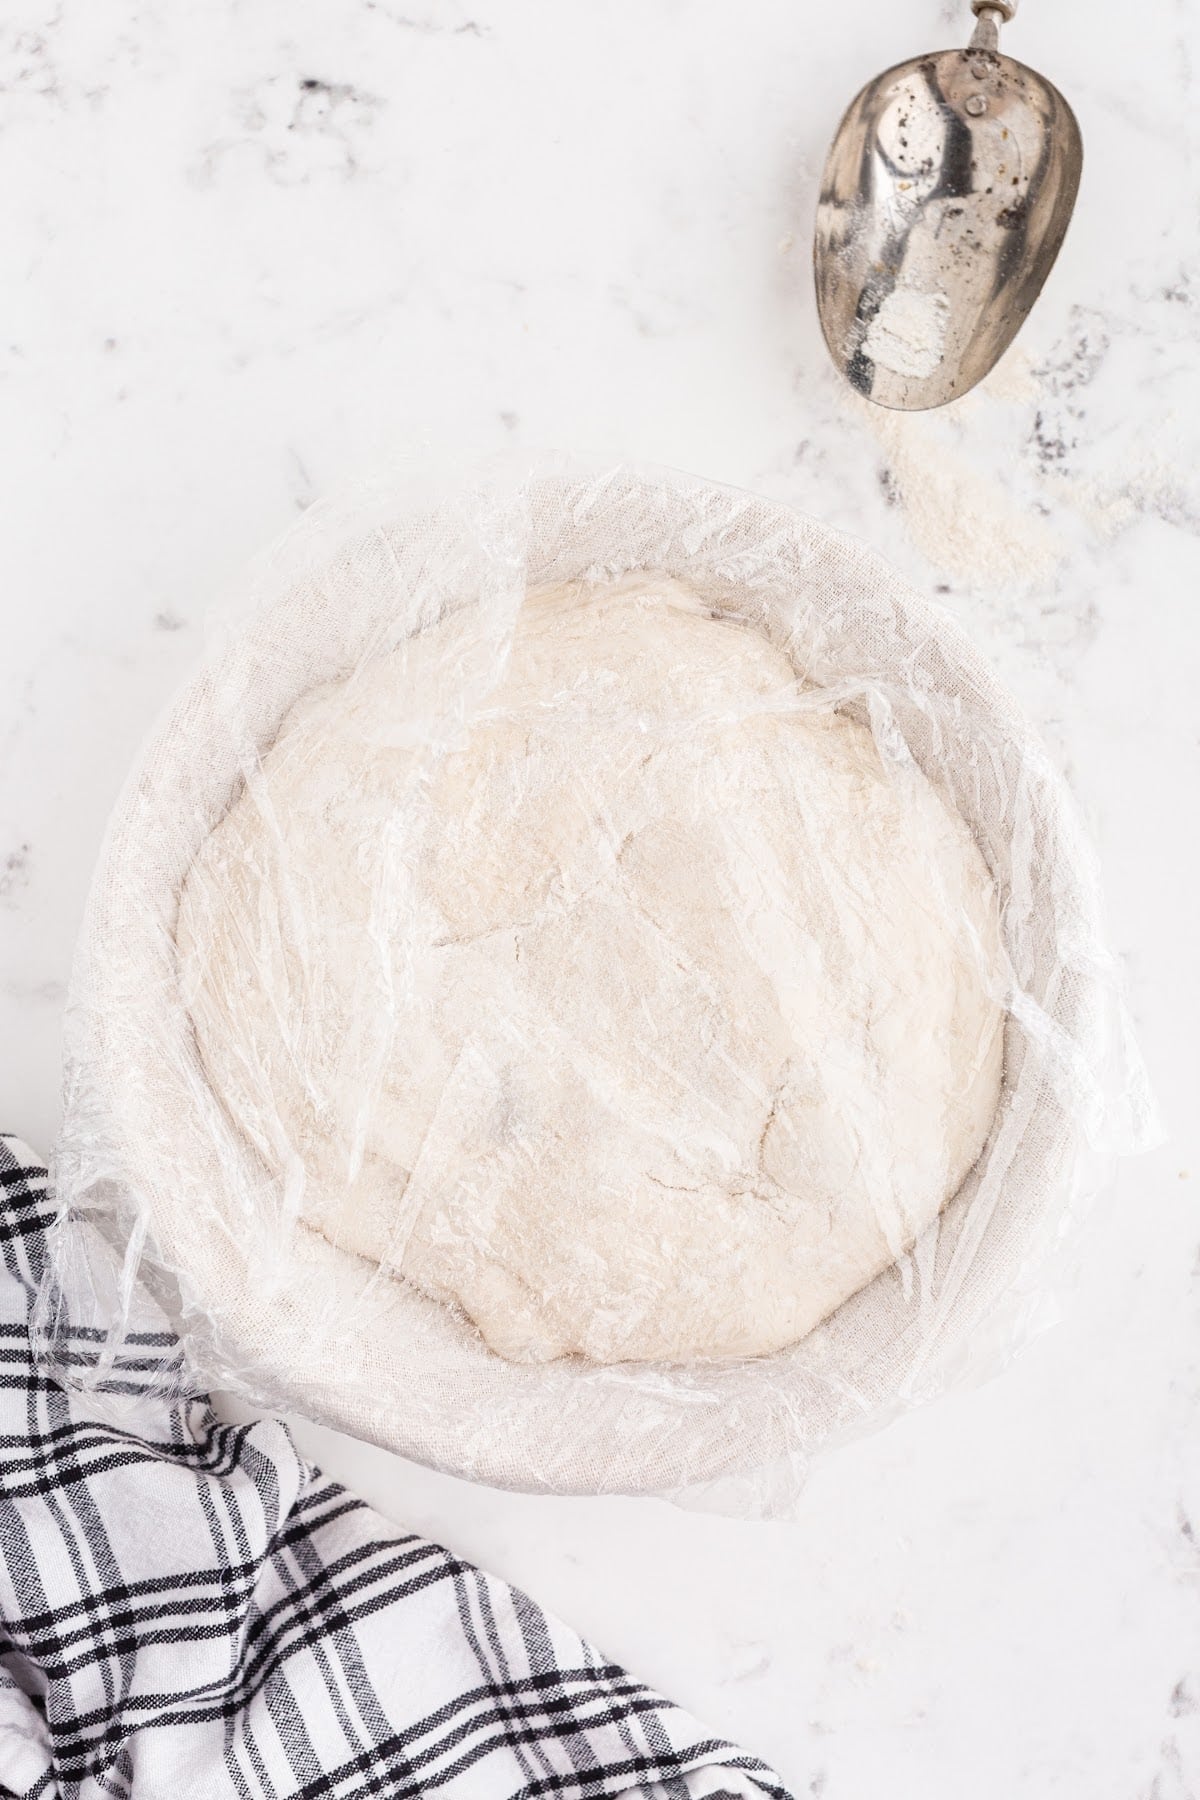
Step 9: Wrap the entire basket with plastic wrap so that it is sealed up and doesn’t dry out. Place it in the refrigerator overnight or for at least 12 hours.
Step 10: When it’s time to bake, place the Dutch oven into the oven and preheat to 500°F. Allow the oven and Dutch oven to heat at this temperature for at least 30 minutes (I try to do 1 hour).
Remove the dough from the refrigerator and have your scoring tool ready.
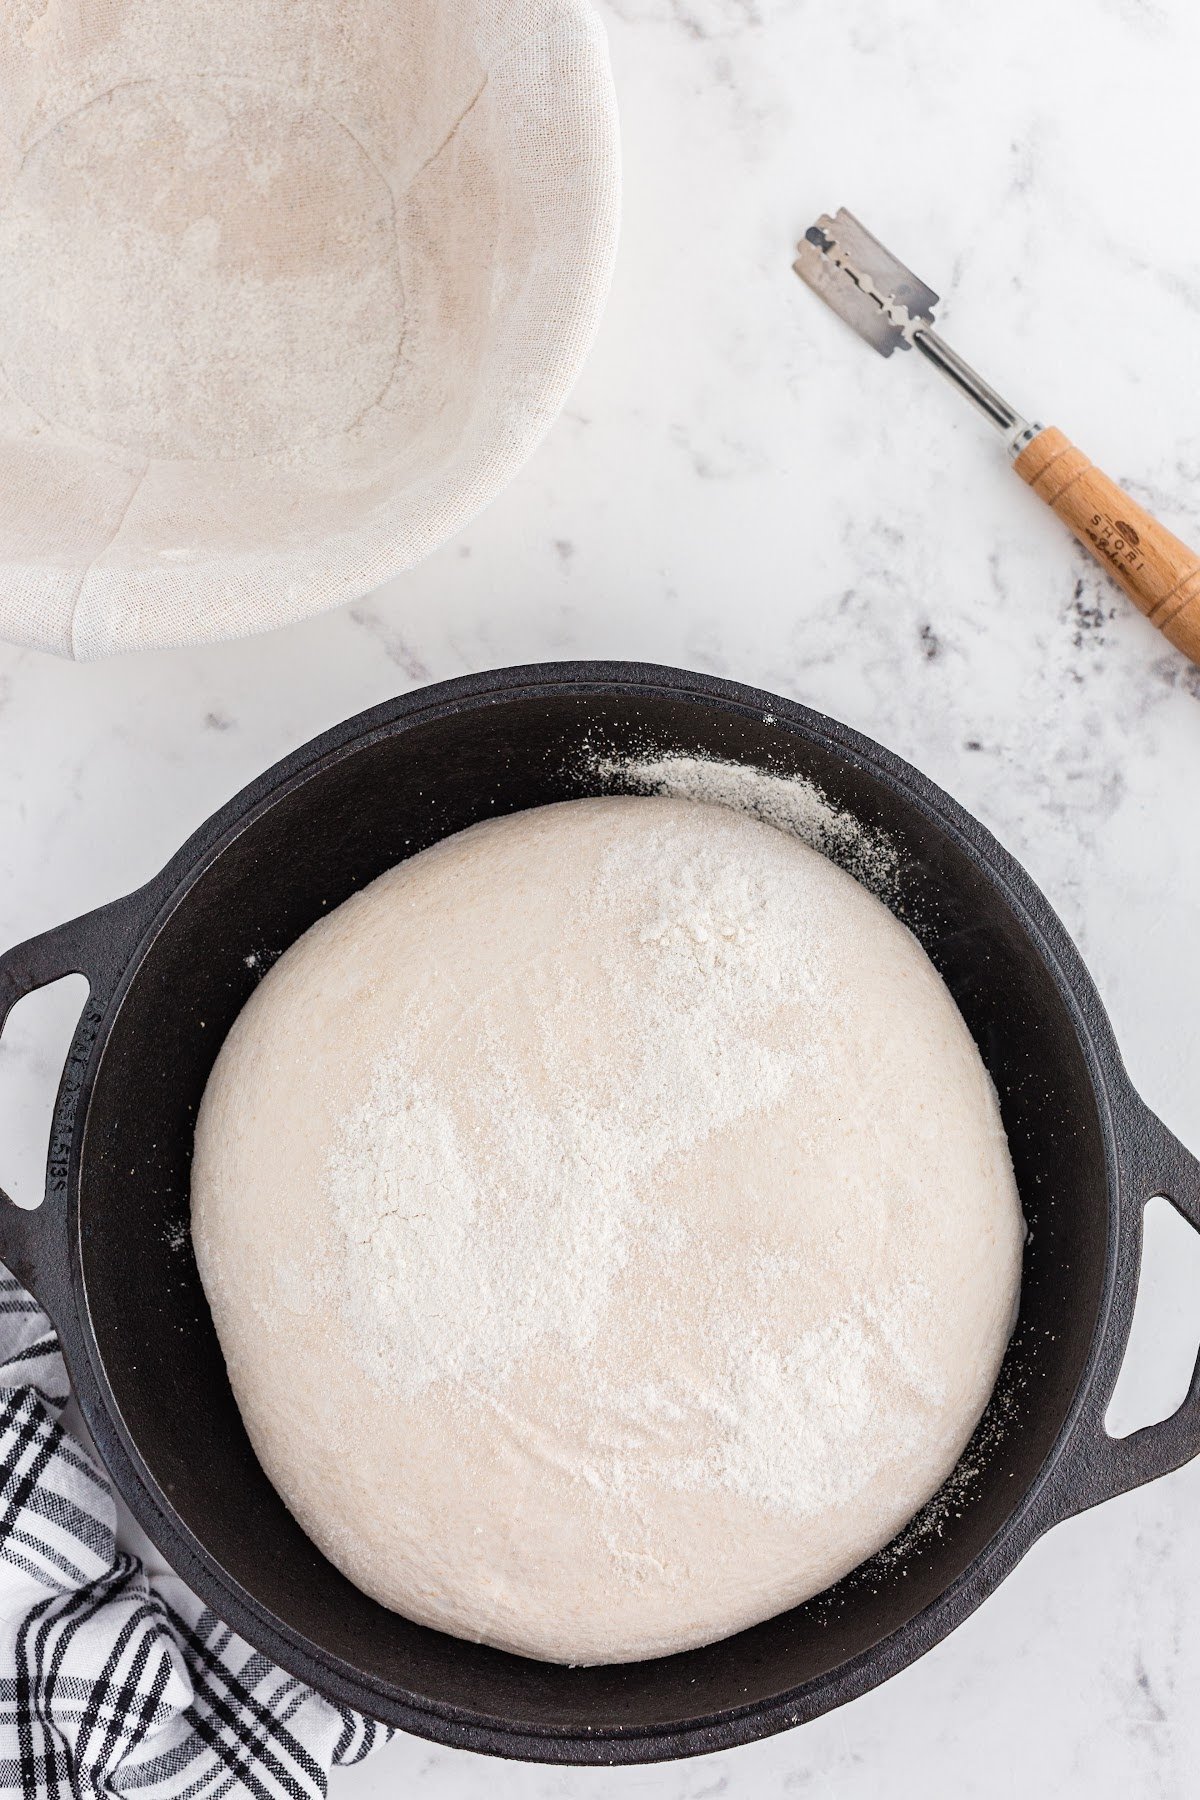
Step 11: Carefully take the hot Dutch oven out of the oven. Quickly flip the banneton basket upside down to dump the dough into the center of the Dutch oven.
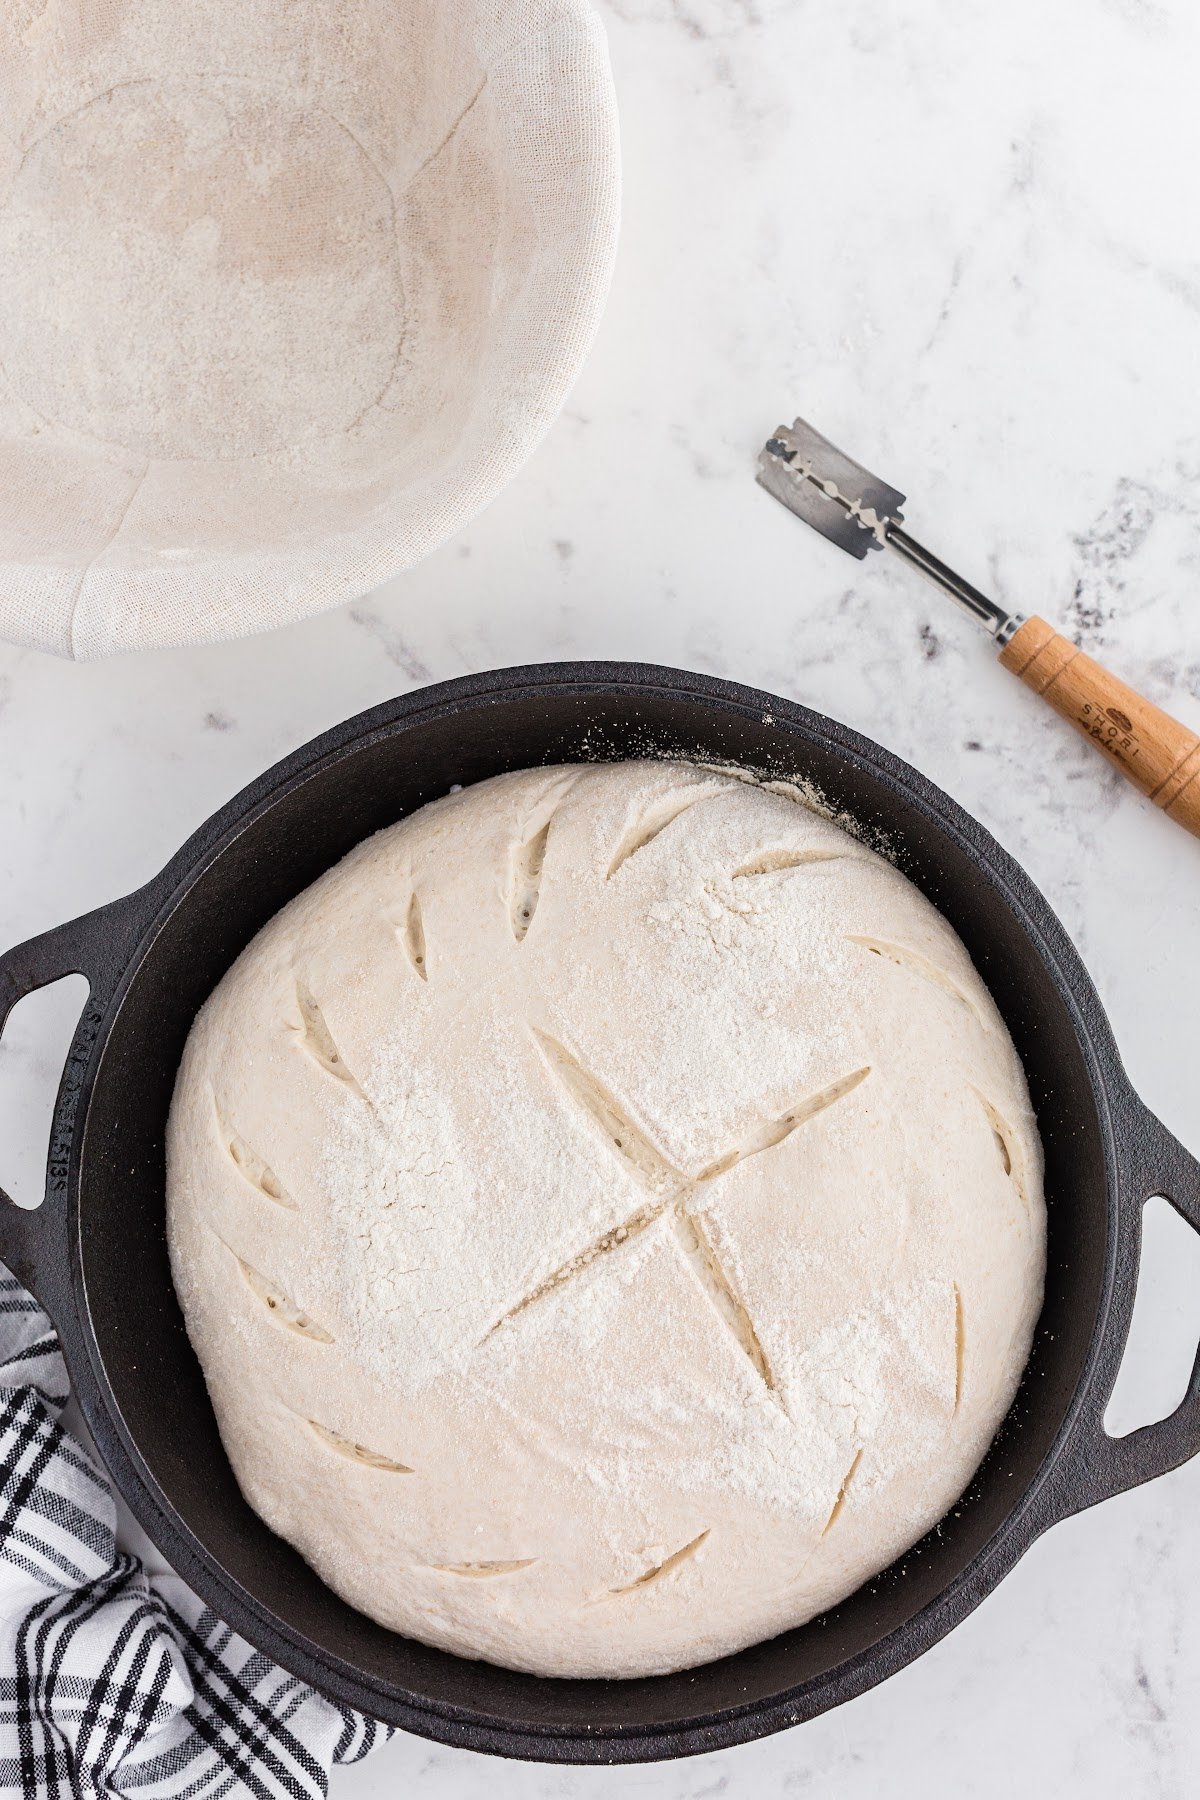
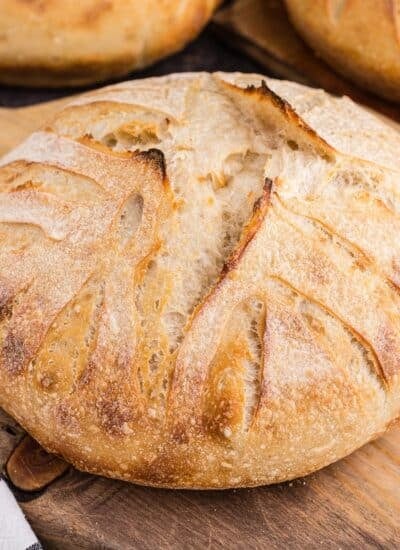
Step 12: Score the loaf with the lame. This gives the bread an area for steam to escape and the loaf to puff during baking. One long swipe across the center of the dough is sufficient, but you can eventually progress to creating intricate designs once you have refined your skills.
Step 13: Place the lid on the Dutch oven and return to the hot oven. Bake for 20 minutes at 500°F. Remove the lid and reduce the oven temperature to 450°F. Continue baking for 10-15 minutes more, until the crust is deep golden brown and the center of the bread reaches about 205°F.
Step 14: Remove the bread from the oven and lift from the pan. Set on a cooling rack for several hours to cool completely. Cutting too soon can smash the crumb and make it gummy.
SLICE & SERVE: After all that work, it’s now time to dig in. Our favorite way to eat this oat sourdough is with a generous slather of butter and a sprinkle of flakey salt.
Recipe Tips for Oat Flour Sourdough Bread
- If your loaf is scorching on the bottom, simply place an empty sheet pan on the rack below the bread while it’s baking. The sheet pan will diffuse some of the heat coming from the bottom of the oven and works beautifully to prevent a burnt bottom.
- Bread flour is preferred to all-purpose flour for this recipe, but you can use it if it’s all you have.
- This recipe can easily be made with 100% bread flour without having to make any changes. Keep in mind that you should not use more than 30% of a gluten-free flour (like oat flour) or you can end up with dense bread.
- This is a 77% hydration recipe – to find the hydration, you’re dividing the amount of water by the amount of flour. Stick between a 70% and 80% hydration – the lower the hydration, the easier the bread is to work with, but the higher hydration, the yummier. For a more open crumb and thinner/crispier crust, I recommend leaning towards a higher hydration.
- The step to autolyze the dough (the mixing of the flour and water) helps the gluten to begin developing and makes the dough more pliable from the start. Get a head start on this for best results.
- There are two basic stretch techniques used in this oat sourdough bread recipe. The first is the “easy-over” method which is done when the dough is just starting to develop and the “lift-and-set-down” method is done later in the process when the dough is much more pliable and stretchy. The combination of these two methods helps the gluten develop, strengthens the dough, and adds air to create that much-desired open crumb. I also like the “slap and fold” method, which I have not shown here.
- Proofing the dough overnight in the fridge helps the dough develop more flavor and it slows down the fermentation. You can leave the dough in the fridge between 12-18 hours to fit into your preferred baking time/schedule.
- The equipment and tools I’ve listed at the beginning of this post make a huge difference in making this oat sourdough bread or any sourdough bread recipe, really. I highly recommend investing in them.
Fun Fact
Did you know that true sourdough is one of the least processed breads? It’s true – just flour, water, salt, and natural fermentation! That said, many store-bought “sourdough” versions sneak in unwanted preservatives, so check the labels or better yet – bake your own! – Sourdough Bread Company
Recipe FAQs
No, this oat sourdough bread is not gluten-free. While the recipe does include up to 30% of gluten-free oat flour, the larger percentage of flour does contain gluten.
Store your cooled oat sourdough bread in an airtight container at room temperature once it has been cut into. This homemade bread is the most delicious on the first day after baking, but stores well for up to 2-3 days.
You can also freeze this sourdough oatmeal bread for 3-6 months, either whole or in slices for easy reheating/toasting later on.
Autolyse (pronounced auto-lees) is the first rest period in sourdough baking where you mix just the flour and water – no starter or salt yet. Letting this mixture sit for 20-60 minutes jumpstarts the gluten development naturally, making the dough more elastic and easier to handle.
You can still bake excellent sourdough by creating a steamy oven environment. Preheat your oven with an upside-down baking sheet on the middle rack and a cake pan on the bottom, then pour boiling water into the pan right before loading your scored dough (on parchment) onto the baking sheet. While this method isn’t quite as foolproof as a Dutch oven and may require some trial and error to perfect, the steam generated will help your bread develop that coveted crisp crust and promote a good rise.
Sourdough Recipes You’ll Love


If you tried this Oat Sourdough Bread Recipe or any other recipe on my website, please leave a 🌟 star rating and let me know how you liked it in the 📝 comments below.
Oat Sourdough Bread
Equipment
- Dutch oven (or bread cloche)
- Lame (for scoring the bread)
- Banneton with liner (for proofing the bread)
- Rice flour (for dusting the bowls/liner)
- Plastic wrap
Ingredients
- 420 grams bread flour
- 180 grams oat flour
- 460 grams filtered water
- 12 grams salt
- 90 grams sourdough starter 8-12 hours after last feeding
- Whole-grain or rolled oats optional, for garnish
Instructions
- In a large mixing bowl, combine bread flour, oat flour, and water and stir to combine as best as possible (mixture will be “shaggy”). Cover with plastic wrap and set in a warm, room temperature location for 45 minutes.
- After 45 minutes (this gives the mixture time to autolyze), add the starter and salt to the flour/water mixture and stir well.
- Cover with plastic wrap and set aside for 4-6 hours (see next step for steps to strengthen dough during the 6 hours).
- We will perform a set of folds to strengthen the dough during the first two hours of this “bulk fermentation” time.
- Every 30 minutes, uncover the bowl of dough. Dip your hands into warm water (this keeps the dough from sticking to your hands). Slide your hands down around the top of the dough. Lift this side of the dough up and fold it down over the side opposite. Turn the bowl 90 degrees and repeat lifting and folding until you have lifted and folded each of the four sides of the dough. Replace the plastic wrap and leave the dough to set for another 30 minutes.
- Repeat twice more.
- After you’ve completed three sets of lifting and folding the dough, do a final set of dough strengthening folds. Slide you dampened hands around the dough sides (right and left). Lift the dough straight up from the bowl. The ends will dangle down and stretch. Do not let the dough break. Set the dough straight back down on itself. Rotate the bowl 90 degrees and repeat, completing four lift and stretch sets.
- Now let the dough sit for about four more hours undisturbed to complete bulk fermentation.
- At this time, the dough should be smooth and rounded, holding its shape with somewhat of a dome toward the edges of the bowl. Large bubbles may appear under the surface of the bread.
- Now it’s time to shape the bread into a loaf. You can divide the dough at this point and make two smaller loaves or shape into ovals or baguettes or whatever you desire. We will simply shape one round loaf.
- Place the liner in the banneton and sprinkle with rice flour (the rice flour doesn’t have gluten so it won’t stick to the bread dough). If you would like to bake your loaf with some whole oats on top, sprinkle a couple tablespoons into the basket at this time.
- Lift the dough from the bowl and place it into the basket, flipping it upside down so that the smooth “top” of the dough is now face down in the basket on top of the oats. Tuck the excess dough onto itself to form a neat upside down loaf.
- Sprinkle rice flour on top of the dough to prevent it from sticking to the plastic wrap and also to dust the baking dish when it flips over into the pan at baking time.
- Wrap the entire basket with plastic wrap so that it is sealed up. Place in the refrigerator overnight or for at least 12 hours.
- When it’s time to bake, place the Dutch oven into the oven and preheat to 500°F. Allow the oven and Dutch oven to heat at this temperature for at least 30 minutes (I try to do 1 hour).
- Remove the dough from the refrigerator and discard the plastic wrap.
- Carefully take the hot Dutch oven out of the oven. Quickly flip the banneton basket upside down to dump the dough into the center of the Dutch oven.
- Score the loaf with the lame. This gives the bread an area for steam to escape and the loaf to puff during baking.
- Quickly place the lid onto the Dutch oven and return it to the oven. Bake for 20 minutes at 500°F.
- Reduce the oven temperature to 450°F and carefully remove the lid – turning the lid away from you so that the steam doesn’t rise out toward you.
- Continue baking for about 10 minutes longer or until the crust is deep golden brown.
- Remove from the oven and transfer the loaf to a cooling rack to cool completely.
Would you like to save this?
Notes
Nutrition
Make this recipe?
Share it with me on Instagram @girlinspired1 and follow on Pinterest for more!


Leave A Reply!